From Other Projects
After you add a new Flare import file (with an .flimpfl extension), it is stored in the Imports folder in the Project Organizer. When you import files from another Flare project, this FLIMPFL file saves your settings. What happens if you make changes to the source project in the future?
If you selected the Auto-reimport before "Generate Output" check box when you first imported the files, the changes in the source project will be reimported automatically when you generate output in the current project. However, if you did not select this "Easy Sync" option, you can open the FLIMPFL file and reimport files from the source project manually. The following steps describe how to do this.
For more details about the way Global Project Linking works when different settings are in effect, see Rules for Global Project Linking.
How to Reimport Files From Another Project
- Open the Project Organizer.
- Double-click the Imports folder.
- Double-click the FLIMPFL import file that you created. The Project Import Editor opens.
-
(Optional) If necessary, change the settings on the Source Project tab.
-
Source Project If you want to change the project from which files will be imported, click Browse. In the dialog find and double-click the Flare project file (.flprj extension) from which you will be importing files.
Note You can also manually enter the path in the Source Project field. However, if you enter a relative path, make sure the path is relative to the import file (located by default in the Projects/Imports subfolder), not the project file (which is located at the root level of the project files).
- Auto-reimport before "Generate Output If you want future changes to the files in the source project to be reimported automatically, click this check box.
-
Delete stale files If you want outdated files (e.g., files that have been deleted, renamed, or moved in the parent project) to be deleted from the child project during automatic reimports, click this check box.
Example You import a group of files from a parent project into a child project. Later, you delete some of the files from the parent project. Selecting this option will remove the stale files from the child project automatically when you reimport files. The stale files will be deleted when you reimport either manually (by clicking Reimport in the Project Import Editor) or automatically when you generate output (if you have selected Auto-reimport before "Generate Output" in the Project Import Editor).
Warning If you do not use this option, you must remember to delete the stale files in the child project manually. Otherwise, the files in the parent and child projects will not match.
-
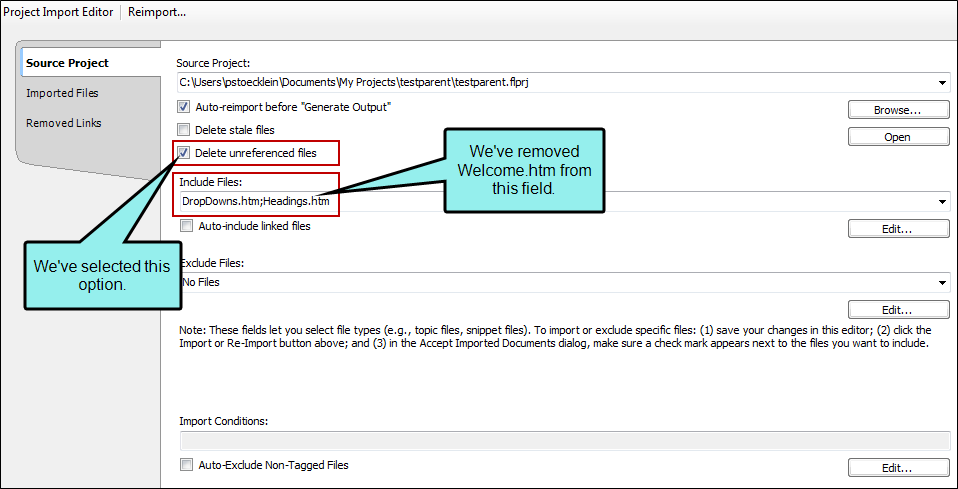
Delete unreferenced files This means that any files that were previously imported—but are not specified to be included (either under the Include Files or Import Conditions filters) in the reimport—will be marked for deletion in the Accept Imported Documents dialog and removed from the child project upon confirmation.
Example Previously you had the Project Import Editor set up like this, where you are importing three topic files from a parent project:
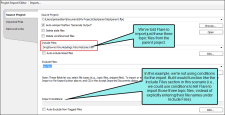
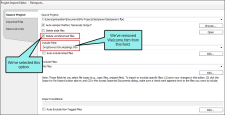
Later, after you've made lots of changes to the parent project, you open the child project again to import the latest files into it. However, you decide you no longer want to import the Welcome.htm topic into the child project (although it still exists in the parent project). So in the Project Import Editor, you remove it from the Include Files field. You also click Delete unreferenced files.
When you tell Flare to reimport, the Accept Imported Documents dialog opens, showing the following:

After you click Accept in that dialog, the changed files are replaced and Welcome.htm is removed from the child project.
If you had not selected the "Delete unreferenced files" check box, the two changed files would still have been imported, but the old Welcome.htm topic would still remain in the child project.
This feature is slightly different from "Delete stale files." When you tell Flare to delete stale files, you automatically sync the parent project with the child project when you've removed files in the parent. So in the example above, the Welcome.htm file would automatically be removed from the child project if you had also removed it from the parent project.
-
Include Files/Exclude Files Use these fields to select the type of files to be included in the import or excluded from it. Click the down arrow next to the appropriate field and select the type of files.If you want to import all of the files from the global project, select All Files (*.*).
Note You are not limited to importing all files of a single file type. Items below explain how to add more than one file type to the field, as well as how to select specific files to be imported while excluding others.
-
Edit (Include Files/Exclude Files) If you want to add more file types to one of the fields, click the Edit button under the appropriate field and use the following steps.
- In the Import File Filter dialog click Add. The Import File Filter Designer dialog opens.
-
Select the file type that you want to add. You can also use standard wildcards (text between asterisks) to enter patterns directly into the Pattern field (or into the Include Files or Exclude Files fields).
Example You want to import only topic files that contain the word "Interface" in the file name. Rather than selecting to import all topic files and then later systematically deselecting the ones you do not really want in the import (via the Accept Imported Documents dialog), you can enter the following:
*Interface*.htm;*Interface*.html
Or maybe you want to import only files that have an extension starting with "fl," such as TOC files (.fltoc) and snippet files (.flsnp). In order to do this, you could enter *.fl* in the field, like the following:
*.fl*
- Click OK.
- In the Import File Filter dialog, click OK.
-
Import Conditions In addition to specifying certain files or file types to include or exclude from the import, you can go a level deeper through the use of condition tags. If you have applied condition tags to files in your project, you can use
-
Edit (Import Conditions) Clicking this button opens the Import Conditions dialog, which lets you specify which files to include or exclude in the import, based on the condition tags that are applied to them in the source project.
-
Auto-Exclude Non-Tagged Files If you use the "Import Conditions" option, you may want to make sure that files without condition tags in the source project are not included in the import. If that is the case, click this check box.
-
- Click
") to save your work.
to save your work. -
In the local toolbar of the Project Import Editor, click Reimport.
The Accept Imported Documents dialog opens. The files in the source project are listed (depending on whether the file types were included or excluded from the import in the previous steps).
-
(Optional) The Accept Imported Documents dialog provides you with one last look at the files to be imported, allowing you to make sure everything is correct and letting you change your mind on any of the files. If you recognize files in the dialog that should not be imported, you can click the check boxes next to the files you want to exclude (removing the check marks).
You can use the Select All and Clear All buttons as necessary. For example, if you only want to include a very small number of the files listed, you can click the Clear All button and then manually click the check boxes next to the files you want to include (this is quicker than individually deselecting each file that you want to exclude).
Tip You might find it useful to click on the column headings in the Accept Imported Documents dialog. Doing this reorganizes the contents in alphabetical order of the column that you click. For example, by clicking the Status column, you can easily group together all of the files that have red or green backgrounds (i.e., files that are newer in the local project or newer in the source project). This can be especially useful when reimporting project files.
Note If the current project already contains a file with the same name, the Status cell may be highlighted in green or red. Green shading indicates that the source file is newer. Red shading indicates that the local (or current) file is newer. If the file is identical in both projects, the check box is deselected by default.
Note If you purposely excluded a particular file when performing a previous import, Flare remembers this and leaves the file deselected.
-
Click Accept.
If the current project already contains files with the same names, you may be asked if you want to replace the local copies. Select Yes if you do.


Note A link icon ![]() displays on tabs in the XML Editor next to file names that are imported from and linked to another file or Flare project. However, if you are also using the built-in source control technology, the source control icons have a higher precedence and will therefore be displayed instead.
displays on tabs in the XML Editor next to file names that are imported from and linked to another file or Flare project. However, if you are also using the built-in source control technology, the source control icons have a higher precedence and will therefore be displayed instead.
Note The Imported Files tab in the Import Editor displays the files that have been imported previously.
Note In the Project Import Editor, the Removed Links tab displays any files that were previously imported, but the link to the source project has since been removed. For example, let's say that you have imported several files from a source project. After awhile, you open one of those files in the project where the files were imported. You make a few changes and attempt to save it. Because Flare sees that a connection exists between the file and the source project, it prompts you with some options. One of the options is to continue to save your changes and remove the link from the source project. This means that future changes to the file need to be made in the current project, rather than in the source project. When you remove a link to a file in this way, that file is added to the Removed Links tab.

