The order of topics in the TOC Editor dictates the flow of the course. When learners navigate through a course (e.g., using a "Next" button), they are navigating in the order specified in the table of contents (TOC). How you organize the TOC depends on the type of course you are creating. See Course Types in Flare.
The main question to ask yourself while updating the TOC is, does the course include gradable questions or not? If it does, then creating a test node is needed for test scoring and test results.
[Menu Proxy — Headings — Online — Depth3 ]
TOC Configurations
The type of course you are creating comes into play when creating the TOC.
-
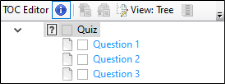
For a quiz, topics that contain test questions for the final output should have a test node enabled for them in the TOC. If your course only consists of a test, then the TOC might look like this:
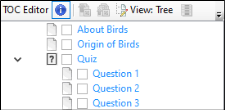
You can have other topics in the TOC with your test. The TOC might look like this:
-
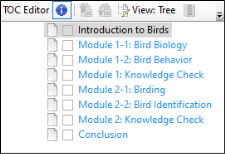
For a knowledge check, a test node is not required, but you have to place the knowledge check topics into the TOC. The TOC might look like this:
-
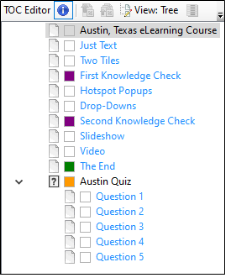
For a combo, the TOC should consist of the knowledge check topics and a test node (that holds the questions for the test). The test node is needed for the gradable portion of the course only. The combo TOC might look like this:
How to Arrange Course Topics
Keep in mind that when a learner advances through the course, the navigation mimics the order specified in the TOC file.
-
From the Project Organizer on the left side of Flare, add a new TOC file or open an existing one.
Note If you open an existing TOC that is already populated, you might want to clean it up so it is suitable for your course (e.g., removing missing links, deleting topics).
-
Drag and drop topics from the Content Explorer to the TOC Editor in the order you need them to display in the output.
-
(Optional) In the TOC Editor's local toolbar, use the arrow buttons to adjust the order of files for the desired course workflow.
How to Enable a Test Node
Enabling a test node in the TOC is required for the gradable portion of your course (i.e., a quiz). The following describes how to do this via the TOC Editor, but you can alternatively create and enable a test node using the eLearning ribbon. See How to Create a Test Node.
-
From the Project Organizer, expand the TOCs folder, and double-click the desired TOC.
-
If not already done, drag and drop topics from the Content Explorer to the TOC Editor.
-
In the TOC Editor, right-click the file that you want to be the start of the test, and select Properties. The file you select should be able to act as a test node container. The test node should have nested topics within it, containing the test questions. A test node can be anywhere in the TOC (e.g., the test can be a top-level node or a lower-level node).
-
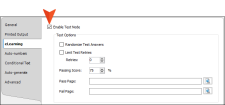
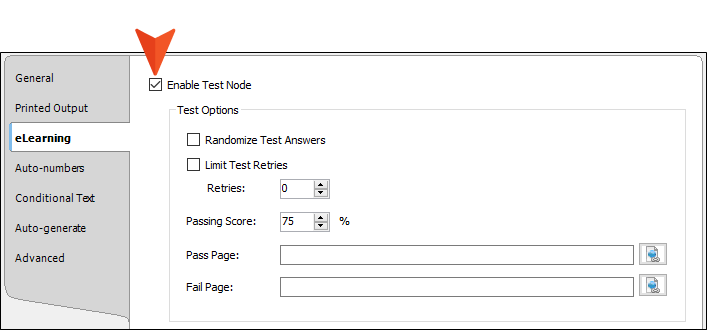
In the Properties dialog, click the eLearning tab and select Enable Test Node.
-
(Optional) By default, the Passing Score percentage is set to 75%. You can edit the passing score and other test node options. See Editing the TOC for eLearning.
-
Click
") to save your work.
to save your work.
Ending a Course
A course designed with a gradable test will "end" differently from a course that is designed without scoring. Keep in mind the following:
-
Quiz Since a quiz consists of content to be graded, an enabled test node in the TOC is needed to end the test. The test node initiates scoring, and automatically generates a test results page. You can optionally end the test with a customized results page. In this case, it is also necessary to add a Test Results proxy to a custom pass and fail page topic for ending navigation and calculating the score.
-
Knowledge Check The knowledge check course on its own is not graded. A test node in the TOC and a Test Results proxy are not required. In this case, the navigation toolbar buttons for the first or last topic (i.e., Previous, and Next respectively) display as disabled in the online output. The disabled button at the end signifies the end of the course.
-
Combination of a Knowledge Check and Quiz (Combo) Since a combination includes a quiz for grading, the test components (e.g., test node, test results page and proxy) are applicable for ending the course.
Note For the Quiz and Combo courses, it is the presence of a test node in the TOC that triggers the "Next" button to automatically switch to a "Complete" button (in the eLearning toolbar) when a learner reaches the end of a test.
What’s Next?
The next required eLearning component is adding the eLearning Toolbar proxy to ensure the course has navigation. See Adding an eLearning Toolbar Proxy.
Before you do this, there are a couple of optional items in the process to be aware of.
-
Instead of enabling a test node via a topic already in the TOC Editor, you can conveniently create, insert, and enable a test node using the eLearning ribbon. To learn more about this, and how tests are scored, see Creating a Test.
-
Since a test results page is automatically generated after a test is completed, this is not necessary to do, but you can customize the test results. To learn more about this, see Customizing a Results Page.


