


After you insert an image, you can create multiple hyperlinks for specific sections of the image. This is called an "image map." Image maps engage online users to click linked parts of an image that reveal more information.
The image map contains a “hotspot,” which is the part of the image that contains the link as you hover the mouse on it (e.g., text, icon). It also contains a target frame property that determines how the link opens (e.g., popup, tab, window).
The foundation of an image map can take on several forms, such as a graphic, photo, or map. The image map is anything with identifiable clickable areas.

[Menu Proxy — Headings — Online — Depth3 ]
How to Create an Image Map
- Open the topic.
- In the XML Editor, right-click the image on which you want to create an image map.
-
In the context menu, select Image Map. The Image Map Editor opens, with the image displayed.

-
In the Standard toolbar of the Image Map Editor, click one of the shape drawing buttons, depending on the area of the image that you want to use as a hyperlink.

Click this button if you want to draw an odd shape over a section of the image.

Click this button if you want to draw a rectangle over a section of the image.

Click this button if you want to draw a circle over a section of the image.
-
In the image, click and drag your mouse over the area to be used as a hyperlink. Release the mouse button when you are satisfied with the size and location of the shape. You should now see the shape on top of the image, connected by a series of points.

The Image Map Editor only draws clickable areas for the hyperlink (or hotspot). It does not draw shapes and objects on the image. You will have to use another tool, such as MadCap Capture, if you want to annotate the image itself.
-
In the toolbar, click
 . The Area Properties displays.
-
From the Link to drop-down field, select a way to identify the topic, bookmark, or file to which you want to link. Based the option you choose, the section below gives you a list of selections or additional fields to complete.
File in Project
This option lets you search for a file within your project. After you select this option, use the area below to navigate to the file that you want to link to and select it. By using the buttons in the local toolbar, you can view all files in a list, view files in their folder structure, and use other options.

Shows all of the files

Shows or hides the folders that the files are stored in.

Shows or hides the files. If you click this button when the Show Folders button
 is selected, the area splits into two. The folder is shown on the left side, and the files and subfolders within it are shown on the right.
If the Show Files button
 is the only one selected, you can click this button to move up one folder level.
Lets you filter the kinds of files shown below. Depending on the task you are performing, this field may already be populated with the most appropriate file type(s).
You can also click
 to display and select any bookmark or a location using a particular style (including classes and IDs). If necessary, a bookmark will be created at that location if one does not exist. If you want to clear a bookmark in the link, select it and click the button at the bottom of the dialog.
You can also select
 if you have selected a PDF file.
 Place in This Document
This option displays any bookmarks, headings, and other elements in the current file. Expand the appropriate section and select the element to which you want to link. If you select anything other than an existing bookmark, Flare will insert a new bookmark at that destination in the file.
External File
This option lets you search for a file (e.g., HTM, HTML, XML, PDF, Microsoft Office files) outside your
You can also click
to display and select any bookmarks within the destination file, or if you have selected a PDF file. For more information see Inserting Links to External Files—HTML, PDF, Microsoft Office.
Note Because the link usually needs to be relative, based on the final locations of your output files, it is preferable to enter the text directly into the field, rather than clicking the External File button.
Website
This option lets you enter the path to an external file, such as the URL for a website. After you click this option, simply type the path in the field next to the Website field (e.g., http://www.acme.com).
If you want to insert a variable in a field, you can click
 . The variable will appear as syntax in the field, but in the output the variable definition will be shown.
You can create links to specific topics in HTML5, WebHelp, or WebHelp Plus output. This includes the ability to incorporate search strings and skin references (for some outputs).
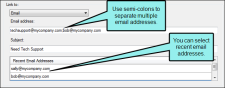
Email
This option lets you add email addresses and subject line so that the user can quickly send an email. To add multiple email addresses, separate them with semi-colons.
Example You might use this feature to help the end user send an email to your company's technical support department. When users click the link, it opens their email program and begins a new email message for them, inserting the email address and subject line for them. After you click this option, complete the E-mail address and Subject fields to the right (or select a recent email address from the list below).
HTML Help File
This option lets you search for a topic within an HTML Help (CHM) file that you have added to your project. After you select this option, click the External File button. In the Link to HTML Help dialog, you can do one of the following.
-
Select Project Files and then use the area below to navigate to the file that you want to link to and select it. By using the buttons in the local toolbar, you can view all files in a list, view files in their folder structure, and use other options.
Shows or hides the folders that the files are stored in.
Shows or hides the files. If you click this button when the Show Folders button
is selected, the area splits into two. The folder is shown on the left side, and the files and subfolders within it are shown on the right. - Select Import Existing. In the dialog that opens, find and double-click the CHM file. Then from the drop-down—which displays "(root folder)" by default, you can select a specific content folder in your project to place the CHM file.
After the CHM file is selected, in the Topic field click
 . In the dialog that opens, find and double-click the topic that you want to link to.
When you are finished, click OK in the Link to HTML Help dialog.
-
- (Optional) In the Screen Tip field, you can type a phrase that will appear when the end user hovers over the hyperlink in the output. This is added not only as a "title" attribute, but as an "alt" (alternate text) attribute as well.
-
(Optional) In the Target Frame field, click the drop-down arrow to select the way the linked destination will open.
- Page Default The destination file opens in the same window as the output window.
- Parent Frame The destination file opens in the parent frame of the current topic while hiding that topic.
- New Window The destination file opens in a new browser window.
- Same Frame The destination file opens in the same window frame as the current topic.
- Top Frame The destination file opens in the same output window, removing all other framesets. You might use this option, for example, if the destination topic has its own frameset.
- Popup Window The destination file opens in a popup box on top of the current topic.
Note The Popup Window option is not supported in HTML5 online output formats with Side Navigation and Top Navigation skin types. Either select an output format that supports it, or in the Target Editor’s Skin tab, set the skin type to none.
-
(Optional) In the Tab Index field you can enter a value to specify the order in which users can tab through hyperlinks in the image. So when a user presses the TAB key the first time in a topic, the hyperlink with an index value of 1 will be selected first, the hyperlink with a value of 2 will be selected next, and so on. If you want to skip a hyperlink, enter -1 in that field.
Note This feature is supported only in web outputs—HTML5, Clean XHTML, WebHelp, WebHelp Plus.
- Click OK.
- If you want to add more hyperlinks to the image, select a shape button again and repeat the steps above.
-
When you are finished creating hyperlinks on the image, click OK in the Image Map Editor.
Notice that when the object is selected in the Image Map Editor, the link property fields at the bottom are populated with the information you provided.
- Click
") to save your work.
to save your work.


How to Make Image Maps Responsive
Image maps are not natively responsive; meaning the image and its clickable area do not automatically adjust depending on the user’s device and screen size. Because of this, it is a best practice to set the image max width style property to 100%.
-
From the Content Explorer, open the stylesheet that you want to modify.
-
Using the Advanced view, select the img style.
-
From the local toolbar, select Show: All Properties.
-
Expand Unclassified, and set the max-width property to 100%.
-
Click
to save your work.

Note This process makes the image itself responsive in the output. If you want the clickable areas of the map to be responsive as well, you’ll have to download a Responsive Image Maps jQuery Plugin from a GitHub repository.
See the following:
https://github.com/stowball/jQuery-rwdImageMapsFor complete insight on this process, see:
https://www.madcapsoftware.com/blog/how-to-implement-responsive-image-maps-in-your-html5-outputs/If you would rather not download the jQuery plugin, you can remove the max-width property. This would keep the image map and clickable areas in sync as users adjust the output, but the image map and the clickables areas would not be responsive.
Buttons and Sections in the Image Map Editor
|
Edit |
Use this menu to select basic editing options (such as undo, redo, cut, copy, and paste). You can also open the properties for an object or apply conditions to it. |
|
|
Click this button to toggle between seeing a clear image of the picture and a faded image. This is only for your internal use; it will not affect the output. |
|
|
Click this button to hide the shapes that you draw over areas of the image. This is only for your internal use; it will not affect the output. |
|
|
Click this button to fill the shapes that you draw over areas of the image. This is only for your internal use; it will not affect the output. |
|
|
Click this button to open the Area Properties dialog, which lets you find and select a destination file to link to a shape that you've drawn. You must select a shape before this button is enabled. |
|
|
Click this button to delete a selected point in the editor. |
|
|
Click this button to enable "Select" mode so that you can click on shapes that you have drawn in the editor. |
|
|
Click this button to draw a polygon shape over an area of the image. You can then select the shape and link it to a destination file. |
|
|
Click this button to draw a rectangle shape over an area of the image. You can then select the shape and link it to a destination file. |
|
|
Click this button to draw a circle shape over an area of the image. You can then select the shape and link it to a destination file. |
|
|
Click this button to bring a shape up one layer (if it is overlapped by one or more other shapes). |
|
|
Click this button to bring a shape up to the top layer (if it is overlapped by one or more other shapes). |
|
|
Click this button to move a shape down one layer (if it is overlapped by one or more other shapes). |
|
|
Click this button to move a shape down to the bottom layer (if it is overlapped by one or more other shapes). |
|
|
Opens a dialog that lets you apply conditions to content. |
|
Link |
Displays the path to the linked destination file for the selected object. This field is automatically populated after you click |
|
Screen Tip |
Displays the screen tip (or "alt" text) for the selected object. An alt tag provides a textual equivalent for the image. This code allows the page to be usable by persons with graphics turned off or who are blind and using a screen reader. This field is automatically populated after you click |
|
Tab Index |
Displays the tab index value that you entered in the Area Properties dialog for the selected object. The tab index is a value to specify the order in which users can tab through links on an image. So when a user presses the TAB key the first time, the link with an index value of 1 will be selected first, the link with a value of 2 will be selected next, and so on. If you want to skip a link, enter -1 in that field. This feature is supported only in web outputs—HTML5, Clean XHTML, WebHelp, WebHelp Plus. |


Overlapping Objects and PDF Output
PDFs are limited to rectangular-shaped image map objects. Therefore, if you have an image map with circle or polygon objects, those will be redrawn as rectangles in the PDF output. If this occurs, Flare will include a compile warning. Also, keep in mind that if objects overlap one another, the one on the top layer (usually the last one drawn) takes precedence.
Example You have an image of the Olympic circles inserted into a topic:

You create an image map, drawing round objects around each of the five circles, and you link each of these objects to a different website. For the purposes of this example, we're showing dark green circles to represent each image map object:

Notice that the circles overlap in some places. In those locations, the circle object that is on the top layer will win. Therefore, if the user clicks in that area, the website linked to the object on top will be opened.
Now, if you generate online output, such as HTML5, the circle shapes on the image map will be retained, just as you see them above. But if you generate PDF output, each of the circle objects will be converted to a rectangle, like this:

Therefore, the link areas (as well as the overlapping areas) are adjusted accordingly.
What’s Noteworthy?
Warning It is recommended that you avoid creating links to snippets.This is primarily due to the nature of snippets, which are designed to be inserted into multiple files. Let's say you have a heading style in a snippet and that snippet is then inserted into 12 different topics. In another topic, you might decide to create a cross-reference that points to the heading in that snippet. But which of those 12 topics is it supposed to point to in the output? There is no way for Flare to know this, so you could end up with some very undesirable results. For this reason, it's a good idea not to link to any content in a snippet.
Note You can also insert an image hyperlink. This lets you create one hyperlink for the entire image, as opposed to creating multiple hyperlinks for specific sections of the image. See Inserting Image Hyperlinks.
Note The Flare user interface lets you create client-side image maps, which are the most common type. However, you can code HTML and use a CGI script to create server-side image maps, where the file containing the links is located on a server. One down side of server-side image maps is that alt tags cannot be read, and therefore the output is not as accessible as it would be with client-side image maps. There is an option on the Warnings tab of the Target Editor for the web formats—HTML5, Clean XHTML, WebHelp, WebHelp Plus. This option lets you see compiler warnings when a server-side image map is found in the output.

