Creating Named Destinations

A named destination lets you point to a specific place in a PDF. In the Insert Hyperlink dialog, you can create links to named destinations when using the
This process involves the following:
- Generate/Insert Named Destinations You can generate named destinations automatically in a PDF everywhere a bookmark exists. Alternatively, you can insert named destinations into content files manually.
- Create Links to Named Destinations You can insert hyperlinks to named destinations in a PDF.
[Menu Proxy — Headings — Online — Depth3 ]
Example
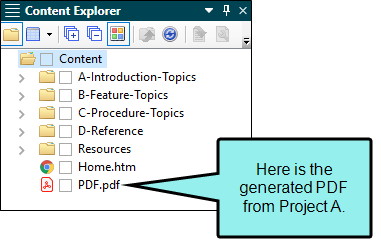
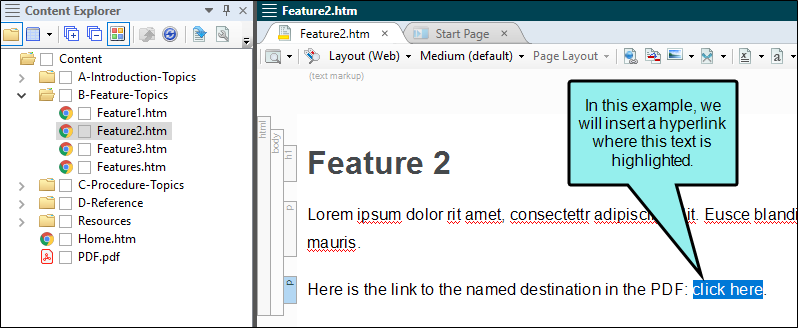
Example You plan to generate a PDF file from Flare Project A. Once that is done, you plan to add the PDF to Flare Project B. And in one of the topics of Flare Project B, you create a hyperlink that points to a specific paragraph in the PDF.
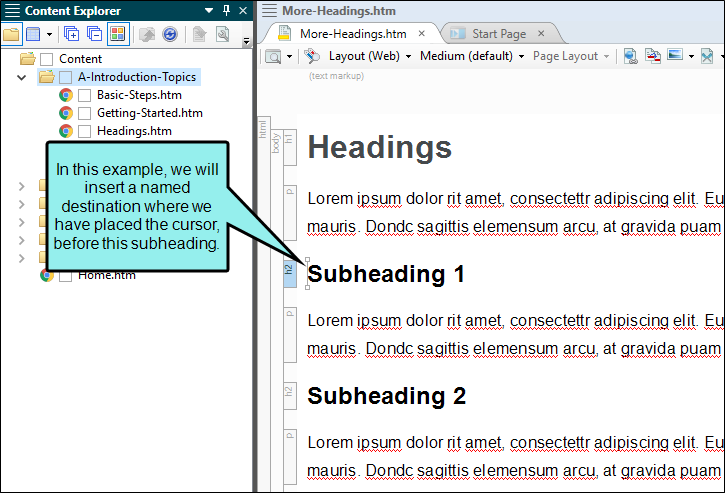
First, you open the topic or snippet in Flare Project A where the destination paragraph will eventually exist in the PDF, and you insert a named destination at that location:
Next, you generate the output for the PDF.
Now you open Flare Project B. You could use a feature such as External Resources to add the PDF to that project, or you could just copy and paste it in Windows.
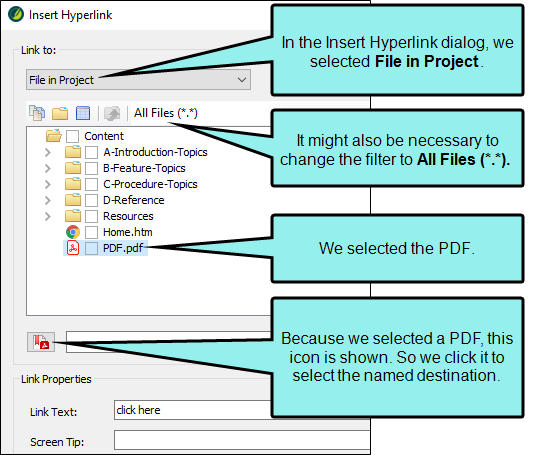
Now you open a topic in Flare Project B, and you create a hyperlink that points to the named destination in the PDF. You follow the steps for inserting a link into a file, and you select the PDF file. Then you click  and select the named destination that you created:
Now when you generate the output from Project B, you can click on the hyperlink in that output, and the PDF will open to the specified paragraph.
How to Generate Named Destinations Automatically
- Open the PDF target that will contain the named destinations (i.e., hyperlinks in another file will point to these destinations).
- Select the PDF Options tab.
-
In the Document Properties area, click Create named destinations for bookmarks.
Note This does not remove bookmarks. It simply creates named destinations next to other bookmarks in the generated PDF if they exist.
- Click
") to save your work.
to save your work. - Generate and publish the PDF.
How to Generate a Named Destination Manually
- Open the
- Click in the
-
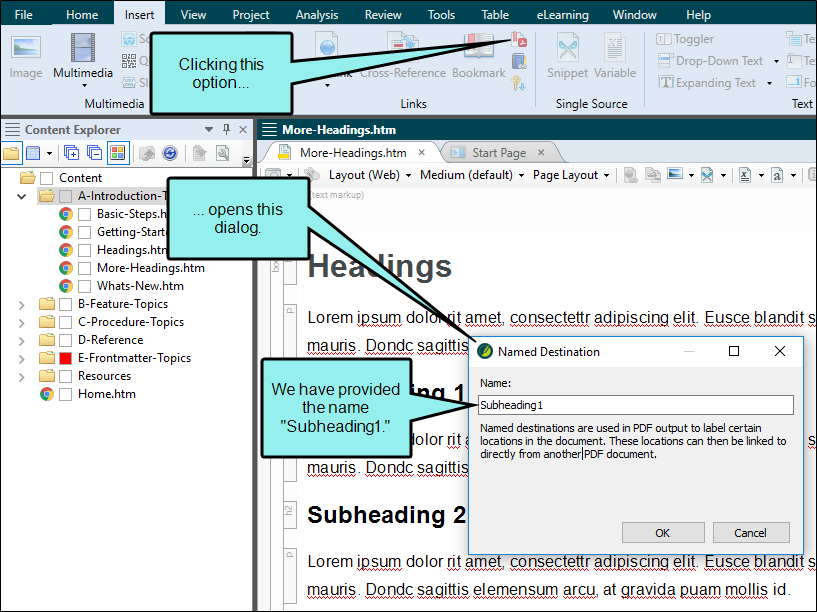
Select Insert > Named Destination.
The Named Destination dialog opens.
- In the Name field, type a name for destination (do not use spaces).
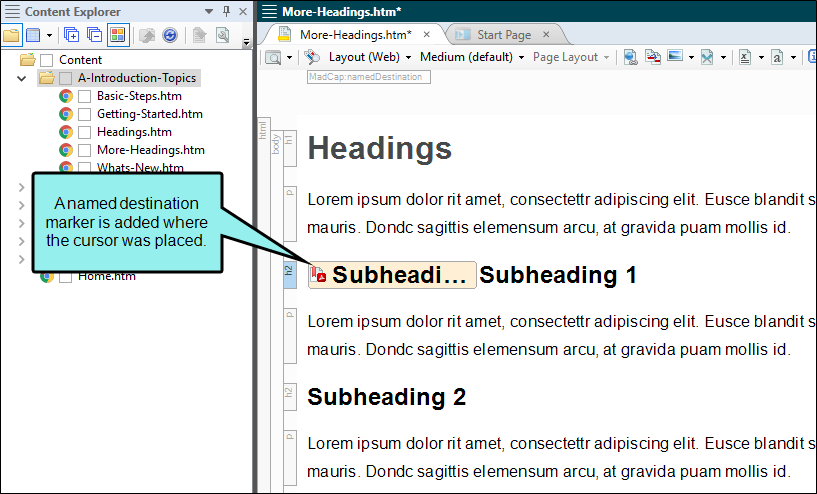
- Click OK. An icon is displayed at the appropriate location in the document (as long as your markers are turned on).
- Click to save your work.
- Generate and publish the PDF containing that topic.
How to Create a Link to a Named Destination
- Open the
- Highlight the text that you want to use as the link (or "hotspot").
-
Do one of the following, depending on the part of the user interface you are using:
- Ribbon Select Insert > Hyperlink.
- Local Toolbar In the local toolbar of the XML Editor click
 .
. - Keyboard Shortcut Press CTRL+K on your keyboard.
- Right-Click In the XML Editor, right-click and select Hyperlink.
-
From the Link to drop-down field select one of the following. Based on the option you choose, the section below the field gives you a list of selections or additional fields to complete.
File in Project
This option lets you search for a file within your project. After you select this option, use the area below to navigate to the PDF file that you want to link to and select it. By using the buttons in the local toolbar, you can view all files in a list, view files in their folder structure, and use other options.

Shows all of the files

Shows or hides the folders that the files are stored in.

Shows or hides the files. If you click this button when the Show Folders button
 is selected, the area splits into two. The folder is shown on the left side, and the files and subfolders within it are shown on the right.
If the Show Files button
 is the only one selected, you can click this button to move up one folder level.
Lets you filter the kinds of files shown below. Depending on the task you are performing, this field may already be populated with the most appropriate file type(s).
External File
This option lets you search for a file outside your project. After you select this option, enter the path to the PDF file in the field next to the External File button.
For more information see Inserting Links to External Files—HTML, PDF, Microsoft Office.
Note Because the link usually needs to be relative, based on the final locations of your output files, it is preferable to enter the text directly into the field, rather than clicking the External File button.
- After selecting the PDF, click .
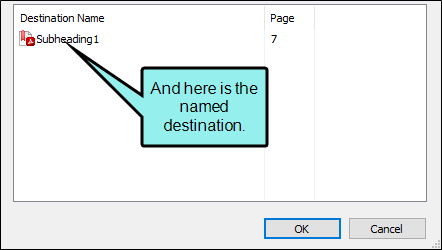
- In the dialog that opens, select the named destination and click OK.
- (Optional) The Link text field displays the text that you highlighted in the topic, which will be used as the hyperlink. Leave the text as it is, unless you decide you would like to change it. If you want to change the link text, type the new text in the field. It will replace the previously selected text in the topic.
-
(Optional) In the Screen Tip field you can type a phrase that will appear when the end user hovers over the hyperlink in the output.
When you enter a screen tip, it is added as a <title> tag in the markup. In addition, an <alt> (alternate text) tag is added with the same text. This is useful when it comes to accessibility.
For more information see Accessibility.
- (Optional) Next to the Style Class field click the Select button. This opens the Select Class dialog, which lets you apply one of the defined hyperlink styles from your stylesheet to the link. You can change the appearance of the link in the Stylesheet Editor. After you select a style class in the dialog, click OK. The Style Class field displays the selected style. (If you do not specify a style class, Flare uses the parent "a" style.)
-
(Optional) In the Target Frame field, click the drop-down arrow to select the way the linked destination will open (e.g., in another window, in a popup).
- Page Default The destination file opens in the same window as the output window.
- Parent Frame The destination file opens in the parent frame of the current topic while hiding that topic.
- New Window The destination file opens in a new browser window.
- Same Frame The destination file opens in the same window frame as the current topic.
- Top Frame The destination file opens in the same output window, removing all other framesets. You might use this option, for example, if the destination topic has its own frameset.
- Popup Window The destination file opens in a popup box on top of the current topic.
- Click OK. The hyperlink is added to the topic.
- Click to save your work.
What’s Noteworthy?
Note You can generate a report to see all of the named destinations in your project and the files that contain them. See Reports and Generating Reports.
