Editing Text Hyperlinks


You can edit text hyperlinks that you have inserted into a topic in at least three different ways: (1) edit the destination and properties of the hyperlink, (2) edit the style of the hyperlink, and (3) unbind (or remove) the hyperlink from the text.
[Menu Proxy — Headings — Online — Depth3 ]
How to Edit the Destination and Properties of a Text Hyperlink
The first way to edit text hyperlinks is to change the destination and other properties (link text, target frame, screen tip).
Example You test the topic containing the text hyperlink and you notice that the wrong destination topic is opening when you click the hyperlink. So you use the steps below to associate the correct destination topic with the hyperlink.
- Open the content file.
- In the XML Editor, click inside the link.
- At the top of the XML Editor, right-click the span bar representing the link. For example, hyperlink span bars have an "a" label, and cross-reference span bars have a "MadCap:xref" label. When you click on the link in the topic, the appropriate span bar at the top of the XML Editor will change color to indicate that it goes with the link. If your span bars are not turned on, click
 in the local toolbar of the XML Editor.
 - Select Edit Hyperlink. The Insert Hyperlink dialog opens.
-
From the Link to drop-down field, select a way to identify the topic, bookmark, or file to which you want to link. Based the option you choose, the section below gives you a list of selections or additional fields to complete.
File in Project
This option lets you search for a file within your project. After you select this option, use the area below to navigate to the file that you want to link to and select it. By using the buttons in the local toolbar, you can view all files in a list, view files in their folder structure, and use other options.

Shows all of the files

Shows or hides the folders that the files are stored in.

Shows or hides the files. If you click this button when the Show Folders button
 is selected, the area splits into two. The folder is shown on the left side, and the files and subfolders within it are shown on the right.
If the Show Files button
 is the only one selected, you can click this button to move up one folder level.
Lets you filter the kinds of files shown below. Depending on the task you are performing, this field may already be populated with the most appropriate file type(s).
You can also click
 to display and select any bookmark or a location using a particular style (including classes and IDs). If necessary, a bookmark will be created at that location if one does not exist. If you want to clear a bookmark in the link, select it and click the button at the bottom of the dialog.
You can also select
 if you have selected a PDF file.
 Place in This Document
This option displays any bookmarks, headings, and other elements in the current file. Expand the appropriate section and select the element to which you want to link. If you select anything other than an existing bookmark, Flare will insert a new bookmark at that destination in the file.
External File
This option lets you search for a file (e.g., HTM, HTML, XML, PDF, Microsoft Office files) outside your
You can also click
to display and select any bookmarks within the destination file, or if you have selected a PDF file. For more information see Inserting Links to External Files—HTML, PDF, Microsoft Office.
Note Because the link usually needs to be relative, based on the final locations of your output files, it is preferable to enter the text directly into the field, rather than clicking the External File button.
Website
This option lets you enter the path to an external file, such as the URL for a website. After you click this option, simply type the path in the field next to the Website field (e.g., http://www.acme.com).
If you want to insert a variable in a field, you can click
 . The variable will appear as syntax in the field, but in the output the variable definition will be shown.
You can create links to specific topics in HTML5, WebHelp, or WebHelp Plus output. This includes the ability to incorporate search strings and skin references (for some outputs).
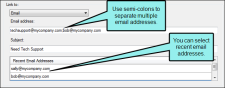
Email
This option lets you add email addresses and subject line so that the user can quickly send an email. To add multiple email addresses, separate them with semi-colons.
Example You might use this feature to help the end user send an email to your company's technical support department. When users click the link, it opens their email program and begins a new email message for them, inserting the email address and subject line for them. After you click this option, complete the E-mail address and Subject fields to the right (or select a recent email address from the list below).
HTML Help File
This option lets you search for a topic within an HTML Help (CHM) file that you have added to your project. After you select this option, click the External File button. In the Link to HTML Help dialog, you can do one of the following.
-
Select Project Files and then use the area below to navigate to the file that you want to link to and select it. By using the buttons in the local toolbar, you can view all files in a list, view files in their folder structure, and use other options.
Shows or hides the folders that the files are stored in.
Shows or hides the files. If you click this button when the Show Folders button
is selected, the area splits into two. The folder is shown on the left side, and the files and subfolders within it are shown on the right. - Select Import Existing. In the dialog that opens, find and double-click the CHM file. Then from the drop-down—which displays "(root folder)" by default, you can select a specific content folder in your project to place the CHM file.
After the CHM file is selected, in the Topic field click
 . In the dialog that opens, find and double-click the topic that you want to link to.
When you are finished, click OK in the Link to HTML Help dialog.
-
-
(Optional) The Link text field displays the text that you highlighted in the topic, which will be used as the hyperlink. Leave the text as it is, unless you decide you would like to change it. If you want to change the link text, type the new text in the field. It will replace the previous text in the topic.
-
(Optional) In the Screen Tip field, you can type a phrase that will appear when the end user hovers over the hyperlink in the output.
When you enter a screen tip, it is added as a <title> tag in the markup.
For more information see Accessibility.
- (Optional) In the Alternate Text field, type a phrase that describes what the element is about. This option should be used to increase accessibility for users who are unable to view an element. .
- (Optional) Next to the Style Class field, click the Select button. This opens the Select Class dialog, which lets you apply one of the defined hyperlink styles (a.NameOfStyleClass) from your stylesheet to the link. After you select a style class in the dialog, click OK. The Style Class field displays the selected style. (If you do not specify a style class, Flare uses the parent "a" style.)
- (Optional) In the Target Frame field, click the drop-down arrow to select the way the linked destination will open.
- Page Default The destination file opens in the same window as the output window.
- Parent Frame The destination file opens in the parent frame of the current topic while hiding that topic.
- New Window The destination file opens in a new browser window.
- Same Frame The destination file opens in the same window frame as the current topic.
- Top Frame The destination file opens in the same output window, removing all other framesets. You might use this option, for example, if the destination topic has its own frameset.
- Popup Window The destination file opens in a popup box on top of the current topic.
-
(Optional) In the Tab Index field you can enter a value to specify the order in which users can tab through hyperlinks in a topic. So when a user presses the TAB key the first time in a topic, the hyperlink with an index value of 1 will be selected first, the hyperlink with a value of 2 will be selected next, and so on. If you want to skip a hyperlink, enter -1 in that field.
Note This feature is supported only in web outputs—HTML5, Clean XHTML, WebHelp, WebHelp Plus.
- Click OK. The hyperlink is changed in the topic. By default the hyperlink is displayed in blue, underlined font. You can change the appearance of the link by modifying the style in the Stylesheet Editor.
- Click
") to save your work.
to save your work.

How to Edit the Style of a Text Hyperlink
The second way to edit a text hyperlink is to edit the style (e.g., font, color) of the hyperlink. When you edit the style for a text hyperlink, the style changes for all text hyperlinks
- From the Content Explorer, open the stylesheet that you want to modify.
-
Complete one of the following sets of steps, depending on whether you want to use the Simplified view or Advanced view in the Stylesheet Editor.
-
Simplified The Simplified view displays styles in a grid view and is often best for brand new users.
This view provides an easy way to apply properties to styles, with format options available from a toolbar and dialogs (similar to the way one would use an interface such as Microsoft Word). In some cases, only the most common property options are available in the Simplified view (e.g., font, letter/word spacing, paragraph alignment/indentation, autonumbering format, borders, background). One advantage of the Simplified view is that you can apply a property to multiple styles at the same time. You can also click a check box to hide the properties in the editor, allowing you to see only the styles.
-
Advanced The Advanced view displays styles in a tree structure, and despite the name, is user friendly for authors of all levels.
For the properties, you can toggle between a grouped display and an alphabetical display. The Advanced view of the Stylesheet Editor lets you edit more settings than are available in the Simplified view. In addition, the Advanced view lets you see and apply settings to multiple mediums and media queries at the same time.
-
- In the local toolbar, make sure the first button displays
 (which means that the Simplified view is currently shown in the editor). If the button displays
  instead, then click it.
 - In the upper-left corner of the editor, click in the drop-down field and select
 .
. -
From the grid in the bottom portion of the editor, find and select the a tag.
If you want to modify the way links look when they are in a certain state, you can select a pseudo class under the "a" style. Link pseudo classes include the following:
- Active This class is used when the person activates the element (mouse is clicked).
- Focus This class is used if the element has the focus.
- Hover This class is used when the person hovers the mouse over the element.
- Link This class is used for links that have not yet been clicked.
- Visited This class is used for links that have already been clicked.
-
In the local toolbar of the editor, click
 . The Properties dialog opens.
 -
Use the Properties dialog to change values for any of the style's properties.
For more information see Styles and Stylesheets, as well as Editing Styles in a Regular Stylesheet.
- In the Properties dialog, click OK.
- In the local toolbar, make sure the first button displays . If the button displays instead, then click it.
- In the upper-left corner of the editor, click in the drop-down field and select .
-
On the left side of the editor, find and select the a tag.
If you want to modify the way links look when they are in a certain state, you can select a pseudo class under the "a" style. Link pseudo classes include the following:
- Active This class is used when the person activates the element (mouse is clicked).
- Focus This class is used if the element has the focus.
- Hover This class is used when the person hovers the mouse over the element.
- Link This class is used for links that have not yet been clicked.
- Visited This class is used for links that have already been clicked.
Example You want a text hyperlink to display in green when a user hovers over it. Therefore, in your stylesheet you expand the a style and modify the hover pseudo class, changing the font color to green.
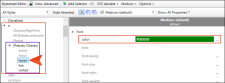
- From the Show drop-down list on the upper-right side of the editor, select
 . The most relevant properties for that style are shown on the right side of the editor.
 - (Optional) You can use the toggle button in the local toolbar to show properties below in a group view
 or an alphabetical view
  .
. -
Locate the property you want to change.
-
The area to the right of the property is used for selecting and entering values. If you know how to enter the information correctly, you can click in the value field and type it directly. Otherwise, click the ellipsis button
 to the right of the property. Depending on the type of property, the appropriate controls and options display, allowing you to choose or enter values (e.g., select from a drop-down list, click a button, complete fields in a dialog or popup). If you completed values in a popup, click OK at the bottom of the box.
For more information see Styles and Stylesheets, as well as Editing Styles in a Regular Stylesheet.
- Click to save your work.
If Using Simplified View
If Using Advanced View

How to Fix Link Overflow in a Container
If you have a long hyperlink (such as a URL) that is extending past the boundary of its container (such as a div) in the output, you can fix it by adding an overflow-wrap property to the style.
-
Right-click your stylesheet file and select Open with > Internal Text Editor.
-
Find the style where the issue occurs, and add this to it:
overflow-wrap: break-word;
- Click to save your work.
How to Unbind or Remove the Text Hyperlink
The third way to edit a text hyperlink is to unbind (or remove) the hyperlink effect. If you decide that you no longer want the content to serve as a hyperlink, you can use the steps below to remove the hyperlink, converting the content to regular text.
- Open the content file.
- In the XML Editor, click inside the link.
- At the top of the XML Editor, right-click the span bar representing the link. For example, hyperlink span bars have an "a" label, and cross-reference span bars have a "MadCap:xref" label. When you click on the link in the topic, the appropriate span bar at the top of the XML Editor will change color to indicate that it goes with the link. If your span bars are not turned on, click in the local toolbar of the XML Editor.
- From the context menu, select Unbind. The hyperlink effect is removed.
- Click to save your work.
What’s Noteworthy?
Warning It is recommended that you avoid creating links to snippets.This is primarily due to the nature of snippets, which are designed to be inserted into multiple files. Let's say you have a heading style in a snippet and that snippet is then inserted into 12 different topics. In another topic, you might decide to create a cross-reference that points to the heading in that snippet. But which of those 12 topics is it supposed to point to in the output? There is no way for Flare to know this, so you could end up with some very undesirable results. For this reason, it's a good idea not to link to any content in a snippet.

