


After you add a language skin file, you need to edit it to make sure it provides all the correct text strings.
How to Edit a Language Skin
- Open the Project Organizer.
- Double-click the Advanced folder.
- Double-click a language skin to open it.
-
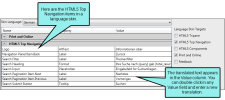
In the Language Skin Targets area, select the check boxes for the target types you want to modify. Translatable values appear in the grid. Values are grouped by the skin type(s) in which they appear, so you do not need to translate the value more than once.
Note
-
Double-click in any of the Value fields and change the text as necessary.
- Click
") to save your work.
to save your work.

Important Once you enable a language skin target on the right side of the editor, you should not disable it unless you do not plan to use it in your project. Disabling the language skin target removes any translated strings from your skin file.
Note Typically, language skins are designed for online outputs only (HTML5, WebHelp, and WebHelp Plus).
However, if you are editing text strings in a language skin for toolbar items, those strings will be translated in Microsoft HTML Help output as well.
In addition, the "Formats/Cross-Reference" items in the Language Skin Editor are used for both print-based and online outputs. Those items are intended to set text for context-sensitive cross-references.
Another print-based feature controlled in the language skin is the heading text for auto-generated glossaries, indexes, and proxies.
Note You can also translate interface values in your stylesheet, on the UI Text tab of the Skin Editor (for HTML5 skins; see Changing Text Strings in HTML5 Skins), or using a legacy language skin. When you set these values in multiple places, they are prioritized as follows:
- Stylesheet
- HTML5 skin
- Language skin
- Legacy language skin, still in your AppData\Roaming folder
As a best practice, you should try to translate each interface value in a single location to prevent conflicts.
Note If you have legacy language skins in your AppData\Roaming folder, you can move them to the Advanced folder in your Flare project folder. This allows you open the skin in Flare and edit newer skin types, such as the HTML5 Top Navigation skin. Alternatively, you can use the legacy language skin as a template to create a new language skin. See Adding Language Skins.
Note If you use the Language Skin Editor to edit an HTML5 skin value, your changes will be reflected in the HTML5 skin file (on the UI Text tab of the Skin Editor). However, changes made in the Skin Editor are not reflected in the Language Skin Editor.
Note If you want to make other changes to a skin to affect how it looks in the output (e.g., color, navigation elements), you can edit a regular skin in the Project Organizer (see Editing Skin Settings).
