 SINGLE-SOURCING TUTORIAL
Snippets capture the idea of writing content once, maintaining it in one place, and then reusing the same content multiple times. A snippet is like a mini-topic. It is a chunk of content, usually a sentence or multiple paragraphs that can include formatted text, tables, images, etc.
[Menu Proxy — Headings — Online — Depth3 ]
How to Create a Snippet
- Open the Austin-Plants.htm topic to display in the XML Editor.
-
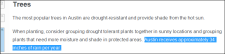
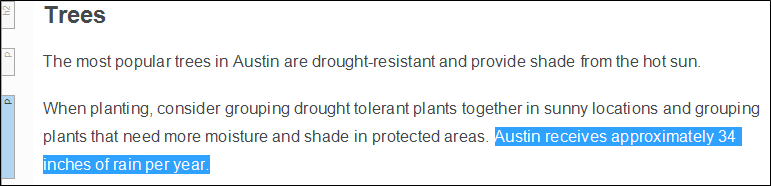
Under the “Trees” heading, in the second paragraph select the sentence that reads, “Austin receives approximately 34 inches of rain per year."
-
Select the Home ribbon, and click Create Snippet. The Create Snippet dialog opens.
-
In the Snippet File field, type Austin-Rainfall. This is the name for your snippet.

-
Keep the other defaults in the dialog, and click Create. The snippet is saved and inserted into the topic.

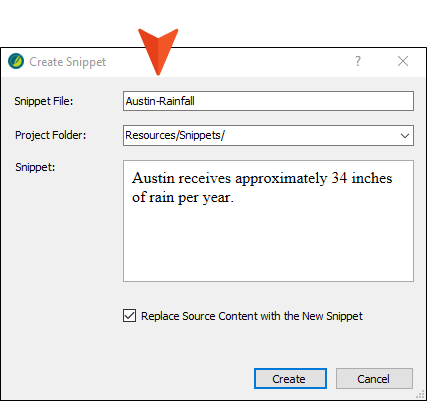
Note By default, snippets are saved in the Content folder in the Resources > Snippets folder. This is the recommended location to save snippets. However, you can store snippets anywhere within the Content Explorer.
Note In the XML Editor, snippets are surrounded by brackets and visible if markers are turned on. To enable or disable markers, go to the local toolbar at the top of the XML Editor, click the Show Tags
 drop-down field, and then select Markers.
 -
Click
") to save your work.
to save your work.
How to Insert a Snippet Inline
Let's reuse the snippet in another topic by adding it to existing inline text.
- From the Content Explorer, double-click Introduction.htm. The topic opens in the XML Editor.
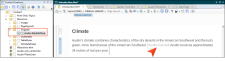
- Under the “Climate” heading, place the cursor after the last word in the first paragraph. Press the Spacebar once.
- From the Content Explorer, expand Resources > Snippets.
-
Select the Austin-Rainfall.flsnp file, and drag it to the cursor location in the XML Editor. Since the snippet is added inline to a paragraph, it takes on the same look and inserts as a text snippet.
-
Click
to save your work.

Note There are several ways to insert a snippet.
Note See the example at the end of this topic for information on how a snippet might behave depending on how and where it is inserted.
How to Edit a Snippet
Now that we’ve created a snippet and reused it in another location, let’s edit the content. Because this chunk of information is single-sourced we only have to edit the source (or snippet) file, and we don’t have to keep track of where it is used in the project.
- From the Content Explorer, expand Resources > Snippets and double-click Austin-Rainfall.flsnp. It opens in the XML Editor.
- Let's make the sentence more definitive. Delete the word “approximately” from the statement.
-
Click
to save your work. - After saving the snippet file, changes can be viewed in all the files that contain the snippet. Open Introduction.htm and Austin-Plants.htm to see the updated text.
-
(Optional) You can use the Link Viewer to quickly view files that a snippet is associated with. From the Content Explorer, expand Resources > Snippets, right-click the Austin-Rainfall.flsnp file, and then select View Links. The Link Viewer opens.
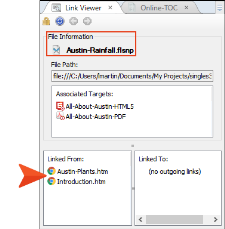
Note The Link Viewer can be used to view links to and from a file. This tool is especially handy to locate and view files in larger projects that contain many types of files. When opened, the Link Viewer window pane gives focus to the file in question.
How to Insert a Snippet Into an Empty Paragraph
Let’s create a new snippet of a table that we intend to insert in multiple places.
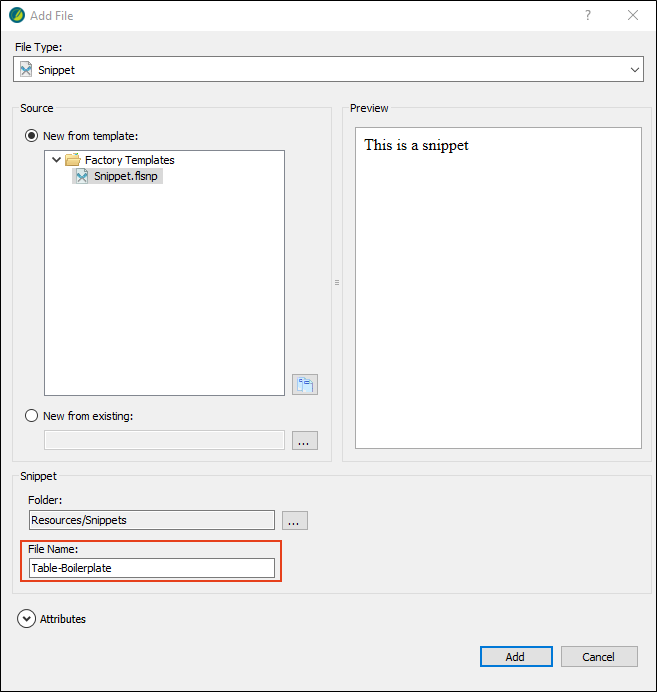
- From the Resources folder, right-click the Snippets subfolder, and select New > Snippet. The Add File dialog opens.
-
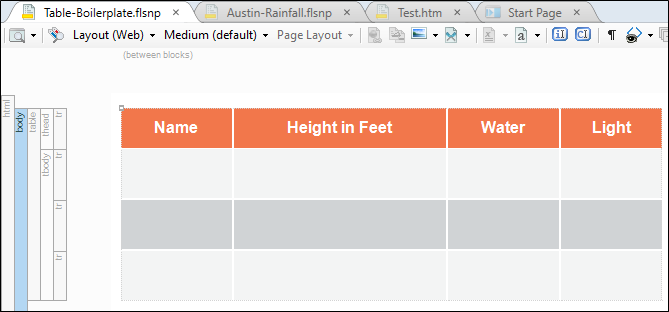
In the File Name field, type Table-Boilerplate, and click Add. The new snippet opens in the XML Editor.

- Delete the text “This is a snippet."
-
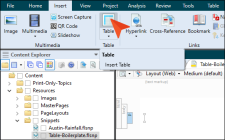
From the Insert ribbon, select Table (the face of the button, not the drop-down). The Insert Table dialog opens.
- Let's create a boilerplate table using the table stylesheet that comes with the Austin project. In the Insert Table dialog, fill out the following.
- In the Table Size section: Number of columns type 4, Number of rows type 3, Number of header rows type 1.
- In the AutoFit Behavior section, select AutoFit to window.
In the Table Style section, from the Table Style drop-down, select the Alternate-Row-Color file.
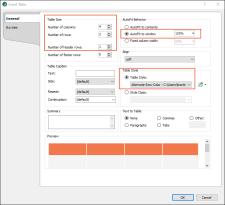
- Click OK.
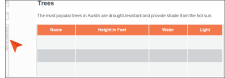
- Now, let’s fill in the header row so each time the snippet is inserted that row is already populated.
- In the top left cell, type Name.
- In the next cell to the right, type Height in Feet.
- In the next cell to the right, type Water.
- In the last cell, type Light.
-
Click
to save your work. - Open Austin-Plants.htm in the XML Editor.
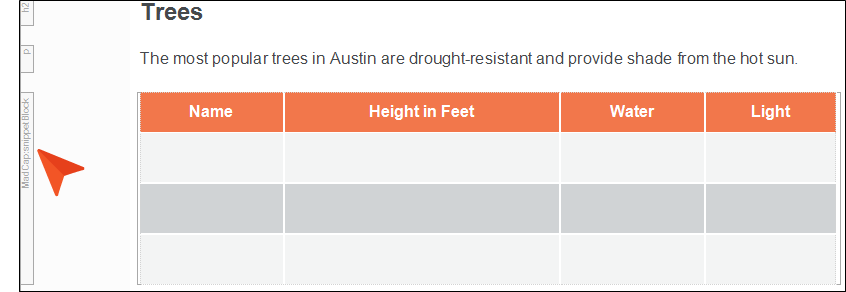
- Under the “Trees” heading, place the cursor after the last word in the first paragraph and press ENTER. This creates a new paragraph.
- From the Content Explorer, under Resources > Snippets, select Table-Boilerplate.flsnp, and drag it to the empty paragraph.
-
The table gets inserted as a block snippet. Block snippets are typically used for larger chunks of content that involve one or more paragraphs or block elements. Notice the structure bar label is "MadCap:snippetBlock."
- Let's use it again. Under the “Vines” heading, place the cursor after the last word in the first paragraph and press ENTER.
- From the Content Explorer, under Resources > Snippets, select the Table-Boilerplate.flsnp, and drag it to the empty paragraph.
-
Click
to save your work.

Note When creating a bunch of snippets, you might find you use some more often than others. You can pin those frequently used snippets to easily find them. This can be done via the Snippet Link dialog or from the topic's local toolbar by selecting Insert a snippet  .
.
How to Convert a Snippet to Text
Since the block of content in this snippet is a boilerplate for a table, it needs to be converted to text so unique information can be added to it. Each time a table of this type is needed in the project, reusing this template can save authoring time. This can be a valuable workflow if multiple tables are required for many topics.
- Open Austin-Plants.htm in the XML Editor.
-
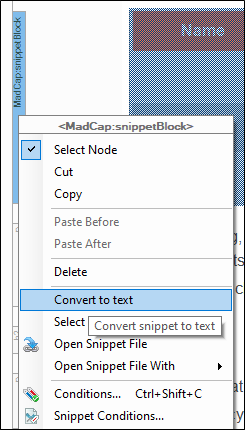
From the structure bar, right-click MadCap:snippetBlock, and from the context menu select Convert to text. Do this for both snippet blocks.

Converting a snippet to text removes the link to the snippet file.
-
Click
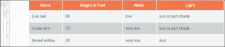
to save your work. - Each table is ready to add specific content to it. In the "Trees" table, type the following text, starting in the left cell and working to the right.
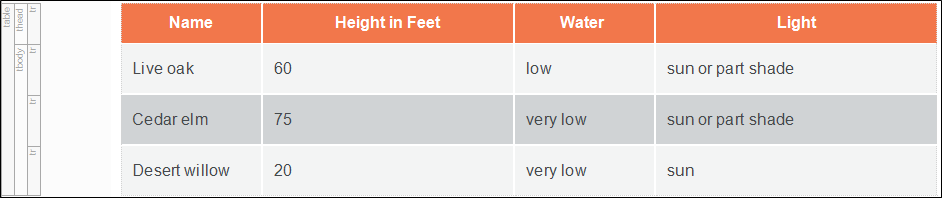
- First row: Live oak, 60, low, sun or part shade
- Second row: Cedar elm, 75, very low, sun or part shade
Third row: Desert willow, 20, very low, sun
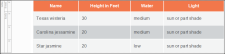
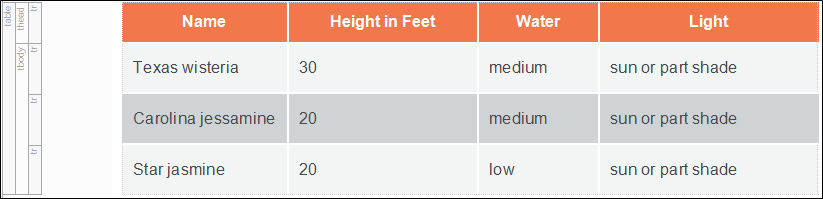
- In the "Vines" table, type the following text, starting in the left cell and working to the right.
- First row: Texas wisteria, 30, medium, sun or part shade
- Second row: Carolina jessamine, 20, medium, sun or part shade
Third row: Star jasmine, 20, low, sun or part shade
Tip If your column widths look different than the images above, press F5 to refresh the topic.
Note Table columns, rows, and styles can be adjusted however you like.
-
Click
to save your work. -
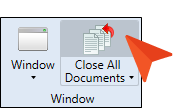
From the Window ribbon, select Close All Documents. It is good practice to close files that have been opened in the XML Editor when you are done working with them. Otherwise, if you leave many files open, it might take longer to load everything the next time you launch Flare.

Example
Example The style behavior of a snippet depends on how a snippet is inserted. If a snippet is inserted in a line where other content exists, it is inserted as a text snippet. If a snippet contains block tags (e.g., paragraphs) and is inserted at an empty paragraph, it is inserted as a block snippet, and no other content can be typed in the line it occupies.
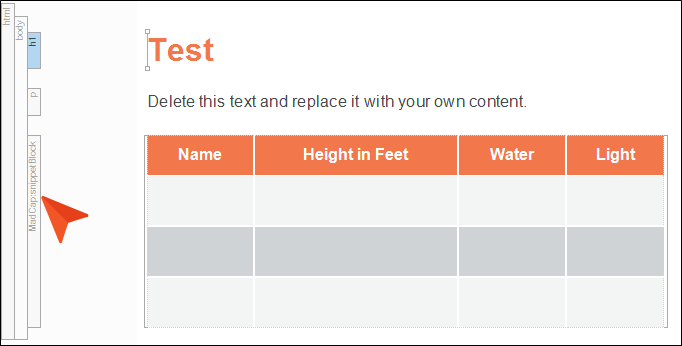
Consider the Table-Boilerplate snippet created for this tutorial. The content in this snippet file exists as a table.
Let's say we insert the Table-Boilerplate snippet into a test topic. If the snippet is inserted into a new paragraph, the snippet gets inserted as a block snippet.
But if we insert the Table-Boilerplate snippet into an existing line of content, it gets inserted as a text snippet and we do not get our desired results.
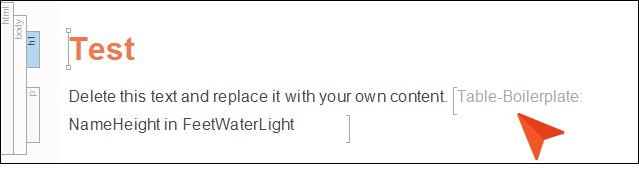
It is good practice to insert block-level snippets (consisting of one or more paragraphs) into an empty paragraph.
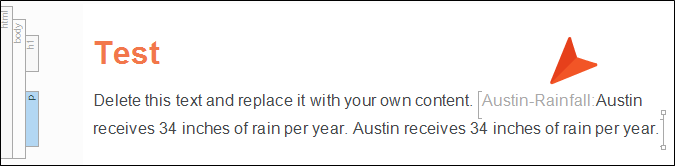
Now, consider the Austin-Rainfall snippet for this tutorial. Because the snippet was created by highlighting some content inline, it only includes a <body> tag.
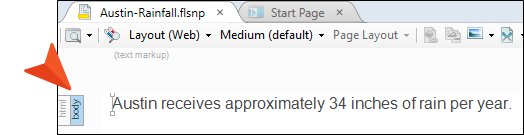
It does not have a block tag (e.g., paragraph tag). In this state, the snippet gets inserted as a text snippet regardless of how or where it is inserted.
But let's say we modify the snippet so a paragraph tag is added to the original text and another paragraph is added to it. (You don't have to have more than one paragraph or block element; we're just doing it here to illustrate clearly that we've got block tags within the main <body> tag, instead of just the <body> tag.)
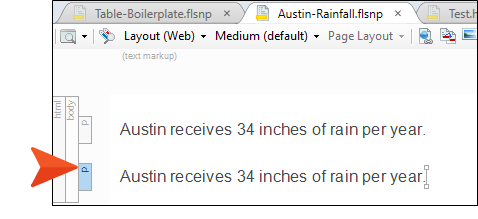
If we place the snippet into the test topic, inline at the end of an existing paragraph, it is inserted as a text snippet and assumes that paragraph style.
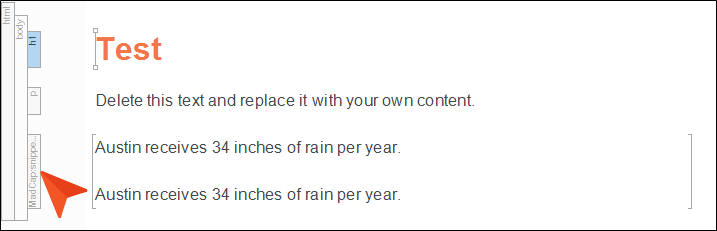
But if the Austin-Rainfall snippet is inserted into the test topic in an empty paragraph, it gets inserted as a block snippet.
Remember that a snippet only becomes a text or block snippet when it is inserted.

