You can use dynamic filters to control the content that appears in your Lingo project. These filters are based on settings in a Flare project or DITA file, such as target settings or conditional attributes.
You can set filters when creating a new project, or you can update an existing project's filtering settings in the Project Properties dialog. The settings are the same in both locations. These settings are updated whenever you change them—dynamically—so you do not need to update the entire project to apply new filter settings.
[Menu Proxy — Headings — Online — Depth3 ]
How to Filter Out Condition Tags
You can filter Flare projects to exclude one or more conditions. You can also select conditions based on the entire condition set, or you can pick the specific conditions in the set that you want to filter by. The resulting Lingo project will include all of the translatable files that are not marked with the selected conditions. Additionally, because Lingo supports block-level, inline, glossary, snippet, and CSS conditions, content within a file or segment that is marked with an excluded condition tag will also be excluded from a filtered Lingo project.
If you use condition tags to filter your Lingo project, the filtered content and files will be used throughout your Lingo project when running reports, creating bundles, viewing glossary terms, and performing other tasks. For example, if you pull a report, you will only see data from the filtered content. If you make a bundle, you will only be able to select from files that are included in the project.
-
Do one of the following, depending on the type of project you are using:
- New Project Select File > New Project. The Start New Project Wizard opens. Proceed through the wizard until you get to the Select Flare project settings page (the location of this page in the wizard varies slightly depending on your project creation method).
- Existing Project Select File > Project Properties. The Project Properties dialog opens. Select the Flare Settings tab.
- New Project Select File > New Project. The Start New Project Wizard opens. Proceed through the wizard until you get to the Select Flare project settings page (the location of this page in the wizard varies slightly depending on your project creation method).
- Select Filter out condition.
- Click Select conditions. The Select Conditions dialog opens.
- From the left side of the grid, select the condition set you want to exclude . The tags in that condition set appear on the right side of the grid. By default, all of the tags in the set are selected.
- (Optional) If you only want to exclude some of the tags in a condition set, on the right side of the grid, deselect the boxes next to the condition tags you do not want to exclude from the project.
- Click OK.
-
In the Project Properties dialog, click OK.
OR
In the Start New Project Wizard, click Next or Finish.
Example
You are an author with a very large Flare project, but you only need to send specific files to your translator. Rather than exporting your entire project to Lingo and then searching for the individual files that you need to export for translation, you instead mark the files and folders you do not need to translate with a "Do Not Translate" condition tag as you create each item in Flare.

In Lingo, you filter the project to exclude the condition tag, creating a new Lingo project that only includes the files you need to send to your translator.

When you open the File List window pane in a Lingo project, it looks like this:

Because you applied the "Do Not Translate" condition throughout your project, you see only a handful of topics and images. You also see a few project files, such as your glossary, variables file, and TOCs.
Example
The content author filtered her Flare project to exclude a "Do Not Translate" condition tag. Of the nine lines in the original topic (including the heading), four were marked with a "Do Not Translate" condition tag.

When you view the topic in the Translation Editor in Lingo, only five segments appear. This is because four lines were excluded when the project was created. Additionally, you see blue condition tag indicators in some segments where individual words were conditioned out and excluded from a segment.

Example
You use expanding text throughout your Flare project. You do not want your expanding headers to appear in your printed outputs, so you create a style class in your stylesheet named “OnlineOnly” that has a condition called “ScreenOnly” condition tag applied to it. After this, you set this style class on your expanding headers.


Later, you need to send one of your printed outputs for translation. When you create a Lingo project, you can exclude the “ScreenOnly” condition tag from the project.

This way, the expanding headers in your online outputs are not included in the content you send to your translator.

Note Although you can filter out condition tags, Lingo does not explicitly include the condition tags that you have not excluded. For example, if you have condition tags A and B in your project, and you filter out A, you will see content marked with tag B in the project. However, if there is content marked with both tags in your project, it will also be excluded. This is because Lingo excludes anything marked with the A tag, even if the B tag was not also excluded.
If you need to exclude some content and include other content, you can do this by filtering your project using a Flare target with your desired condition filters. Filtering by a Flare target respects both include and exclude condition tag filters.
Note Conditions that "unbind" rather than "exclude" content will not be excluded when you filter out a condition in Lingo. If you notice that content has not been removed but you think that it should be, check to be sure that the condition is not marked as an "unbind" condition in Flare.
How to Filter By DITA Attributes
You can filter DITA files to include one or more conditional attributes. The resulting Lingo project will include all of the translatable files that are marked with the selected attributes (while excluding those that are not selected). Additionally, because Lingo supports block-level and inline attributes, content within a segment that is marked with an excluded attribute will also be excluded from a filtered Lingo project.
If you use conditional attributes to filter your Lingo project, the filtered content and files will be used throughout your project when running reports, creating bundles, and performing other tasks. For example, if you pull a report, you will only see data from the filtered content. If you make a bundle, you will only be able to select from files that are included in the project.
-
Do one of the following, depending on the type of project you are using:
- New Project Select File > New Project. The Start New Project Wizard opens. Proceed through the wizard until you get to the Select DITA project settings page (the location of this page in the wizard varies slightly depending on your project creation method).
- Existing Project Select File > Project Properties. The Project Properties dialog opens. Select the DITA Settings tab.
- New Project Select File > New Project. The Start New Project Wizard opens. Proceed through the wizard until you get to the Select DITA project settings page (the location of this page in the wizard varies slightly depending on your project creation method).
-
In the Select conditional attributes to include section, use the drop-downs to select the attributes you want to include in your DITA project.
- Props Filter to include the selected property attribute.
- Platform Filter to include the selected platform attribute.
- Product Filter to include the selected product attribute.
- Audience Filter to include the selected audience attribute.
- Other props Filter to include any other defined otherprops attribute.
Note If you select All in any of the drop-downs, Lingo will include all available values for that attribute. In other words, no values are excluded from that attribute.
-
In the Project Properties dialog, click OK.
OR
In the Start New Project Wizard, click Next or Finish.
Example
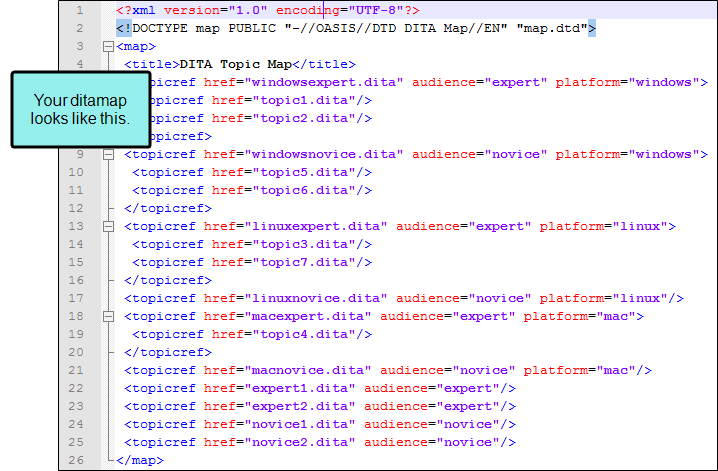
Your DITA files include information for Mac, Windows, and Linux operating systems. In your DITA files, you used the platform attribute to mark the content applicable to each of these operating systems. Additionally, you used the audience attribute to mark content for expert and novice users.
When creating your Lingo project, you have the option to filter your content by either the platform or audience attributes. You could also filter the content using both attributes.
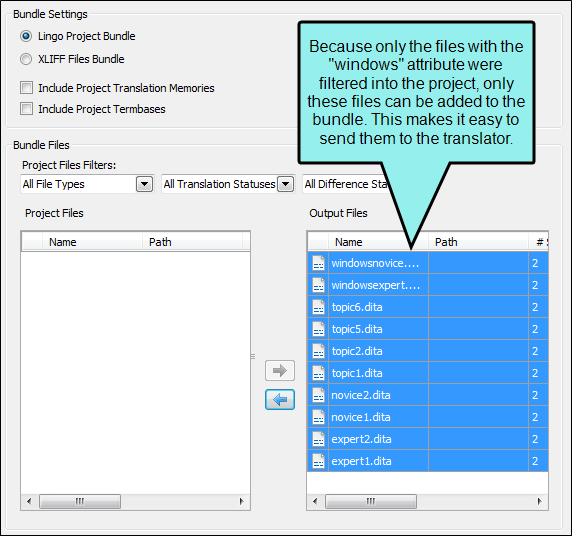
You need to translate all of the content that is applicable to all of your users who use Windows. You select the windows platform attribute to include this attribute type (excluding Mac and Linux) and leave the audience attribute set to All (including both expert and novice users).

Your project looks like this in Lingo:
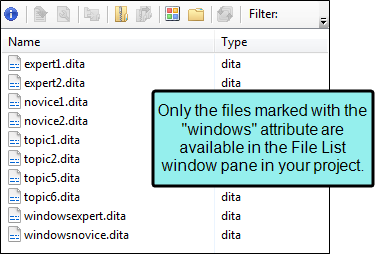
You then use Lingo to create a bundle and send the Windows files to your translator.
You also need to translate content for expert Linux users, but this content goes to a different translator. You open the Project Properties dialog and adjust the filter settings so the platform attribute is set to linux (excluding Mac and Windows) and the audience attribute is set to expert (excluding novice users).
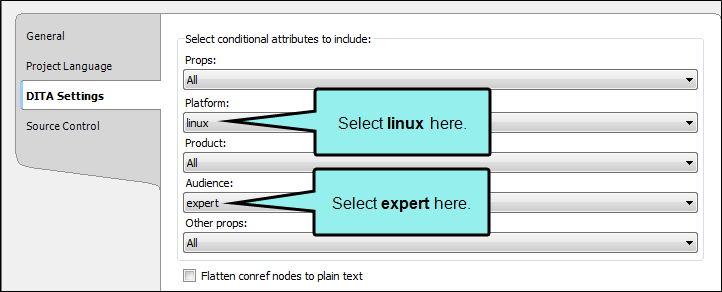
Your project dynamically updates, and now it looks like this in Lingo:
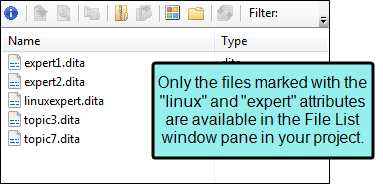
Because your project now displays only the expert-level Linux files, you can create a bundle with these files and send them to the other translator.
Note For more detailed information about DITA, please refer to:
How to Filter by a Target
You can filter your Flare projects by one or more targets. The resulting project will include all of the translatable files that are part of the selected target(s), such as topics, images, skins, and variables.
A good reason to use target filters is if you need to maintain different translations for different targets. Additionally, you could filter to a specific target and use variable flattening
-
Do one of the following, depending on the type of project you are using:
- New Project Select File > New Project. The Start New Project Wizard opens. Proceed through the wizard until you get to the Select Flare project settings page (the location of this page in the wizard varies slightly depending on your project creation method).
- Existing Project Select File > Project Properties. The Project Properties dialog opens. Select the Flare Settings tab.
- New Project Select File > New Project. The Start New Project Wizard opens. Proceed through the wizard until you get to the Select Flare project settings page (the location of this page in the wizard varies slightly depending on your project creation method).
- Select Filter by target.
-
From the drop-down, select the target(s) whose files you want to include in the Lingo project. After clicking the appropriate check boxes, click elsewhere on the page to close the drop-down.
Any files that are not part of the selected target(s) will not be shown in the File List.
Note If you want to replace variable definitions for a specific target, you can optionally select variables from the Select variables to flatten grid. You can then translate the target-specific variables in the target file in your Lingo project.
-
In the Project Properties dialog, click OK.
OR
In the Start New Project Wizard, click Next or Finish.
Example
You create your glossary in Flare with the intent of using the same glossary file for multiple outputs. To do this, you apply condition tags to each term that indicate which terms belong in which output. Some terms are used in multiple targets, others are used in single targets.

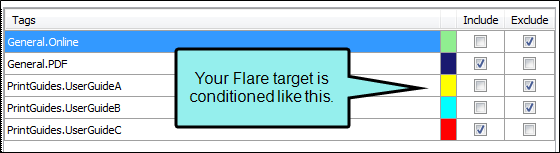
Later, when you need to send a specific target to your translator, you can filter your new Lingo project by the target you need to produce.

When you do this, the condition text rules set in the Flare target are applied to the Lingo project. Because you applied condition tags to your glossary as well as to your topics, when your translator opens the glossary file in your Lingo project, she will only see the terms that need to be translated for that output.

She will also only see the terms for that output when she opens the Project Properties dialog and views the Sort Order information for the glossary.

Note If you are creating Lingo projects from both Flare and DITA source files, be aware that DITA conditional filters are include filters, while Flare conditional filters are exclude filters.
Note If you update the filter settings for an existing project, the translation status of changed segments is set to Untranslated. You also have the option to completely clear any existing translations for these segments.
Note You cannot filter a Flare project by both target and conditions. If you select one filter, the other will be disabled.
Note If you need to create a filter for the content in individual files or for files in a folder, you can use file type filters. See File Type Filters.