Managing Users
Important Pulse is deprecated in Flare, which means that it is slated to be removed in a future version.
AVAILABLE TO: Administrators only
In the Pulse dashboard, the Administration > Settings menu command is available to members of the Administrators group. This gives administrators the ability to click the Users feature to add new users and perform user administration tasks on the Pulse web server.
[Menu Proxy — Headings — Online — Depth3 ]
Types of Users
When you open the Users page, you will notice counts showing the total number of users:
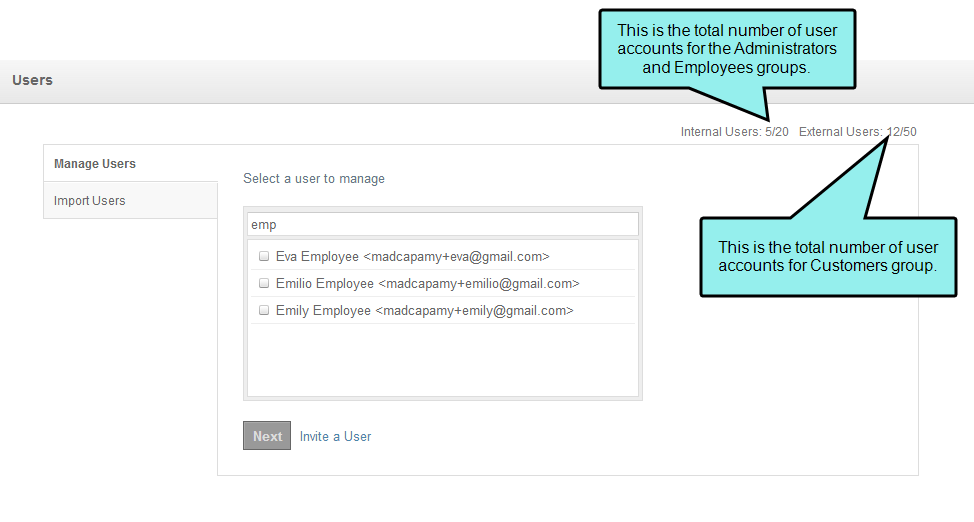
- Internal Users This is the total number of user accounts associated with the Administrators and Employees groups. These are the individuals responsible for administering and/or moderating Pulse. The PulseAdmin account is not included in this total.
- External Users This is the total number of user accounts for the Customers group. These are the users who will typically log in to Pulse and use the community features in the Flare output.
User access to Pulse tools and features is governed by group membership. There are four access levels for users:
|
Group Name |
Access Level |
User Type |
|---|---|---|
|
Administrators |
Full Access |
Registered |
|
Employees |
Advanced Access |
Registered |
|
Customers |
Limited Access |
Registered |
|
General Public |
Restricted Access |
Unregistered |
Note By default, registered users who are not explicitly added to a group are granted the same access privileges as members of the Customers group.
In addition to the default groups above, Administrators can create more groups. See Managing Groups.
How to Create an Administrator Account
Although a default administrator account named "PulseAdmin" is created during the initial server configuration (see Pulse Server Configuration), it is strongly recommended that you create a "standard" user account and assign it administrative permissions for day-to-day administrative operations.
Note The default PulseAdmin account gives the account holder permission to log on to the Pulse server and perform administrative tasks, such as installing software and changing the network configuration. A "standard" account with administrative privileges simply gives the account holder permission to perform day-to-day administrative operations for the Pulse system.
- Log in to the Pulse dashboard using the default PulseAdmin account. See Pulse Dashboard.
- Select Administration > Settings. The Settings page opens.
- In the Settings page, click Users. By default, the Manage Users tab is selected.
- In the Manage Users tab, click Invite a User. This opens the Invite User page.
-
Type the following information in these fields.
- First Name The first name of the user.
- Last Name The last name of the user.
- Email Address A valid email address for the user.
- Title A title for the user, such as a professional or job title.
- Department A department name for the user, such as Engineering or Sales.
- Location A location for the user, such as La Jolla or New York City.
- Phone A telephone number for the user.
- Cell A mobile phone number for the user.
- Skills & Expertise Click Edit Skills if you want to associate yourself with any skills added by the Administrator. You can request new skills to be added by clicking I don't see my skill.
- Experience Click Add Experience if you want to add any relevant experience, including your company name, title, time period, and a description.
- Education Click Add Education if you want to add any relevant educational background, including your school name, dates attended, field of study, and a description.
- Certification Click Add Certification if you want to add any relevant certifications, including your certificate name, year, and a description.
- In the Group area, place a check mark in the Administrators box.
- When you are satisfied with the invitation, click Send Invite.
- In the User Invite dialog, click Ok to close the message confirming that the invitation was sent.
When the email message arrives, follow the instructions to log in to Pulse.
Inviting New Users to Pulse
Members of the Administrators group have permissions to send Pulse invitations to other individuals by e-mail.
Minimum User Account Requirements
In order to send an email invite to users asking them join a Pulse community, you need their basic user information. This list details the minimum user account requirements:
- First Name The first name of the user.
- Last Name The last name of the user.
- Email AddressA valid email address for the user.
- Groups The desired group membership for the user. A user can be a member of one or more groups. The default groups are: Administrators, Employees, or Customers. See Managing Groups.
How to Invite a Single User
- Log in to the Pulse dashboard using an account that is a member of the Administrators group.
- Select Administration > Settings. The Settings page opens.
- In the Settings page, click Users. By default, the Manage Users tab is selected.
- In the Manage Users tab, click Invite a User. This opens the Invite User page.
- Complete the fields on the page.
-
In the Group area, place a check mark in the appropriate group name box(es) to add the user to one or more groups. You must select at least one group to send an invite.When users belong to more than one group, they are granted the combined access for all the groups to which they belong.
- When you are satisfied with the invitation, click Send Invite.
- In the User Invite dialog, click Ok to close the message confirming that the invitation was sent.
How to Bulk Invite Users
If you would like to bulk invite users to join Pulse, members of the Administrators group can import users by importing a comma-separated values (CSV) file.
csv file requirements
To successfully import user data from CSV, keep the following in mind:
- Import a CSV File The file must be saved in the CSV format.
- Include Column Headings in the Top Data Row Always use the first data row to define the column headings. Column headings must use exact spelling shown in the table below under "Column Name."
- Column Order is Not Important As long as you have named the column headings as required, the order of your columns is not important.
- Table Must Contain At Least One Data Row At a minimum, the file must contain at least one row of data.
- Always Include the Required Columns At a minimum, the user data you plan to import must contain these columns: FirstName, LastName, EmailAddress, and at least one assignment for Groups.
Example Below is an example of a properly formatted CSV file:

In order to successfully import CSV-formatted user data into the system, see the information in the table below:
|
Column Name |
Format |
Required Column |
Description |
|---|---|---|---|
|
FirstName |
text Example Enter the first name of the user: Emily |
|
The first name of the user. |
|
LastName |
text Example Enter the last name of the user: Smith |
|
The last name of the user. |
|
EmailAddress |
email address Example Enter a valid email address: emily@example.com A valid email address includes the account (emily), the ampersand (@) and the domain (example.com). |
|
A valid email address. Important The email address is the unique identifier for the account. The email address cannot be changed once an account is created. |
|
Groups |
text Example To add the user to a single group, enter the group name. For example: Customers To add the user to multiple groups, enter the group names and separate them with the semicolon. For example: Administrators;Employees |
|
This in the group name (or names) in Pulse. To add a user to multiple groups, separate the group names using a semicolon (;). |
|
Location |
text |
|
This can be used to specify the user location. This might be a facility, city, town, state, or region. |
|
Title |
text |
|
This is the user's professional title. |
|
Department |
text |
|
This is the user's department. |
|
Phone |
telephone number |
|
This is the account holder's telephone number. Always use a dash (-) to separate the area code, prefix, and line number. For example, 000-000-0000. |
|
Cell |
telephone number |
|
This is the users mobile number. Always use a dash (-) to separate the area code, prefix, and line number. For example, 000-000-0000. |
|
Password |
text |
|
This is the password for the user account. It must be a minimum of 7 characters in length. |
to import users from csv
Follow these steps to import users into Pulse.
Warning If you are syncing Pulse with Microsoft Active Directory (AD), you will not need to import your AD users.
- Log in to the Pulse dashboard using an account that is a member of the Administrators group.
- Select Administration > Settings. The Settings page opens.
- In the Settings page, click Users. By default, the Manage Users tab is selected.
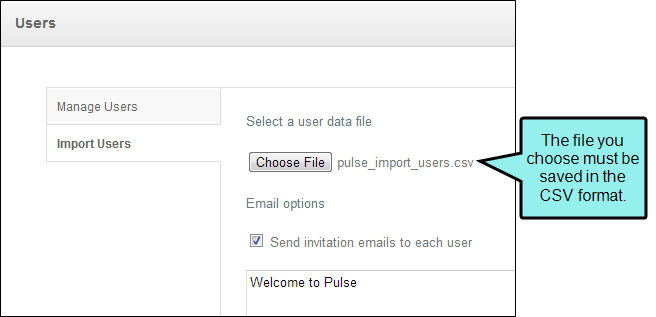
- Click the Import Users tab.
-
Under Select a User Data File, click the Choose File button. The file that you using for the import must be saved in the CSV file format. The data in the file must also meet the requirement defined above.
-
In the Open dialog for Windows, find the file that you want to open. Then, double-click the file or highlight it and click Open.

- Under Email Options, place a check mark in the Send invitation emails to each user box.
- Type a message in the text box. The system includes the message "Welcome to Pulse" by default.
-
Click Import.If the import is not successful, an error message appears. Most failed import attempts are due to a format error in your data file. Be sure to review the requirements for CSV files above. Then, try the import again.
-
Click Back to return to the Import users page. Until your users log in to Pulse for the first time, you will not be able to find them in the Manage Users list.
How to Resend an Invite
Administrators can resend invitations to users that have not yet registered for Pulse.
- Log in to the Pulse dashboard using an account that is a member of the Administrators group.
- Select Administration > Settings. The Settings page opens.
- In the Settings page, click Users. By default, the Manage Users tab is selected.
-
In the Manage Users tab, select the user to manage by following these steps:Type part of all of the user name.In the selection list, place a check mark in the box next to the desired user name.
-
Click Next.
-
In the User Details page, click Resend Invite..
Note This option is only available if the user has not yet activated their Pulse account.
- In the User Invite dialog, click Ok to close the message confirming that the invitation was sent.
The user can click the link in the invitation to log into Pulse for the first time.
Deleting/Disabling Use Accounts
You can disable, enable, and delete user accounts.
How to Disable a User Account
- Log in to the Pulse dashboard using an account that is a member of the Administrators group.
- Select Administration > Settings. The Settings page opens.
- In the Settings page, click Users. By default, the Manage Users tab is selected.
-
In the Manage Users tab, select the user to manage by following these steps:Type part of all of the user name.In the selection list, place a check mark in the box next to the desired user name.
- Click Next..
- In the User Details page, click Disable.
- In the Confirm Disable dialog, click Disable.
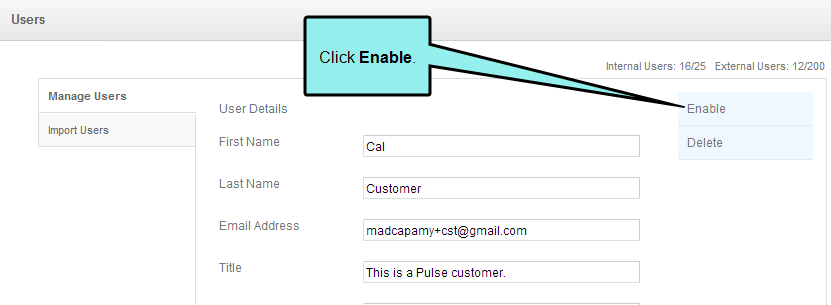
How to Enable a Disabled Account
To enable a disabled account use the same steps as above. Click Enable in the User Details page.
How to Delete a User Account
Members of the Administrators group have permissions to delete users in Pulse. After deleting a user, the user will no longer be able to sign in to Pulse.
In the User Details page, click Delete.
In the Confirm Delete User dialog, click Delete. The user will no longer be able to log in to Pulse.
- Log in to the Pulse dashboard using an account that is a member of the Administrators group.
- Select Administration > Settings. The Settings page opens.
-
In the Settings page, click Users. By default, the Manage Users tab is selected.
- Click the Manage Users tab.
-
Select the user to manage:Type part or all of the user name. For example, type cal.In the selection list, place a check mark in the box next to the desired user name. For example, select Cal Customer.
- Click Next.
- In the User Details page, click Delete.
- In the Confirm Delete User dialog, click Delete. The user will no longer be able to log in to Pulse.
Note Deleting a Pulse user removes all access to Pulse. To give a user the ability to re-use the email address in Pulse, you must also delete the user from the dbo.Users and dbo.Login tables in the SQL Server instance for the Pulse database. Once the entries are deleted, the email can be used to create a new Pulse account.