Following are some key authoring features in Flare.
[Menu Proxy — Headings — Online — Depth3 ]
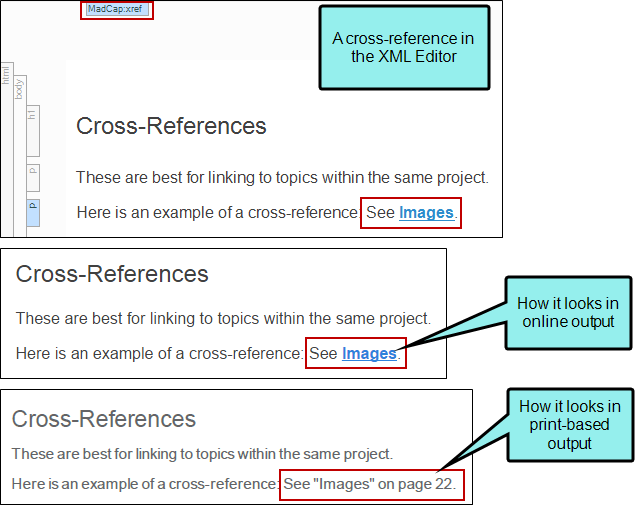
Cross-References
A cross-reference is a link that lets you connect text in one topic to another topic (or a bookmark within a topic). This is somewhat similar to a text hyperlink. However, cross-references are more powerful in that the links can automatically be updated based on commands (e.g., appears as a text link in online output, but page numbers in print-based output).
The best practice is to use cross-references to create links between files and locations inside a Flare project, and hyperlinks are preferred for links that point outside of the project (e.g., websites, external PDFs). There are exceptions to this, but most of the time this is the recommended approach.
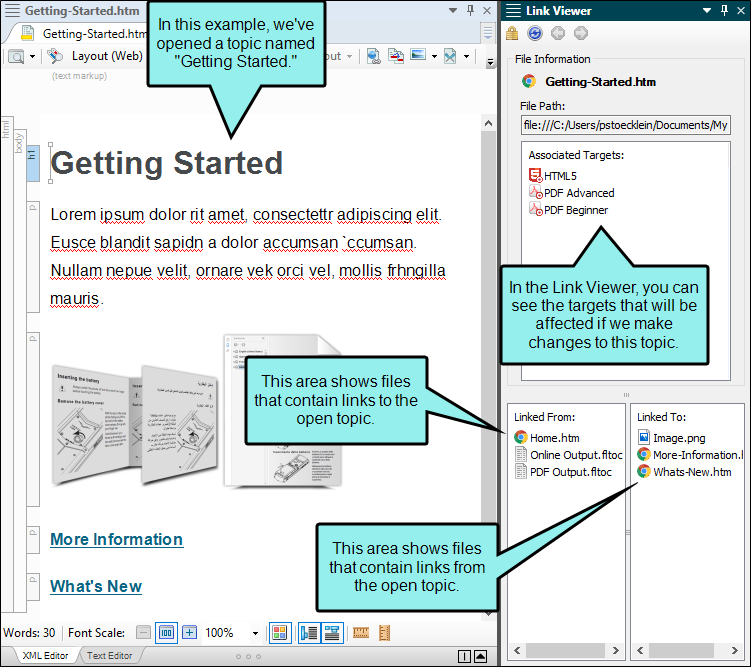
Link Viewer
In Flare there are many ways to link one file to another, such as inserting a cross-reference or text hyperlink, inserting an image, applying a stylesheet to a topic, and more. The Link Viewer window pane (View > Link Viewer) lets you see how your different files are connected and may be one of the most useful tools you use in Flare.
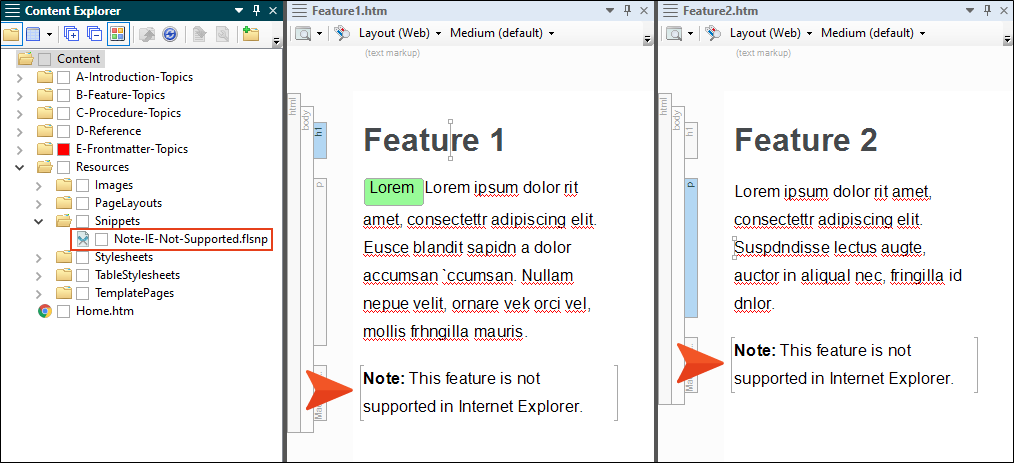
Snippets
A snippet is a chunk of formatted content that is heavily used in single-sourcing. Snippets can include text, tables, images, and whatever else can be included in a normal topic. You can insert snippets into one or more topics throughout your project, thus allowing you to reuse content that is maintained in one place. You can even insert them into other snippets, creating nested snippets. Snippets are not usually intended for single words or very short phrases that change frequently. In those cases, you probably want to use variables instead.
The major benefit of using snippets is that you only have to create your content once, rather than having to type the same information in each topic (or in another snippet) where you want to use it. If you need to modify the content of a snippet, you only need to change it in one place and the change is made automatically in every file where the snippet has been inserted.
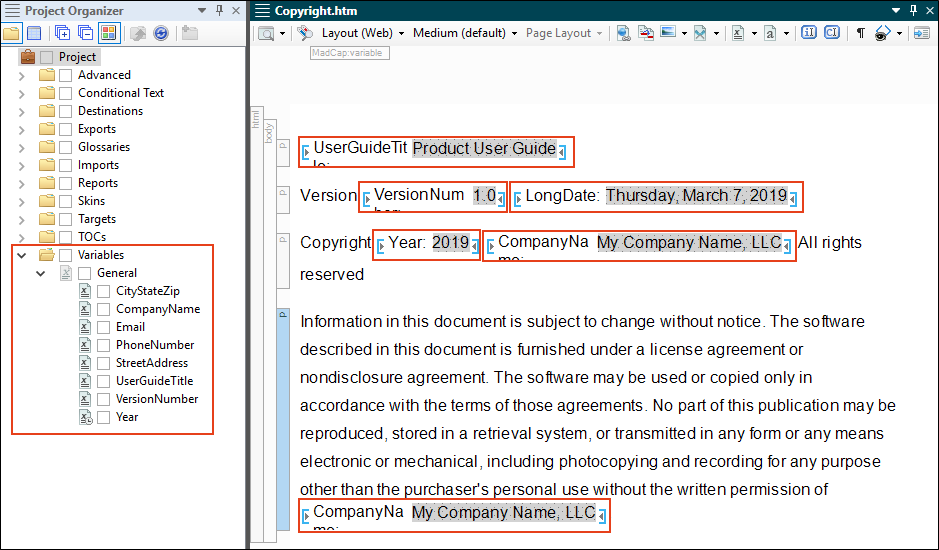
Variables
A variable is a small piece of plain text or auto-generated content that can be edited in one place but used in many places throughout your project. Variables are especially useful for text that might change frequently, such as version numbers and dates. Variables are stored in variable sets, which can hold multiple variables. Depending on the template you select when creating a project, Flare may provide you with an initial variable set, but you can add as many additional variable sets and variables as you like.
Images
You can insert images into
Multimedia
You can incorporate different types of video files (i.e., YouTube, Vimeo, Windows Media, QuickTime
Also, numerous multimedia files are supported in PDF output. This means that those files play when viewing the PDF in electronic format. If you print the PDF, those files are simply displayed as static images.
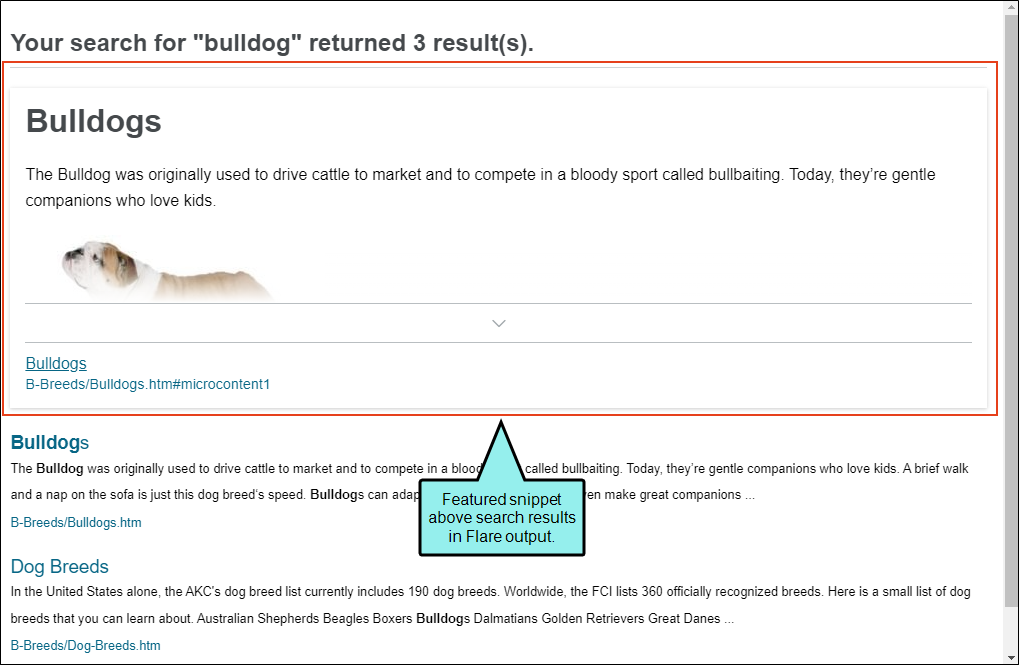
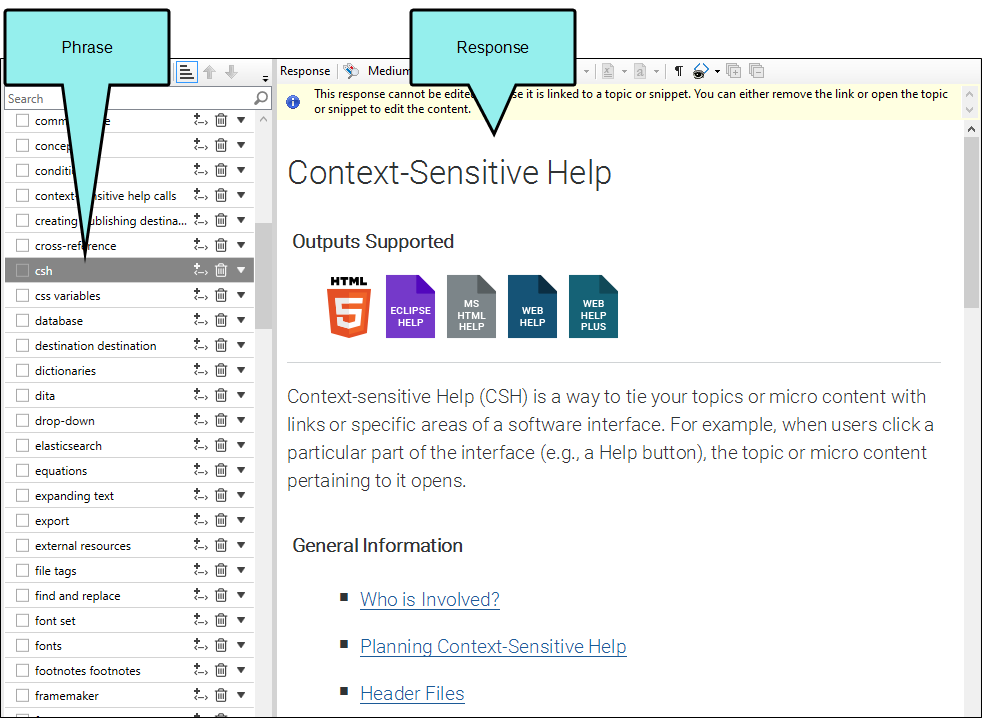
Micro Content
Micro content is short, concise information that stands alone and is easily consumable. In Flare, it begins with the creation of a collection of brief phrases and corresponding responses, such as questions and answers. After generating HTML5 output, these phrase/response combinations can be used in different ways as users interact with your output. For example, it can greatly improve the user experience when people search in your HTML5 output. It can also be used to create field-level context-sensitive Help.
Micro Content Editor
Output

With some extra effort and scripting outside of Flare, you can use micro content for other advanced purposes, such as chatbots.
Conditions
A condition is a single-sourcing feature that you can apply to files or different areas of your content. Conditions can determine whether certain information displays in some outputs but not in others. You can also control whether content displays on a certain device or screen size. For example, maybe you need to produce both online and print-based output. Much of the content you create is going to be the same for both outputs, but some of it is going to be written only for online output, and some only for print-based output. So you can create condition tags for each and use those tags to separate the content when you build your output.
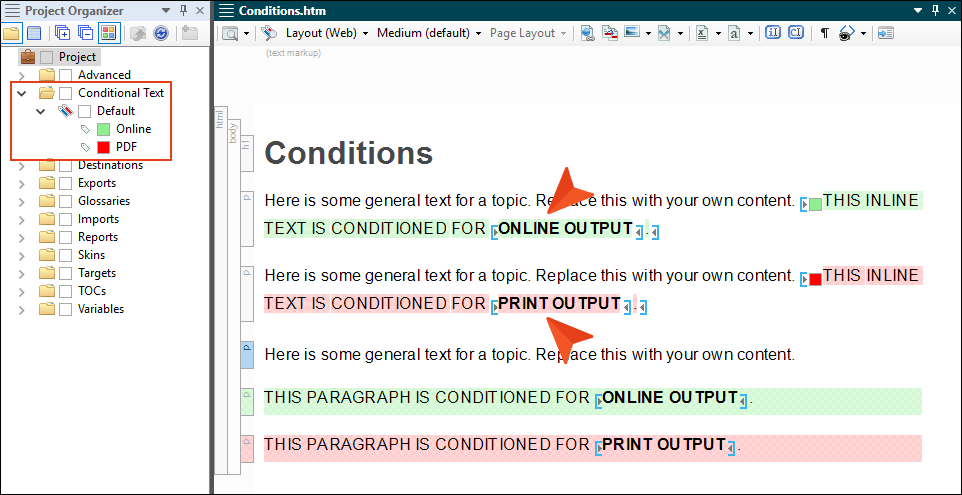
Conditions can also be used to make content responsive (e.g., content changes automatically according to the size of the screen, rather than simply based on “include” or “exclude”). Associating conditions with factory media queries (Web, Tablet, Mobile) can help make some content more appropriate or easier to read on different devices.
Tables of Contents
Creating and editing a table of contents file in Flare can be very easy to do for both online and print output. You can drag topics from the Content Explorer to the TOC Editor. You can also manually add TOC books and items, and then link them to other files. The links usually point to topics, but for online outputs they can also point to external files, other Help systems, and movies. You put all of these books and items in a structure that you think would be useful for the individual. In online output, end users browse through a TOC to find information. And in HTML5 Side and Top Navigation output, the TOC items become links in menus.
The TOC files you see in the Project Organizer work differently for online output than they do for print-based output. For online outputs, TOC files are exactly as their name suggests; they are files that create TOCs or menus in the output. But for print-based outputs, that same TOC file functions more like an outline. The element that actually generates a TOC in print-based output is called a “proxy,” which is inserted into a topic. You can manually create that proxy yourself, or you can select an option in the Advanced tab of the Target Editor and let Flare do it all for you. There are pros and cons for both methods.

Context-Sensitive Help
Context-sensitive Help (CSH) is a way to tie your topics or micro content with links or specific areas of a software interface. For example, when users click a particular part of the interface (e.g., a Help button), the topic or micro content pertaining to it opens.
Responsive Web Design
Responsive web design (RWD) is a way to construct your HTML5 output so that the display and content are adjusted automatically depending on the device. Therefore, on tablets and mobile devices such as smart phones, users will see a condensed look and perhaps different text that is more appropriate for those devices, compared with larger monitors. You can get the same effect if you shrink your browser to a smaller size.
There are two areas where RWD can be applied: (1) skin and (2) content.
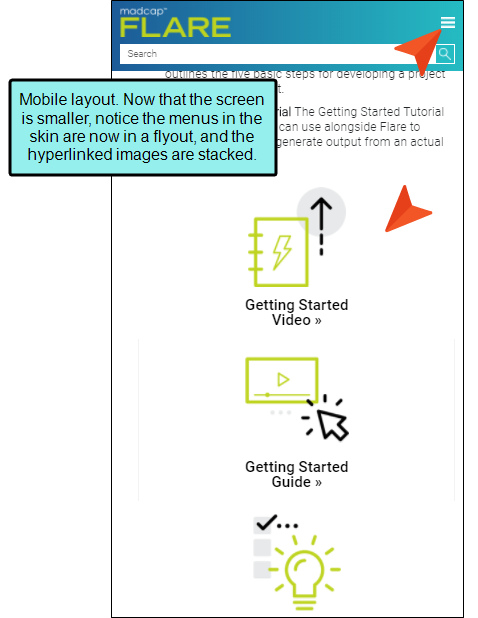
HTML5 Side and Top Navigation skins are always enabled for responsive output, but you can adjust some settings on the Skin tab in the Target Editor. For Tripane output, you can enable responsive output in the Skin Editor, and you can adjust the same settings as Side and Top Navigation output in the Target Editor. When a skin is responsive, the navigation elements (e.g., menu/table of contents items) are automatically adjusted depending on the size of the screen.
Depending on the output type, you can make your content responsive to different devices and screen sizes by using responsive conditions and responsive layouts, in conjunction with media queries.
Dynamic Preview
You can use the Preview window pane to see a quick preview for a topic, snippet, or template page. The Preview window pane is dynamic, allowing you to keep the preview open while you work and see changes as you make them in the XML Editor.
Initially, the window pane opens as a floating window. This can be quite useful if you are working with dual monitors, because you can drag the Preview window pane to one monitor while editing the topic in the other monitor. However, you always have the option of docking the Preview window pane to the interface.
See Previewing Topics.

Search
For HTML5 targets, you can choose the type of search engine you want people to use—MadCap Search, Google Search, or Elasticsearch (for Side Navigation, Top Navigation, or skinless output). There are additional steps that you can follow and features you can select, depending on the search engine you choose. For MadCap Search and Elasticsearch, you can include micro content in the output, which can especially enhance your search results.