Various enhancements have been made for projects that are bound to source control, especially Git.
[Menu Proxy — Headings — Online — Depth3 ]
New Shortcut Options in Status Bar
The following options are now visible in the status bar in the lower-right corner of Lingo when the project is bound to Git. These options make it easier to know which branch is active, as well as whether changes need to be committed or synchronized. You can also more quickly take actions on branches when necessary.
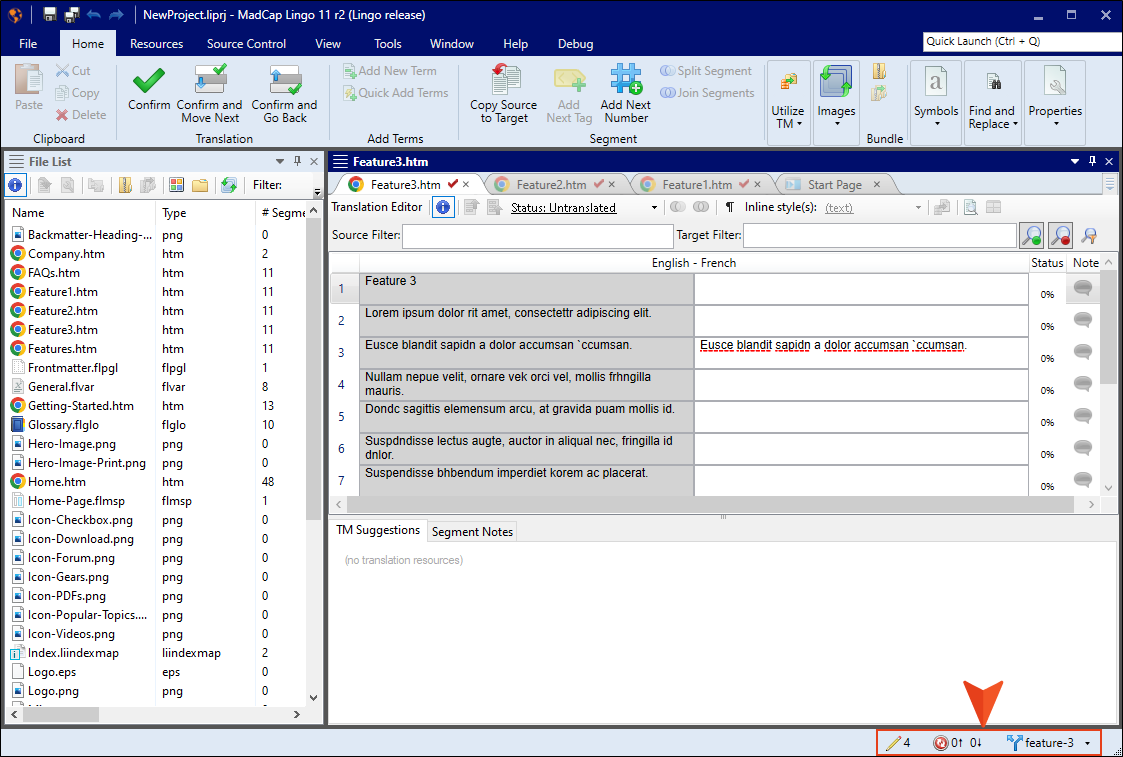
Note If you do not see this option, make sure View > Status Bar is enabled.
Changes to be Committed
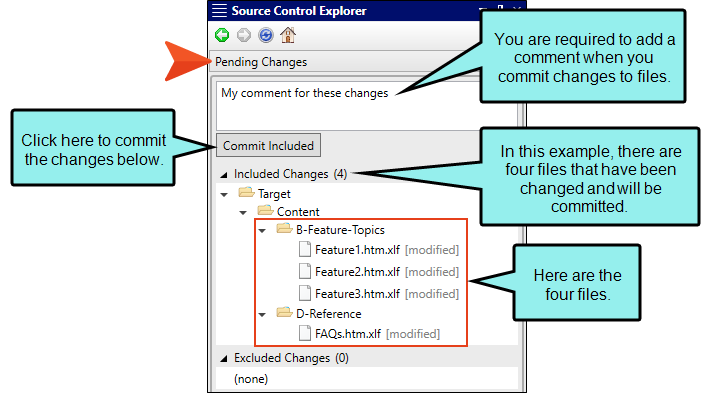
If you see a number next to this button, it indicates how many files with changes need to be committed.

Note A number might not always immediately be shown next to button. Clicking somewhere in the interface helps it to populate.
When you click the button, the Source Control Explorer opens. Select the Pending Changes view, which you can use to add a comment and commit the changes.
Commits to be Synchronized
If you see a number next to the up arrow on this button, it indicates that you have commits locally that need to be pushed to the remote repository.

If you see a number next to the down arrow on this button, it indicates that there are pending remote commits that you still need to pull to your local repository. A number displays here only after you do a fetch (i.e., "git fetch"). This is a command that you cannot perform from the Lingo interface, but you can do it using another tool such as Git Bash. Another way for a number to display next to the down arrow is if you first do a pull on one branch, then switch to another branch that has pending remote commits.

Note After committing changes, you might need to click somewhere in the interface before numbers populate next to this button.
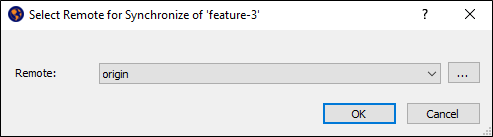
When you click the button, Lingo opens a dialog that lets you choose the remote repository. Lingo then synchronizes the changes, first pulling any commits from the remote repository (whether they include conflicting changes or not), and then pushing local commits up to the server.
If there are conflicts, the Resolve Conflicts dialog opens first, which you can use to select the changes from either repository or to merge the changes.
Once you are done resolving the conflicts, you need to try to synchronize the changes again.
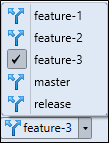
Current Branch
The option on the right displays the branch that is active.

If you click the button displaying the name, the Branch Management dialog opens, letting you work with branches (e.g., create, switch, delete).
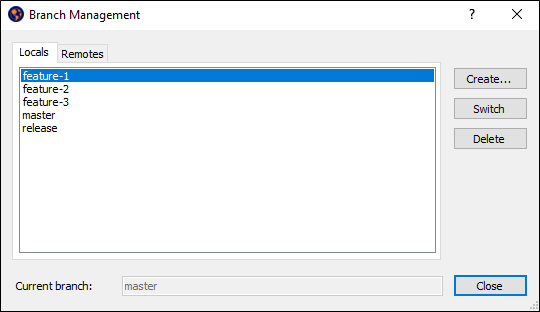
If you click the drop-down next to the button, you can see all of your other branches and select one to quickly switch to it.
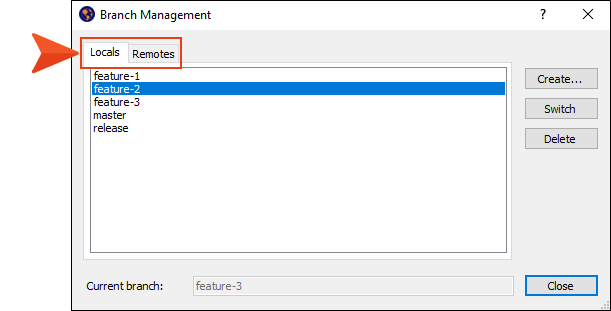
Branch Management Dialog Enhancements
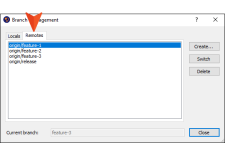
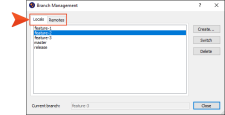
The Branch Management dialog now lets you see both local and remote Git branches. This means you can easily get remote branches that you don't yet have locally. Also, you can delete a branch either locally or remotely, or both.
How to Get a Remote Branch
-
With any branch selected as the active one, do a pull
-
Open the Branch Management dialog in one of the following ways:
-
Status Bar In the lower-right of Lingo, click the name of the active branch.
Note If you do not see this option, make sure View > Status Bar is enabled.
-
Ribbon Select Source Control > Branch (the face of the button, not the drop-down).
-
Right-Click If you have the Pending Changes or File List window pane open, right-click any file and select Source Control > Project > Branch.
-
-
Select the Remotes tab.
-
Select the branch you want to get (i.e., check out) from the remote repository, and click Switch. This adds the branch to the Locals tab, and it also makes that new local branch the active one in the Lingo interface.
-
Close the Branch Management dialog.

How to Delete Branches
-
Make sure the branch you want to delete is not the active branch.
-
Open the Branch Management dialog in one of the following ways:
-
Status Bar In the lower-right of Lingo, click the name of the active branch.
Note If you do not see this option, make sure View > Status Bar is enabled.
-
Ribbon Select Source Control > Branch (the face of the button, not the drop-down).
-
Right-Click If you have the Pending Changes or File List window pane open, right-click any file and select Source Control > Project > Branch.
-
-
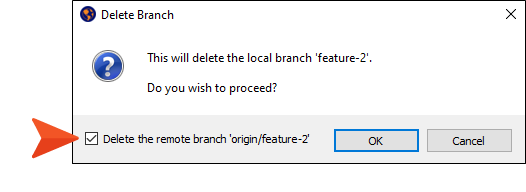
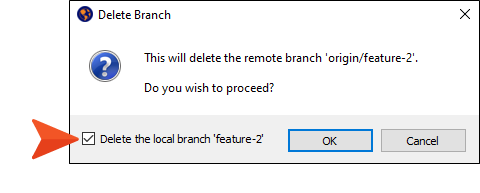
Select the Locals or the Remotes tab, depending on which branch you want to delete. If you want to delete a branch both locally and remotely, select either tab.
-
Select the branch you want to remove and click Delete.
-
If you selected a local branch, you are asked if you also want to delete the remote branch (if one exists). Click the check box if you do; otherwise, leave it disabled.
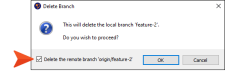
If you selected a remote branch, you are asked if you also want to delete the local branch (if one exists). Click the check box if you do; otherwise, leave it disabled.

-
Click OK.
-
Close the Branch Management dialog.
Bind Detection, Disabling Providers, and Unbinding Providers
Lingo has options for bind detection, disabling providers, and unbinding providers. Although these are separate features, they are all somewhat related. In fact, the bind detection option for Git can be used to automatically disable the provider for all your projects.
The new functionality in this version of Lingo revolves mostly around the ability to disable providers. However, information about bind detection and unbinding providers is also added below. This might help you better understand the relationships between these features.
Bind Detection
Lingo's bind detection settings are found on the Source Control tab of the Options dialog.
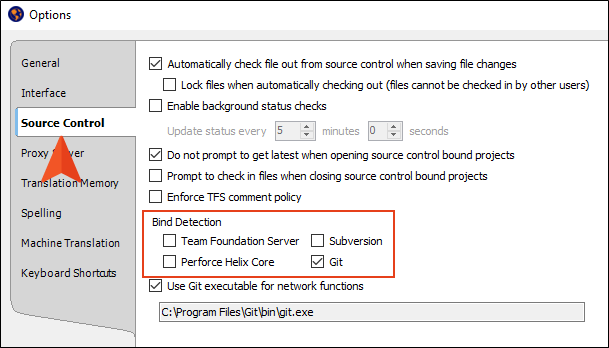
Bind detection scans your project when you load it to see if the project has been previously bound to source control. If a binding is detected, you then have the option of applying the binding and committing the project to source control. Depending on the provider you are using, Lingo may search the file system and its artifacts, as well as contact and query servers, to find potential source control bindings.
When you open a Lingo project that hasn't been bound to source control before, the bind detection option is disabled for Perforce Helix Core, Subversion, and Team Foundation Server. It is enabled by default for Git. If you bind a project to source control using the Lingo interface, the option is then automatically enabled.
Note If you bind a project to Git using the Lingo interface, the detection will automatically happen behind the scenes. If you use a tool outside of Lingo for the Git binding, you may or may not want to enable bind detection. For example, you might create a folder where you store all of your Lingo projects, and you use an external tool to create the bindings, with a .Git folder stored at the root level of that main folder. In that case, you would want the bind detection option on this tab disabled for Git.
Note You can use bind detection as an alternative to importing a Lingo project. If you have received a Lingo project file (e.g., by copying it from a server, by opening it from a network location), you can simply open the file and Lingo will search for and apply existing source control bindings.
Disabling Providers
By default, when a project is bound to source control, the provider (Git, Perforce Helix Core, Subversion, or Team Foundation Server) is enabled. This means that the source control interface elements in Lingo are visible, and you can use them to perform various tasks (e.g., commits, synchronize changes).
Disabling a provider means that the source control interface elements are no longer shown. This does not mean you cannot use source control. As long as the provider is still bound to the project, you can perform source control tasks in a third-party tool outside of Lingo.
How to Disable a Provider for All Projects Globally (Git Only)
This is the easiest method if you have multiple projects and you want to disable the Git provider in Lingo for all of them.
-
Select File > Options.
-
Select the Source Control tab.
-
In the Bind Detection section, remove the check mark next to Git.
-
Click OK.
-
Close the project and then reopen it so that the option can take effect.
The provider option that is found in the Project Properties dialog or the Settings view in the Source Control Explorer (i.e., the "Enabled" check box) will then automatically be disabled.
How to Disable a Provider in an Individual Project
Use this method if you want to disable a provider in just one project, rather than many projects.
-
Do one of the following, depending on the part of the user interface you are using:
-
Project Properties Select File > Project Properties.
-
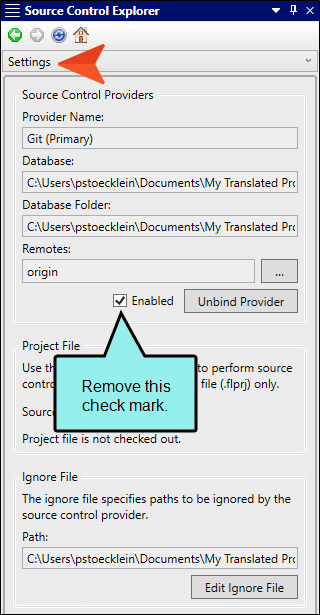
Source Control Explorer Select View > Source Control Explorer. Then, in the window pane, click Settings.
-
-
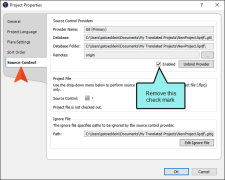
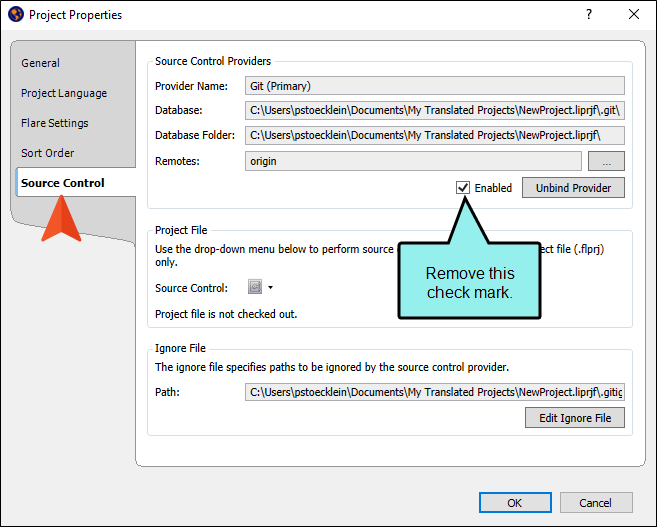
Click Enabled to remove the check mark.
PROJECT PROPERTIES DIALOG
SOURCE CONTROL EXPLORER

-
If you used the Project Properties dialog, click OK.
Note If you disable a Git provider, the local repository will continue to track your changes in case you later decide to enable the provider once again.
If you disable one of the other providers (Perforce Helix Core, Subversion, Team Foundation Server), your changes after that point will not be tracked. Therefore, if you later enable the provider again, it will not have recorded any changes made since the time that you disabled it.
Note When you disable a provider, that information is written to the registry on your computer.
Note If you disable a provider, but then perform one of the following actions in the Lingo interface, the provider will automatically become enabled once again.
-
Bind an existing project
-
Bind a new project
-
Import a project from source control
Note Having a provider enabled in Lingo does not interfere with your workflow if you are performing source control actions exclusively outside of Lingo. Even if a provider is enabled in the project and the source control user interface elements are visible, this does not mean Lingo is automatically performing any source control actions with your files. It simply means Lingo is recognizing the binding, so it reflects your activities (e.g., the Pending Changes window is populated when you make edits in topics). However, if you prefer not to see any of this in Lingo, you can disable the provider.
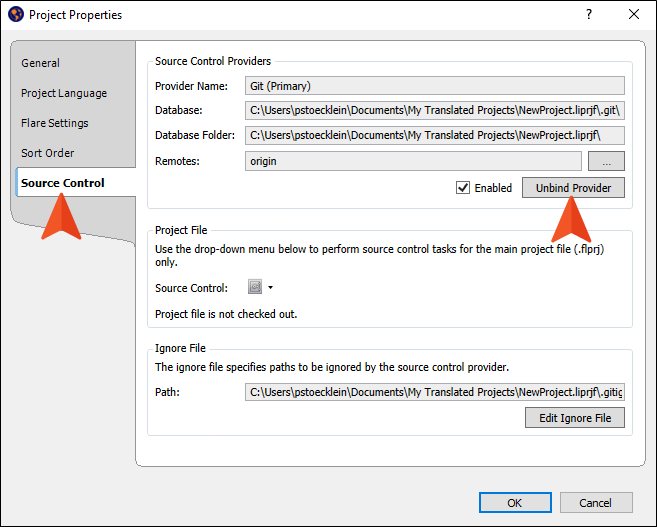
Unbinding Providers
When you unbind a provider, it means you are removing the connection altogether between the Lingo project and the local repository.
You can unbind a provider via the Project Properties dialog or the Settings view in the Source Control Explorer. Click the Unbind Provider button.
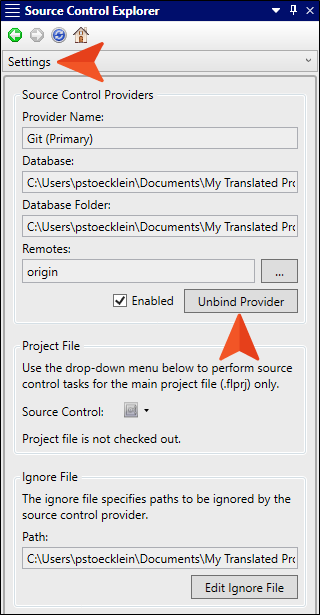
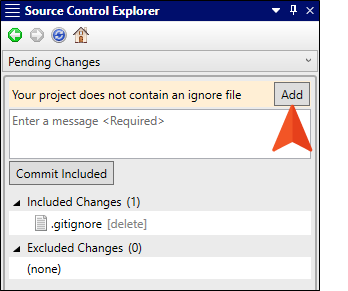
Ignore File for Git
The .git folder is the local repository for a Lingo project and is included when your project is bound to Git. The contents of this folder are updated automatically when you perform source control tasks. The additional .gitignore file is necessary to make sure that certain folders are ignored when you push and pull files. In most cases, you do not need to do anything with the .git folder or .gitignore file.
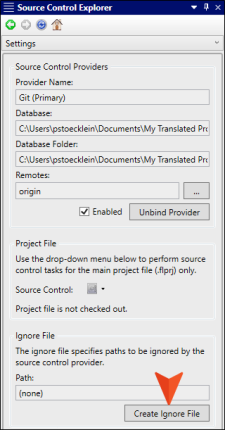
If you bind a project to Git outside of Lingo (i.e., you do not use Lingo's interface to do the binding), you should make sure that you have a .gitignore file. You can add the .gitignore file by selecting an option in the Source Control Explorer or Project Properties dialog. Once you have a project containing a .gitignore file, the button in the interface changes to "Edit Ignore File," so that you can open the file to make edits to it.
How to Add an Ignore File
The following steps show how to do this in the Source Control Explorer. You can also accomplish this in the Project Properties dialog (Project > Project Properties) on the Source Control tab.
-
Select View > Source Control Explorer.
-
Do one of the following:
-
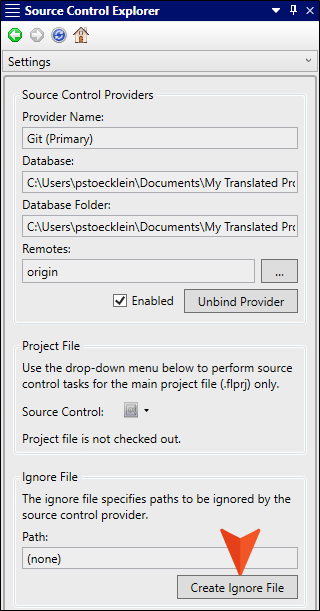
Click Settings. Then in the Ignore File section, click Create Ignore File.
-
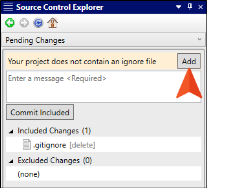
Click Pending Changes. Then next to the message at the top, click Add.
-
-
Make edits in the Text Editor and save your changes.
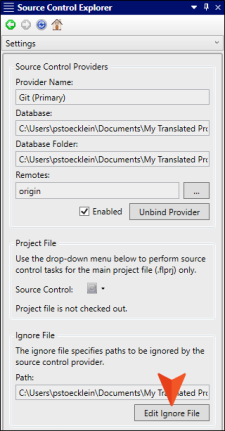
How to Edit an Ignore File
The following steps show how to do this in the Source Control Explorer. You can also accomplish this in the Project Properties dialog (Project > Project Properties) on the Source Control tab.
-
Select View > Source Control Explorer.
-
Click Settings.
-
In the Ignore File section, click Edit Ignore File.
-
Make edits in the Text Editor and save your changes.


