


In addition to creating regular index entries that point to a specific place in your project, you can also create index links. An index link is an entry in a generated index that points to another entry. There are three kinds of index links—"See," "See Also," and "Sort As."
[Menu Proxy — Headings — Online — Depth3 ]
Examples
Example — See Link
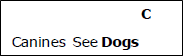
You have written several topics about dogs, and in each of those topics you have inserted an index marker labeled "Dogs." Therefore, when users look in the index under "Dogs," they will be able to quickly find any of those topics. But what if users do not look under "Dogs," but rather "Canines"?
There are a couple of options to solve the problem. First, you could add index markers labeled "Canines" in all of those topics. A second option is to create an index "see" link for "Canines" that points users to "Dogs." In the output, it might look something like this:
Example — Sort As Link
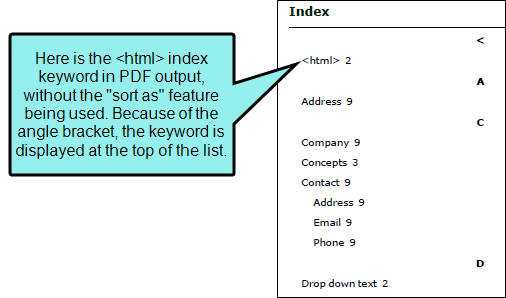
You add "<html>" as an index keyword. Normally, without the "Sort As" feature, the keyword would be placed at the top of the index list, before the alphabetized keywords.
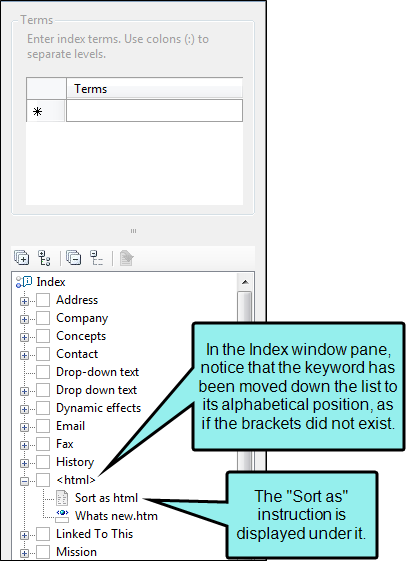
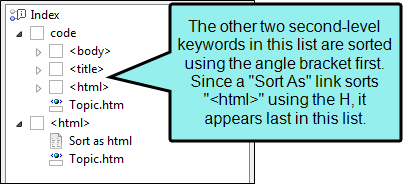
This occurs not only in the output, but also in the Index window pane in your project.

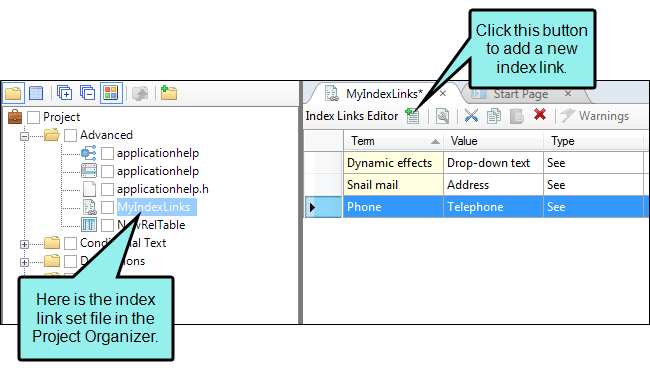
After adding an index link set file—which is stored in the Advanced folder in the Project Organizer—you can create a new index link for this keyword in the Index Links Editor.

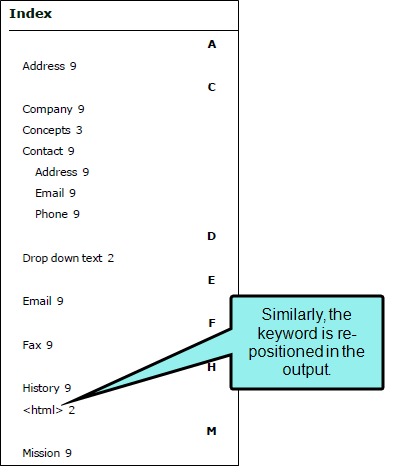
"Sort As" links apply to both first- and second-level keywords. If you were to use the term "<html>" as both a first- and second-level keyword, the second-level keyword would also be repositioned based on the "Sort as" link.
How to Create Index Links Using the Index Links Editor
- Do one of the following, depending on the part of the user interface you are using:
Ribbon Select Project > New > Advanced > Add Index Link Set.
- Right-Click In the Project Organizer, right-click on the Advanced folder and from the context menu select Add Index Link Set.
The Add File dialog opens.
- In the File Type field at the top, make sure Index Link Set is selected.
- In the Source area, choose to create the new file based on a template or an existing file.
- New From Template Choose either a factory template file or one of your own custom template files as a starting point. The new file will take on all of the settings contained in the template. If you want to use the factory template provided by Flare, expand the Factory Templates folder and click on a template file. If you want to use your own custom template file, expand the appropriate folder and click on a file.
- New From Existing Choose an existing file of the same type as a starting point for your new file. As with template files, your new file will take on all of the settings contained in the file you select. To use this option, click
 , use the Open File dialog to find a file, and double-click it.
- New From Template Choose either a factory template file or one of your own custom template files as a starting point. The new file will take on all of the settings contained in the template. If you want to use the factory template provided by Flare, expand the Factory Templates folder and click on a template file. If you want to use your own custom template file, expand the appropriate folder and click on a file.
- (Optional) If you want to place the file into a subfolder previously created in the Content Explorer or Project Organizer, in the Folder field click and select the subfolder. Otherwise, keep the default location.
- In the File Name field, provide a name for the index link set file.
- (Optional) If you want to apply condition tags to the file, expand the Attributes section at the bottom of the dialog. Next to the Condition Tags field, click and select the conditions you want to apply. Click OK.
- (Optional) If you want to apply file tags, expand the Attributes section at the bottom of the dialog. Next to the File Tags field, click and select the file tags you want to apply. Click OK.
- Click Add. The Index Links Editor opens. Also, the index link file (.flixl extension) is added to the Advanced folder in the Project Organizer. In the future, you can open the index link set from there.
-
For each index link that you want to create for a particular term, complete the following steps in the Index Links Editor.
- In the local toolbar, click
 . The Index Link dialog opens and a new row is added to the editor.
 -
In the Term field, type the term that you anticipate users may look for in the generated index. Please note that the fields in this dialog are case-sensitive; therefore, if you enter a term in all lowercase letters, that is how it will be displayed in the output.
If you want to create a multi-level index entry, separate the first-level term and the second-level term with a colon (e.g., a single-level entry might be "Pasta"; a multi-level entry might be "Pasta:rigatoni").
If you want to insert a variable in a field, you can click
 . The variable will appear as syntax in the field, but in the output the variable definition will be shown.
Note If you want to see the variable syntax replaced by the variable definition, click
 in the local toolbar of the editor. This shows you the "Evaluated
 -
Select a link type—See, See Also, or Sort As.
Use a "See" link if the term in question does not exist in the project as an index marker. The idea is that, if a user looks for that term in the index, you want to point the person to a different term instead of the one originally sought. You can enter one "See" link per term.
Use a "See Also" link if the term in question does exist as an index marker somewhere in the project. The idea is that, if a user looks for that term in the index, you want to point the person to a different term in addition to the one originally sought. You can create as many "See Also" links for a term as you like.
Use a "Sort As" link if you want to sort an index keyword as something else. This can be useful when a keyword begins with a symbol (e.g., place <html> in the "h" section, instead of at the top of the index) or if you are using character sets that should be sorted phonetically. "Sort As" links apply to both first-level terms and second-level terms (e.g., if you sort the first-level term "<html>" as "html," the index will also sort the second-level term "code:<html>" as "code:html").
-
In the Linked Term(s) field, enter the existing index entry that you want users to look for, or the term as you want it to be sorted in the list. If you want to create a multi-level index entry, separate the first-level term and the second-level term with a colon.
If you want to insert a variable in a field, you can click
. The variable will appear as syntax in the field, but in the output the variable definition will be shown. - Click OK.
- In the local toolbar, click
- Click
") to save your work.
to save your work.
How to Create Index Links Using the Index Window Pane
- Do one of the following:
- Ribbon Select View > Index Window.
- Keyboard Shortcut Press F9 on your keyboard.
The Index window pane opens. The window pane is split into two sections—the Terms area at the top and the Explorer area at the bottom. If you want to see more or less of either section, you can click the splitter
 between them and drag it up or down.
-
Right-click in the explorer area at the bottom of the window pane, and from the context menu select Add Index Link.
Note In order to see this option in the context menu, you must already have at least one entry in the index. Also, the option is not displayed if you right-click on the root Index heading; you must right-click below it.
-
If you do not yet have an index link set in your project, the Add Index Link Set dialog opens; continue with the next step.
If you already have an index link set in your project, skip to step 11. The index links you create at this point will be added to the first index link set listed in the Advanced folder of the Project Organizer (if there is more than one index link set).
- In the Source area, choose to create the new file based on a template or an existing file.
- New From Template Choose either a factory template file or one of your own custom template files as a starting point. The new file will take on all of the settings contained in the template. If you want to use the factory template provided by Flare, expand the Factory Templates folder and click on a template file. If you want to use your own custom template file, expand the appropriate folder and click on a file.
- New From Existing Choose an existing file of the same type as a starting point for your new file. As with template files, your new file will take on all of the settings contained in the file you select. To use this option, click , use the Open File dialog to find a file, and double-click it.
- New From Template Choose either a factory template file or one of your own custom template files as a starting point. The new file will take on all of the settings contained in the template. If you want to use the factory template provided by Flare, expand the Factory Templates folder and click on a template file. If you want to use your own custom template file, expand the appropriate folder and click on a file.
- (Optional) If you want to place the file into a subfolder previously created in the Content Explorer or Project Organizer, in the Folder field click and select the subfolder. Otherwise, keep the default location.
- In the File Name field, provide a name for the index link set file.
- (Optional) If you want to apply condition tags to the file, expand the Attributes section at the bottom of the dialog. Next to the Condition Tags field, click and select the conditions you want to apply. Click OK.
- (Optional) If you want to apply file tags, expand the Attributes section at the bottom of the dialog. Next to the File Tags field, click and select the file tags you want to apply. Click OK.
- Click Add.
-
Click OK. The Index Link dialog opens. In addition, the Index Links Editor opens. Finally, the index link file (.flixl extension) is added to the Advanced folder in the Project Organizer. In the future, you can open the index link set from there.

-
In the Term field, type the term that you anticipate users may look for in the generated index. Please note that the fields in this dialog are case-sensitive; therefore, if you enter a term in all lowercase letters, that is how it will be displayed in the output.
If you want to create a multi-level index entry, separate the first-level term and the second-level term with a colon (e.g., a single-level entry might be "Pasta"; a multi-level entry might be "Pasta:rigatoni").
If you want to insert a variable in a field, you can click
. The variable will appear as syntax in the field, but in the output the variable definition will be shown.Note If you want to include a variable, you should add the variable first, before entering any other text. Adding a variable will clear any additional text in the field.
Note If you want to see the variable syntax replaced by the variable definition, click
in the local toolbar of the editor. This shows you the "Evaluated -
Select a link type—See, See Also, or Sort As.
Use a "See" link if the term in question does not exist in the project as an index marker. The idea is that, if a user looks for that term in the index, you want to point the person to a different term instead of the one originally sought. You can enter one "See" link per term.
Use a "See Also" link if the term in question does exist as an index marker somewhere in the project. The idea is that, if a user looks for that term in the index, you want to point the person to a different term in addition to the one originally sought. You can create as many "See Also" links for a term as you like.
Use a "Sort As" link if you want to sort an index keyword as something else. This can be useful when a keyword begins with a symbol (e.g., place <html> in the "h" section, instead of at the top of the index) or if you are using character sets that should be sorted phonetically. "Sort As" links apply to both first-level terms and second-level terms (e.g., if you sort the first-level term "<html>" as "html," the index will also sort the second-level term "code:<html>" as "code:html").
-
In the Linked Term(s) field, enter the existing index entry that you want users to look for, or the term as you want it to be sorted in the list. If you want to create a multi-level index entry, separate the first-level term and the second-level term with a colon.
If you want to insert a variable in a field, you can click
. The variable will appear as syntax in the field, but in the output the variable definition will be shown. - Click OK.
- Click to save your work.
How to Create Index Links When Inserting Markers
- Open the content file.
- Click at the location in the topic where want to insert an index keyword.
- Do one of the following:
- Ribbon Select View > Index Window.
- Keyboard Shortcut Press F9 on your keyboard.
The Index window pane opens.
- Click in an empty field in the Terms column.
-
Type the index link using one of the following formats, depending on whether you want to create a "See," "See Also," or "Sort As" link:
{nopage}My Entry{see}Linked Entry
{nopage}My Entry{seealso}Linked Entry
{nopage}My Entry{sortas}Linked Entry
Use a "See" link if the term in question does not exist in the project as an index marker. The idea is that, if a user looks for that term in the index, you want to point the person to a different term instead of the one originally sought. You can enter one "See" link per term.
Use a "See Also" link if the term in question does exist as an index marker somewhere in the project. The idea is that, if a user looks for that term in the index, you want to point the person to a different term in addition to the one originally sought. You can create as many "See Also" links for a term as you like.
Use a "Sort As" link if you want to sort an index keyword as something else. This can be useful when a keyword begins with a symbol (e.g., place <html> in the "h" section, instead of at the top of the index) or if you are using character sets that should be sorted phonetically. "Sort As" links apply to both first-level terms and second-level terms (e.g., if you sort the first-level term "<html>" as "html," the index will also sort the second-level term "code:<html>" as "code:html").
Example You want to see this in the output:
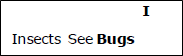
In that case, you would type this in the Index window pane:
{nopage}Insects{see}Bugs
If you want to add a second level to either index keyword, type a colon after the first term, and then type the second term.
If you want to insert a variable in a field, you can click
. The variable will appear as syntax in the field, but in the output the variable definition will be shown.Note If you want to include a variable, you should add the variable first, before entering any other text. Adding a variable will clear any additional text in the field.
Note If you want to see the variable syntax replaced by the variable definition, click
in the local toolbar of the editor. This shows you the "Evaluated - Press ENTER. The index keyword link is displayed within a marker in front of the word where you added it (as long as markers are turned on).
- Click to save your work.
What’s Noteworthy?
Note The option to create index links when inserting index markers is not supported in Microsoft Word or Eclipse Help output.
Additionally, "Sort As" links are not supported in Microsoft Word or Eclipse Help, or Microsoft HTML Help outputs.
Note If you create an index link to another term, you must make sure that you have added that other term to the index (by manually inserting index markers or creating an auto-index). If a linked term is not found when the index is generated, a warning is issued and the link is skipped. Also, if a link term (the one pointing to a linked term) has been added to the index, a warning is issued and the link is skipped.
What’s Next?
If you are creating print-based output, make sure you also create a topic with an Index proxy. See Creating an Index Manually for Print.
You also may want to edit your index links. For example, you may want to use span styles to change the look of the index links (e.g., displaying the term in bold to make it stand out). Another way to edit index links is to change the "See" or See also" references to different text (e.g., change "See also" to "Also see"). See Editing Index Links.
Note The span style method is not available for the web-based outputs (HTML5, Clean XHTML, WebHelp, WebHelp Plus).

