Mimic offers dozens of features to assist you in producing movies. Following are some of the key features.
General
Following are some general key features in Mimic.
Integration With Flare
Mimic can be used for many purposes (e.g., technical support, sales, marketing), but it is especially suited for Flare authors and was designed with those individuals in mind. Therefore, Mimic is tightly integrated with MadCap Flare. This means that it is very easy to start the movie-making process from Flare and to quickly incorporate the finished movie into your output.
Integration With Lingo
One of the easiest ways to translate a Mimic collection or movie is for a translator to open that collection or movie within MadCap Lingo, which is tightly integrated with Mimic. Because of this integration, there is no need to transfer localized files outside of the actual collection or movie, which helps prevent content and formatting corruption. For more information, please refer to the documentation provided with MadCap Lingo.
XML File Format
Mimic movie files are XML-based. This means that they can be opened and modified with third-party XML tools.
Unicode Support for Left-to-Right and Right-to-Left Languages
Mimic is fully Unicode capable, making it possible to handle the entire world's Unicode language characters. This includes English, French, German, Japanese, Chinese, Arabic, Persian, Hebrew, multi-byte languages, and more.
Interface
Following are some key features of the Mimic user interface.
Multiple Documents Open Simultaneously
Mimic is unique in that you can have multiple documents open in the interface simultaneously.
Example
If you want to work on
Floating and Dockable Window Panes
You can "float" window panes and editors, which lets you then click and drag them wherever you want in the interface. A window pane can be attached (or "docked") to the sides, top, or bottom of the program interface.
Window Layouts
You can save a custom configuration (layout) of your workspace.
Tab Options
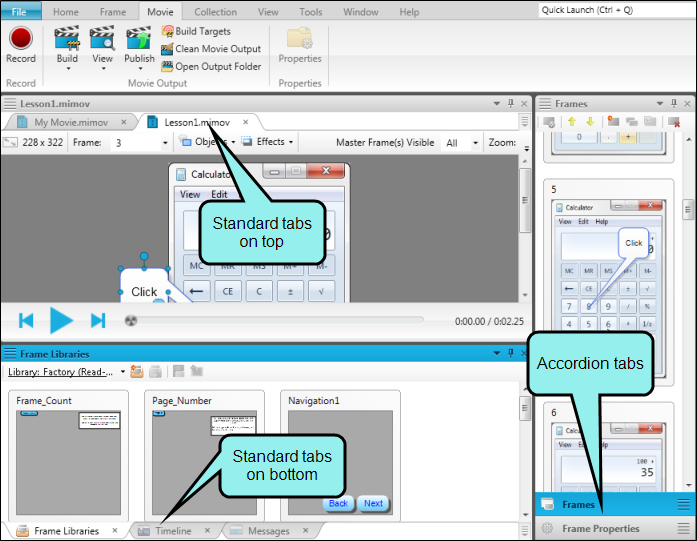
You can choose how to view window panes in the workspace:
- Accordion Tabs Stacks the document tabs below the window pane or editor.
- Standard Tabs on Top Places the document tabs on the top of the window pane or editor.
- Standard Tabs on Bottom Places the document tabs on the bottom of the window pane or editor.
To switch between tab types, right-click in the title bar of the window pane or editor and select a view.
Quick Access Toolbar
You can create a Quick Access toolbar at the top of the workspace to display options that you use most often. When options are added to the Quick Access toolbar, they are easily accessible, regardless of the ribbon that is open.
By default the Save, Save All, Undo, and Redo buttons are already added to the toolbar. However, you can add others as well.
See Quick Access Toolbar.
Quick Launch Bar
The Quick Launch bar lets you search for any Mimic file or command. It is located in the upper-right corner of the interface. You can press CTRL+Q on your keyboard to move focus to the Quick Launch bar so you can begin typing.
See Quick Launch Bar.
Enhanced Undo and Redo
Mimic's undo and redo functions are enhanced as follows:
- Unlimited You can undo or redo an unlimited number of times, back to the last time you opened the document, even after you have saved it.
- Multiple Buffers Each document in the Mimic interface has its own Undo/Redo buffer. This means that you can undo actions in one document and then switch to another document and undo actions specific to that file.
Creation
Following are some of the unique movie creation features available in Mimic.
Collection-Oriented Workflow
In addition to creating standalone movies, Mimic works with the concept of collections. Each collection can contain several individual movies. This lets you easily and quickly link smaller movies together to form larger ones.
Recording Modes
When you record a movie, you can select whether to capture images automatically, manually, or with full-motion video (FMV).
PowerPoint Import
In addition to creating a movie by recording your actions, you can also create a movie by importing a Microsoft PowerPoint presentation.
Enhancement
Following are some of the unique movie enhancement features available in Mimic.
Interactive Live Preview with Synchronized Audio
The Movie Editor includes an integrated play bar and buttons that allow you to review any part of a frame or movie, viewing it directly in the Movie Editor. In addition, the audio associated with the movie or frame is synchronized with the preview.
Keyframes for Animating Objects
Keyframes indicate points within a frame where an object will transition from its current state to a new state. In other words, whenever a keyframe transition happens, the object's properties change. Movies that include keyframes show seamless object transitions from one state to the next.
Animated Typing Boxes
Not only can you add boxes for users to type input during a movie, but you can also add animated typing boxes automatically or manually to movie frames. Animated typing boxes allow users to watch the typing occur before their eyes.
Input Typing Boxes
If you want users to enter input into a particular movie frame, you can add an input typing box. You can also add actions to the input box, such as displaying a feedback bubble when the user enters the correct text.
Effects
You can quickly apply several different kinds of effects to objects in your movies. These include effects that let you highlight an area by applying opacity, blur, or gray scale to everything around it.
Visual Timeline
Use Mimic's visual timeline to synchronize objects in a movie frame. You can specify how long each object should be displayed in a frame, including the specific moment when it should be shown. You can also switch between the default view of the current frame or the entire movie.
Single-Sourcing
Mimic has numerous single-sourcing features that save you time and effort by letting you create content once and reuse it in multiple places. This includes the following features.
Condition Tags and Targets
A condition tag is a way to mark movies, frames, or objects that you want to include in some outputs, but exclude from other outputs. They work in conjunction with targets, which are separate instances of an output type.
Frame Libraries
A frame library lets you store often-used frames so that you can quickly insert them into movies later.
Master Frames
Master frames let you easily and quickly apply certain elements (e.g., buttons, image objects) to many frames at once. In addition, if you need to make a change to any of those elements, you only need to do so in the master frame; as a result, all frames using that master frame will automatically display the changes.
Palettes
After you create a movie, you can add various types of objects (such as shapes, lines, and cursors) to the individual frames. A palette is an element that lets you store objects for later use. You can also link to external palettes, which lets you access palettes saved by your teammates.
Variables
In addition to adding regular text to frame objects, you can also insert variables (reusable text). Not only can you create variables in Mimic, but you can also link to variables that already exist in a MadCap Flare project.
Output
Mimic lets you generate movies in web-based and print formats. Following are the output options available in Mimic.
Web or Desktop Output
You can create movie output that can be accessed from a web server or locally on a desktop with the HTML5 format (WebM and MP4 files).
HTML5 is a movie format that uses the <video> element instead of <object> and can be viewed on any browser that supports HTML5 content. Most newer browsers support the <video> element, including Internet Explorer 9, Firefox, Opera, Chrome, and Safari. Older browsers such as Internet Explorer 8 do not. HTML5 can also be used to generate a standalone video file to play your movies on an iPhone or upload them to YouTube or Vimeo.
Print-Based Output Option
You can create print-based movie output with the Adobe PDF format. This output format is ideal for distributing print versions of your movies. You can also use this format to plan future movies or review existing ones.
Short for "Portable Document Format," PDF is an open standard format for electronic documentation exchange invented by Adobe. PDF files are used to represent a two-dimensional document in an device- and resolution-independent fixed-layout format.
Build Output at the Command Line
You can easily generate movie output from the interface. However, you can also build movies from your operating system's command line. Using this method, you do not have to open Mimic at all. The best way to use the command line feature is to create a batch file with the necessary commands in it. Then you can use a scheduling tool (such as the Task Scheduler utility in Windows) to run the batch file automatically whenever you want.
Upload Movies to YouTube and Vimeo
If you generate non-interactive output using the HTML5 format, you can upload the video to YouTube or Vimeo.
