


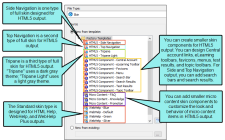
Flare may provide you with an initial skin in your project. You can open this skin, edit its settings, and associate it with any targets you want to build. However, you might decide to add another skin to the project so that you have different skins for different targets. For HTML5 output, you can also add smaller skin components
[Menu Proxy — Headings — Online — Depth3 ]
How to Add a Skin or a Skin Component File
- Do one of the following, depending on the part of the user interface you are using:
- Ribbon Select Project > New > Skin.
- Right-Click In the Project Organizer, right-click on the Skins folder and from the context menu select Add Skin.
The Add File dialog opens.
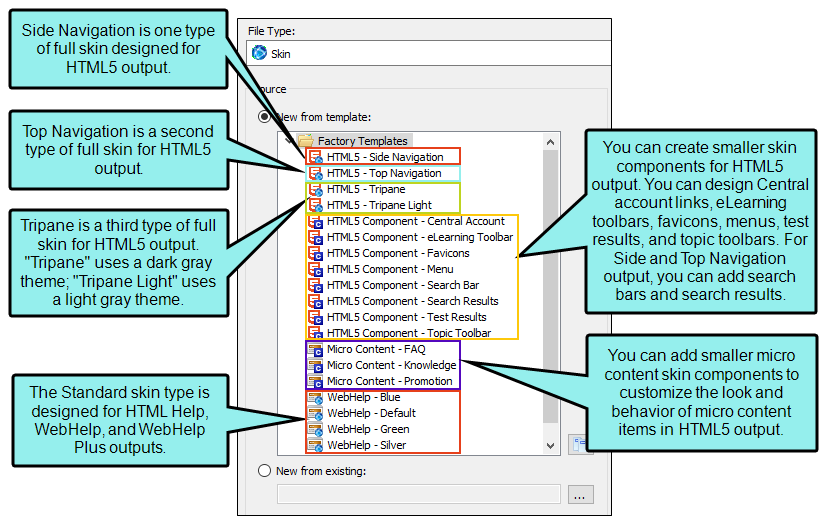
- In the File Type field at the top, make sure Skin is selected.
-
In the Source area, choose to create the new file based on a template or an existing file.
- New From Template Choose either a factory template file or one of your own custom template files as a starting point. The new file will take on all of the settings contained in the template. If you want to use the factory template provided by Flare, expand the Factory Templates folder and click on a template file. If you want to use your own custom template file, expand the appropriate folder and click on a file.
- New From Existing Choose an existing file of the same type as a starting point for your new file. As with template files, your new file will take on all of the settings contained in the file you select. To use this option, click
 , use the Open File dialog to find a file, and double-click it.
There are multiple kinds of skins for the various types of outputs.
- New From Template Choose either a factory template file or one of your own custom template files as a starting point. The new file will take on all of the settings contained in the template. If you want to use the factory template provided by Flare, expand the Factory Templates folder and click on a template file. If you want to use your own custom template file, expand the appropriate folder and click on a file.
- (Optional) If you want to place the file into a subfolder previously created in the Content Explorer or Project Organizer, in the Folder field click and select the subfolder. Otherwise, keep the default location.
- In the File Name field, type a new name for the skin.
- (Optional) If you want to apply condition tags to the file, expand the Attributes section at the bottom of the dialog. Next to the Condition Tags field, click and select the conditions you want to apply. Click OK.
- (Optional) If you want to apply file tags, expand the Attributes section at the bottom of the dialog. Next to the File Tags field, click and select the file tags you want to apply. Click OK.
- Click Add. The skin is added to the Skins folder in the Project Organizer. The Skin Editor opens to the right.
Note You can download a variety of free skins with different looks from the MadCap Software website.
http://madcapsoftware.com/downloads/flareskingallery.aspxAfter downloading the skin, you can import it into your project.
See Importing Skins.
What’s Next?
After you add a new skin, you can edit its settings and then associate it with a target. See Editing Skin Settings and Associating Skins With Targets.
If you add HTML5 skin components, you also have the option of associating them with proxies and targets.
- Creating a Central Account Link
- Adding an eLearning Toolbar Proxy
- Creating a Topic Menu
- Creating a Search Bar
- Creating Search Results
- Customizing a Results Page
- Inserting Topic Proxies (i.e., FAQ Proxy, Knowledge Proxy, Promotion Proxy)
- Inserting and Editing a Topic Toolbar Proxy
- Associating Skin Components With Targets
The Favicons skin component is the only one that is not associated with a proxy. Simply by adding and editing this type of skin component, your HTML5 output will include favicons (“favorite icons”) in the appropriate locations.
