Use the following steps to create a new topic using the Add File dialog.
How to Create a Topic
-
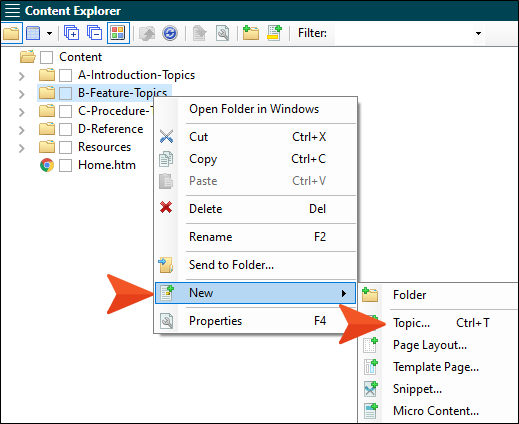
In the Content Explorer, right-click on a folder and from the context menu select New > Topic.
Tip When adding a new file to the Content Explorer, the recommended method is to right-click on the folder in the Content Explorer and use the New menu option. This is the most efficient way to direct the new file to the folder where you want to store it. That's because the Add File dialog opens when you add a new content file, and this method ensures that the folder you want is already selected in that dialog.
Other Options
- Ribbon Open the Project ribbon and select New > Topic.
- Local Toolbar In the local toolbar of the Content Explorer click
 .
. - Keyboard Shortcut Press CTRL+T.
-
Select a template.
- New From Template Choose either a factory template file or one of your own custom template files as a starting point. The new file will take on all of the settings contained in the template. If you want to use the factory template provided by Flare, expand the Factory Templates folder and click on a template file. If you want to use your own custom template file, expand the appropriate folder and click on a file.
- NewTopic.htm This creates a regular topic with default text that you can replace. This is the template that you will select most of the time.
- TopicForEndnotes.htm This creates a topic with an Endnotes proxy, which can be used to generate a list of all your end notes (footnotes) when you build print-based output.
- TopicForGlossary.htm This creates a topic with a Glossary proxy, which can be used to generate a list of all your glossary terms and definitions when you build print-based output.
- TopicForIndex.htm This creates a topic with an Index proxy, which can be used to generate an index when you build print-based output.
- TopicForListOfConcepts.htm This creates a topic with a Concepts proxy, which can be used to generate a list of all your concept keywords when you build print-based output.
- TopicForListOfElements.htm This creates a topic with a List-Of proxy, which can be used to generate a list of any kind of element you want when you build print-based output.
- TopicForListOfImages.htm This creates a topic with a List-Of proxy, which can be used to generate a list of all of your images when you build print-based output.
- TopicForListOfTables.htm This creates a topic with a List-Of proxy, which can be used to generate a list of all of your tables when you build print-based output.
- TopicForMiniTOC.htm This creates a topic with a mini-toc proxy, which can be used to generate a small table of contents when you build online or print-based output.
- TopicForTOC.htm This creates a topic with a TOC proxy, which can be used to generate a full table of contents when you build print-based output.
- New From Existing Choose an existing file of the same type as a starting point for your new file. As with template files, your new file will take on all of the settings contained in the file you select. To use this option, click
 , use the Open File dialog to find a file, and double-click it.
- New From Template Choose either a factory template file or one of your own custom template files as a starting point. The new file will take on all of the settings contained in the template. If you want to use the factory template provided by Flare, expand the Factory Templates folder and click on a template file. If you want to use your own custom template file, expand the appropriate folder and click on a file.
-
In the File Name field type a new name for the topic.
(Optional) The Folder field is automatically populated with the folder that has focus in the Content Explorer. If you want to place the file into a folder that you previously created in the Content Explorer, in the Folder field click
and select the subfolder. Otherwise, keep the default location. Note Spaces are allowed in the file name. However, if you are publishing output to a UNIX system, avoiding spaces in the file name is recommended. You can use underscores in place of spaces.
-
(Optional) You can complete additional fields at the bottom of the dialog.
- 1st Heading If you want the heading for the topic to use the same text that you provide for the file name, leave this field blank. Otherwise, enter the text that you want to use for the heading in the topic.
- Title You can give the topic a title for the file. This does not refer to the visual title (or heading) at the top of the topic. Rather, it refers to the properties title for the topic (
- Stylesheet Select a stylesheet to associate with the new topic. If you do not have a stylesheet in your project, this field remains blank. This field is disabled if you have applied a primary stylesheet.
- Style If you want the heading for the topic to use the default h1 style, leave this field blank. Otherwise, select a style to apply to the heading in the topic.
- Condition Tags If you want to apply condition tags to the file, expand the Attributes section at the bottom of the dialog. Next to the Condition Tags field, click and select the conditions you want to apply. Click OK.
- File Tags If you want to apply file tags, expand the Attributes section at the bottom of the dialog. Next to the File Tags field, click and select the file tags you want to apply. Click OK.
- Click Add.