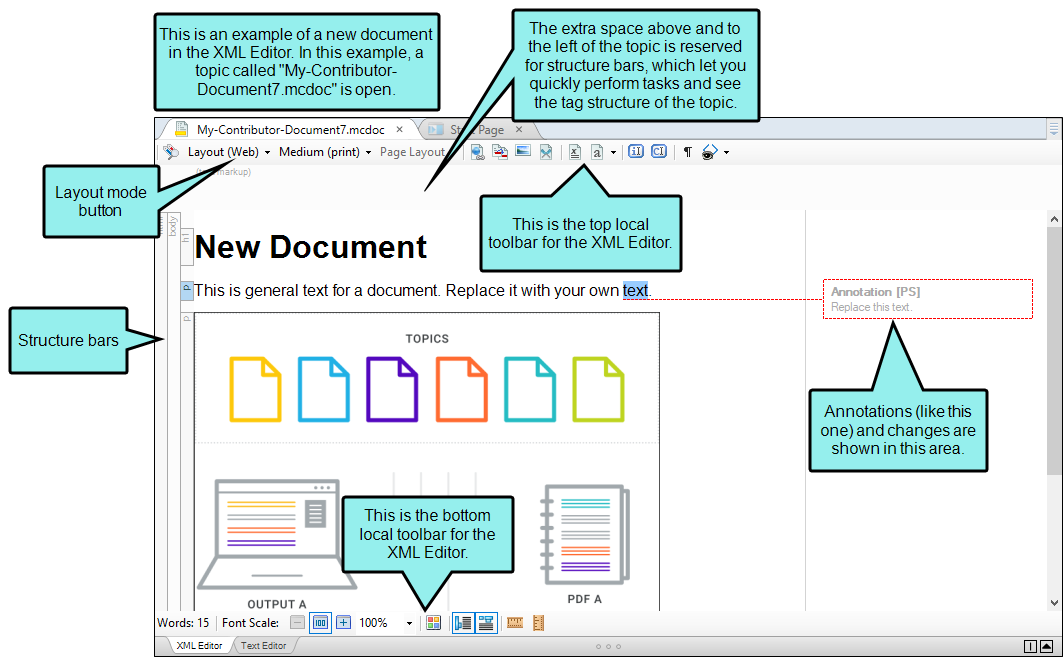
The XML Editor is the place where you add and modify content in topics and documents. You can also insert annotations associated with content in the editor. This editor provides access to the underlying XML structure of documents in a comfortable visual authoring environment. Although this editor lets you produce XML files, you do not need to know anything about XML to use it.
When editing content in the XML Editor, there are two modes that you can use—Web Layout mode and Print Layout mode. These are just two different ways to display the content. See Layout Modes.
[Menu Proxy — Headings — Online — Depth3 ]
Regular Document Files vs. Lingo Translation Files
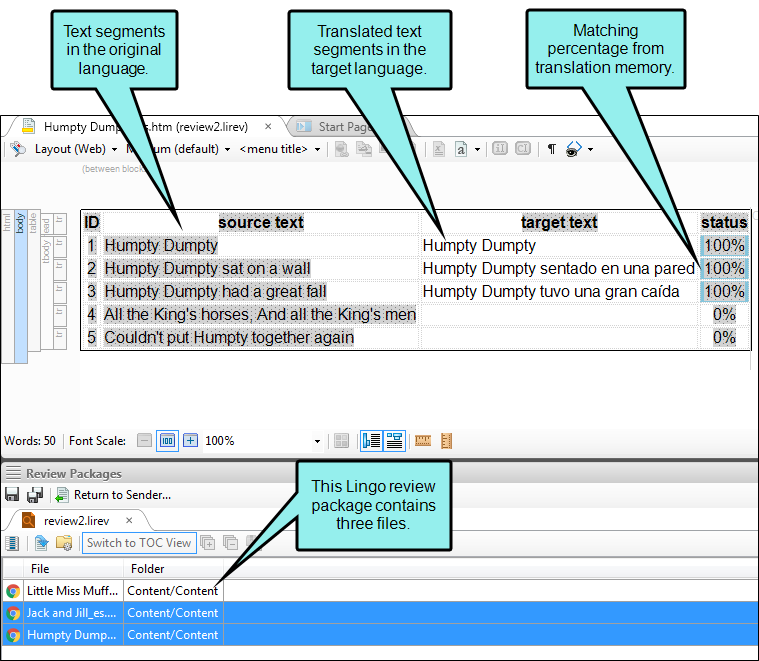
For MadCap Lingo review package (LIREV) files, the XML Editor works a bit differently than it does for regular document files from products such as Flare or Word. That's because Lingo is a translation tool, so only text segments are important, and in particular, the target language segments. When you open a file from an LIREV package, the editor shows a table containing text segments from that file in the source and target languages. The status of each segment—which indicates how closely the target segment matches a translated segment in translation memory—is also shown.
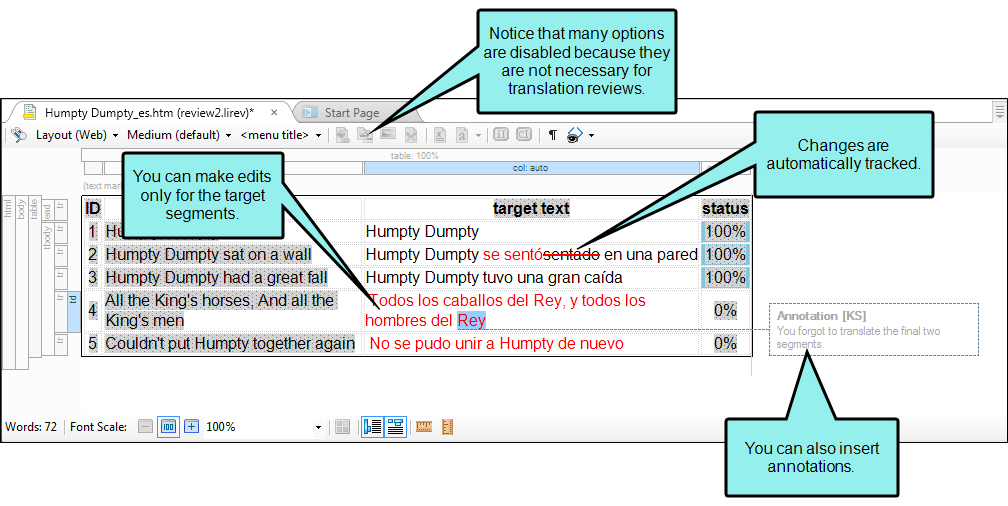
You can make changes only to the target segment, as well as insert annotations. In addition, you can make certain formatting edits to the target segment (e.g., bold, underline, color), but many other features (e.g., insert image, hyperlink, table) are disabled for Lingo review files.
Collapsing and Expanding Tags
When working in the XML Editor, you can collapse or expand tags (i.e., chunks of content) to make it easier to view and find content in long topics. With this feature, you can expand or collapse virtually any block level content.
How to Collapse and Expand Tags
- In the XML Editor, hover to the left of a heading, paragraph, drop-down, snippet, image, table, etc.
-
Click the angled arrow
 .
.You also have the option of right-clicking the content or structure bar and selecting Collapse, or placing the cursor on the content and pressing ALT+SHIFT+C.
If you collapse a heading (determined by the mc-heading-level property), all the content under it is also collapsed, down to another heading of the same or a higher level.
When a block of content is collapsed, the arrow points to the right and remains whether you hover over it or not. Also, an ellipsis icon
 displays at the bottom of the related structure bar, as well as under the content.
-
Click the right arrow
 to expand the content.
 You also have the option of right-clicking the content or structure bar and selecting Expand, or placing the cursor on the content and pressing ALT+SHIFT+C.

Note You can expand or collapse all headings (and the content under them) by clicking  or
or  , respectively, in the local toolbar.
If the animation below is cut off, you can see the complete animation by clicking the link under it to open the full topic.
How to Enable or Disable the Expand/Collapse Arrows
Do one of the following:
- At the bottom of the XML Editor, click
 .
. - On the local toolbar of the XML Editor, click the down arrow of the Show tags button
 . Then select Expand/Collapse.
What’s Noteworthy?
Note When you collapse any part of the file, a message displays at the top of the editor to let you know this, and to be aware of it as you continue editing the file.
Note The collapsed state does not persist when you switch between the XML Editor and Text Editor, or when you switch between mediums.
Note When you collapse a tag that has nested content, that content will also be collapsed.
Note If you collapse a heading and then delete or move it, all content collapsed under that heading is also deleted or moved.
Note The arrows are tied to the structure bars. If the bars are enabled, the arrows can be enabled. If the bars are disabled, the arrows are disabled.
What You Can Do in This Editor
In addition to typing content, there are dozens of things you can do in the XML Editor, depending on the workflow (Review or Contribution). For the free annotation-only Review workflow you cannot edit content; you can only insert annotations.
Following are some of the primary tasks that you can perform.
- Bookmarks (Insert/Edit)
 Read more…
- Characters and Symbols (Insert) Read more…
- Code Snippets (Insert) Read more…
- Condition Tags (Apply) Read more…
- Cross-References (Insert/Edit) Read more…
- Equations (Insert/Edit) Read more…
- Formatting—Local (Apply) Read more…
- Hyperlinks (Insert/Edit) Read more…
- Images (Insert/Edit) Read more…
-
QR Codes (Insert/Edit)
Read more…
- Styles (Apply) Read more…
- Tables (Insert/Edit) Read more…
- Variables (Insert) Read more…
Repeat Last Action
When you are working in the XML Editor, you can use the F8 shortcut to repeat your last action. This feature uses the same controller that is used when you create macros in Contributor. Therefore, only actions that are supported by the macro controller are supported for the repeat shortcut.
Example You are working
Tip If you prefer to use a shortcut other than F8 for this feature, you can open the Options dialog (File > Options), select the Keyboard Shortcuts tab, choose XML Editor in the top field, and assign the Repeat action to a different key.
Note Although you can only repeat an action if that action is supported by the macro controller, you do not need to have assigned a macro to your action in order to repeat it. This lets you repeat occasional actions without having to spend time recording a macro.
Buttons and Sections—Top of XML Editor
|
|
Opens the Conditional Text dialog, which lets you associate condition tags with a file while you edit it. See Condition Tags. |
|
|
Opens a new email message with the file attached so that you can send it to an author. This button is enabled if you are working in an MCCO file (i.e., a contribution topic designed to be sent to a Flare author). See Sending New Contribution Documents to Authors. Note There is more than one way to transfer files between individuals using Flare and Contributor. For example, you can: (1) use the integrated email feature with Microsoft Outlook, (2) add files to SharePoint or External Resources where others can access them, or (3) save files to your computer (File > Save, then Save As or Save To) and then manually transfer them using some method (e.g., email). If you want to use the integrated email feature, you must have matching versions of Contributor and Outlook. If you are using 64-bit Contributor, you need 64-bit Outlook. Likewise, if you are using 32-bit Contributor, you need 32-bit Outlook. |
|
|
Sends an MCCO file to a folder that you select. |
|
|
Contributor provides multiple layout modes when working in the XML Editor: Web Layout, Web Layout (Tablet), Web Layout (Mobile), and Print Layout. This lets you see your content in the format that you are most likely concerned about at the moment. See Layout Modes. The default and print mediums are tied to the Web Layout and Print Layout modes, respectively. The tablet and mobile media queries are tied to the Web Layout (Tablet) and Web Layout (Mobile) modes, respectively. Example You are using the Web Layout mode, so the XML Editor displays the styles from the default medium. But if you switch to Print Layout mode, the XML Editor automatically displays the styles from the print medium. And if you choose the Web Layout (mobile) mode, the XML Editor adjusts to show the topic as if it were displayed on a mobile device. The key is to select the layout first. If you select the medium or media query, the layout will not automatically change as well. Clicking this button lets you toggle between layout modes:
|
|
|
Clicking the down arrow on this button lets you select a medium or media query so that you can view the topic with a specific set of styles. |
|
|
If you are viewing content using the Print Layout in the XML Editor, you can use another drop-down in the local toolbar to choose a specific page layout. Not only can you select a certain page layout to display a |
|
|
Opens the Insert Hyperlink dialog, which lets you insert a text hyperlink on the selected text in the topic. |
|
|
Opens the Insert Cross-Reference dialog, which lets you insert a cross-reference into the topic at the location of the cursor. See Inserting Cross-References. |
|
|
Opens a dialog that lets you insert an image at the location of the cursor. Note You can insert and edit images only if you have created a new document, not if you are reviewing a document received from someone else. |
|
|
Opens a dialog that you can use to insert a snippet. See Inserting Snippets. |
|
|
Opens the Variables dialog, which lets you insert a variable. See Inserting Variables. |
|
|
Opens the Character dialog, if you click the face of the button. You can use this dialog to choose a character to insert or perform many other tasks. If you click the down arrow on the button, you can select other options, such as inserting a quick character or choosing one of your favorite or recent characters. See Inserting Characters and Symbols. |
|
|
Activates Index Entry Mode. Use this method to accomplish the same thing as the Index window pane method. The difference is that, with this method, you do not need to move your cursor from the topic or snippet to the Index window pane. You simply click at the spot in the text where you want to insert the keyword and start typing. The words you type are added directly into the Index window pane. This is a good method to use if you plan to do a lot of indexing all at once, without performing any other tasks in the topic or snippet. |
|
|
Activates Concept Entry Mode. Use this method to accomplish the same thing as the Concept window pane method. The difference is that, with this method, you do not need to move your cursor from the topic to the Concept window pane. You simply click at the spot in the text where you want to insert the keyword and start typing. The words you type are added directly into the Concept window pane. This is a good method to use if you plan to create concepts in a lot of topics all at once, without performing any other tasks in the topic. |
|
|
Turns paragraph and space markers on and off. When you turn this feature on, you can see markers that show where paragraphs end and where space exists before and after content. |
|
|
|
|
|
Expands all tags in the editor (i.e., blocks of content), so that you can see any content that was previously collapsed. |
|
|
Collapses all heading tags in the editor (and the content under them). An ellipsis icon |


Buttons and Sections—Bottom of XML Editor (Web Layout Mode)
|
Words |
Displays the number of words in the open file. If you highlight words in the file, this area shows you how many words are selected out of the total count. If a file contains snippets, the words from those snippets are not included in this word count, because those are separate files. |
|
|
Reduces the scale of the font by 10% each time you click the button. |
|
|
Resets the scale of the font to 100%. |
|
|
Increases the scale of the font by 10% each time you click the button. |
|
|
Lets you select a specific percentage to scale the font. |
|
|
Shows or hides the colored shading of content to which condition tags have been applied. Example Your condition tag has blue associated with it and you have applied this tag to a block of content. When you click this button to show the indicator, the block of content becomes shaded with a lighter version of blue. If more than one condition is applied to the block of content, the shading appears in a pattern that shows all of the applied condition colors. |
|
|
Shows or hides the tag block bars. These bars are displayed to the left of the content area. They show the different tags for your chunks of content (i.e., block-level tags), as well as the overall tag structure. |
|
|
Shows or hides the span bars representing inline tags. These bars are displayed at the top of the content area. Example If you have a block of text that is bold and you click it, you will see a "b" in a bar above. |
|
|
Enables or disables the feature to collapse and expand tags in the XML Editor. |
|
|
Shows or hides a measurement ruler horizontally at the top of the editor or window pane. If you click the ruler after it is opened, you can select to convert the ruler to pixels, points, centimeters, inches, or ems. |
|
|
Shows or hides a measurement ruler vertically at the left of the editor or window pane. If you click the ruler after it is opened, you can select to convert the ruler to pixels, points, centimeters, inches, or ems. |
|
|
|


Buttons and Sections—Bottom of XML Editor (Print Layout Mode)
|
Words |
Displays the number of words in the open file. If you highlight words in the file, this area shows you how many words are selected out of the total count. If a file contains snippets, the words from those snippets are not included in this word count, because those are separate files. |
|
|
Displays the first page of the topic in Print Layout mode. |
|
|
Displays the previous page of the topic in Print Layout mode. |
|
|
Displays the next page of the topic in Print Layout mode. |
|
|
Displays the last page of the topic in Print Layout mode. |
|
|
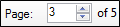
Displays the current page of the topic, as well as the total number of pages in the topic. You can enter another number in the field or use the arrow buttons to navigate to a different page. |
|
|
The Zoom/Scale button (which looks different depending on the current selection) opens a drop-down menu so that you can select from the following options:
Note This option is available only if you are working in Print Layout mode. In this mode, additional pages are automatically created when you add content beyond that which can be held on a single page. |
|
|
Reduces the scale of the font by 10% each time you click the button. |
|
|
Increases the scale of the font by 10% each time you click the button. |
|
|
Lets you select a specific percentage to scale the font. |
|
|
Shows or hides the colored shading of content to which condition tags have been applied. Example Your condition tag has blue associated with it and you have applied this tag to a block of content. When you click this button to show the indicator, the block of content becomes shaded with a lighter version of blue. If more than one condition is applied to the block of content, the shading appears in a pattern that shows all of the applied condition colors. |
|
|
Shows or hides the tag block bars. These bars are displayed to the left of the content area. They show the different tags for your chunks of content (i.e., block-level tags), as well as the overall tag structure. |
|
|
Shows or hides the span bars representing inline tags. These bars are displayed at the top of the content area. Example If you have a block of text that is bold and you click it, you will see a "b" in a bar above. |
|
|
Enables or disables the feature to collapse and expand tags in the XML Editor. |
|
|
Shows or hides a measurement ruler horizontally at the top of the editor or window pane. If you click the ruler after it is opened, you can select to convert the ruler to pixels, points, centimeters, inches, or ems. |
|
|
Shows or hides a measurement ruler vertically at the left of the editor or window pane. If you click the ruler after it is opened, you can select to convert the ruler to pixels, points, centimeters, inches, or ems. |


Elements in Editing Area
|
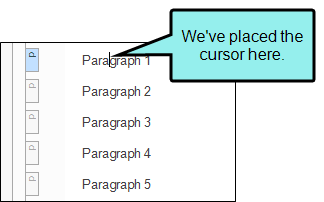
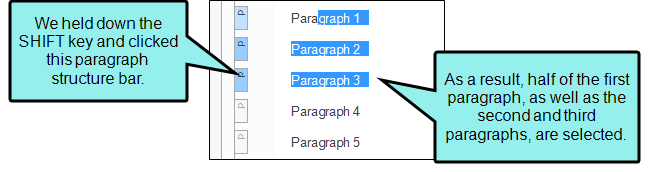
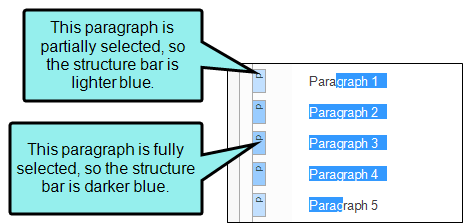
Structure Bars |
These are just what the name implies—bars around the topic content that show the structure. There are two kinds of structure bars—tag and span. Not only do structure bars let you see the tags for content, but you can also perform numerous tasks by using them.
|
|
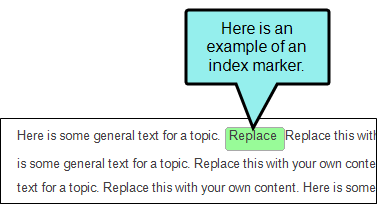
Markers |
A marker is a highlighted "flag" that shows the insertion of certain features. For example, if you insert a variable, bookmark, or index keyword, a marker indicates where that feature has been inserted. You can adjust marker widths or turn them off or on by using the "Show tags"
|
|
Cursors |
When you edit text, the cursor changes size and shape. Sometimes it contains brackets to the right or left. Sometimes it is larger, and sometimes it is smaller. It might even be horizontal. Each of these appearances serves a different purpose.
Some content Courtesy of TechWriteTips. |
|
Caret Tag Neighborhood |
The interface includes a "caret tag neighborhood." If you click on a line that contains inline tags (e.g., bold font, cross-reference), floating tag bars display above it. You can click on a bar to open the context menu and take action on the content.
This feature is disabled by default. If you want to turn it on, simply click the down arrow in the editor's Show Tags button |
|
Empty Tags |
If you are working in a document in the XML Editor and have empty tags at the text level, this will be shown. Example You have a line of text with some bold formatting, like this:
If you then decided you did not want that text and pressed your Backspace key three times to get rid of it, you would see this:
Although you removed the text, the actual bold tags are still there. In this example, all you need to do is press the Backspace key one more time to remove the bold tags altogether:
Note The display of empty tags is simply designed to help you as you edit content. Even if these tags are shown in the XML Editor when you are working, they will not be shown in your output. |