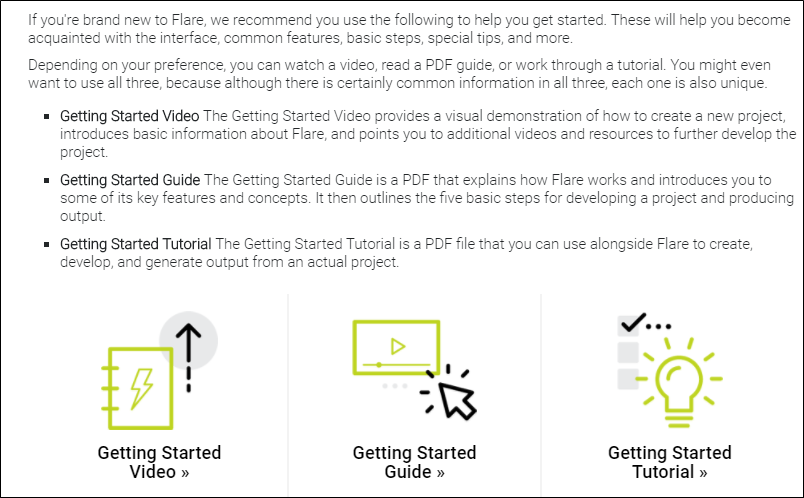
Following are some of the key features of the HTML5 format.
[Menu Proxy — Headings — Online — Depth3 ]
Skins—Multiple Options
Because HTML5 output is quite different from the other online formats, it requires its own skin. In fact, you have more than one skin from which to choose.

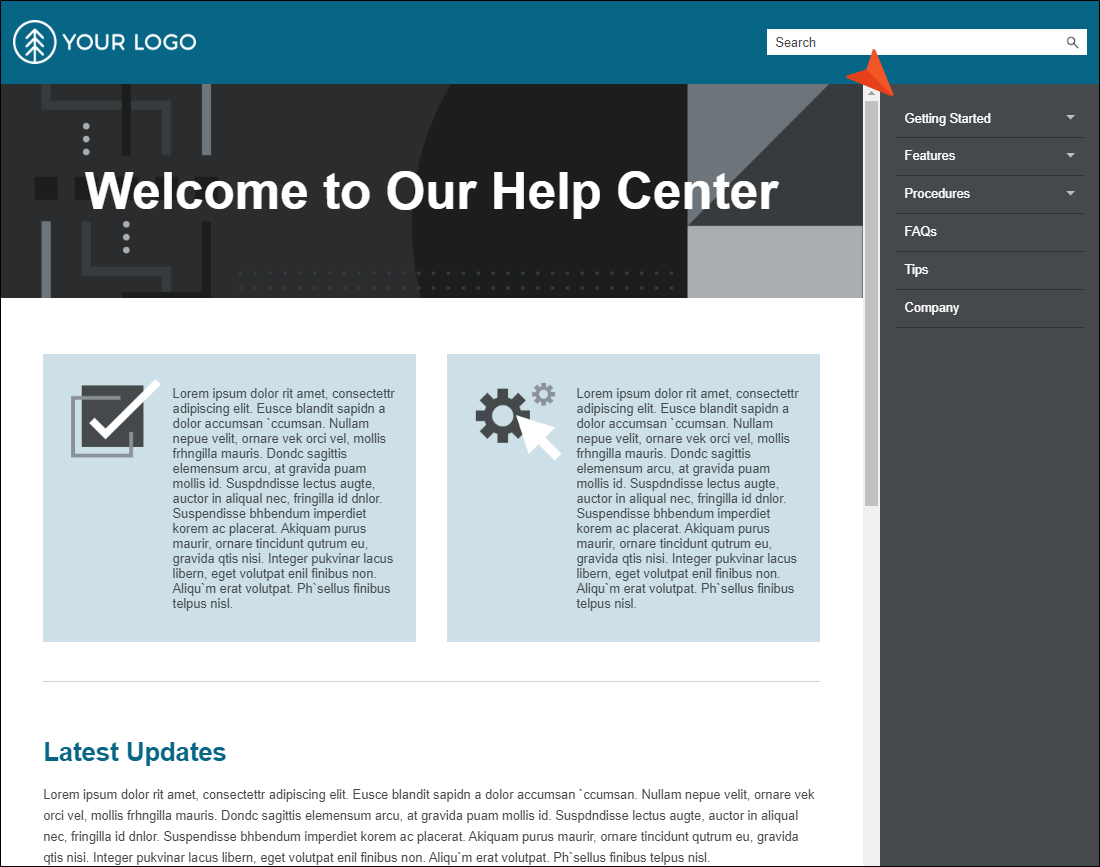
Side Navigation Skin
One popular option is the Side Navigation skin, in which the main navigation is positioned at the left or right. This lets you use a flexible, frameless output while continuing to have a more traditional configuration that looks like the Tripane format.
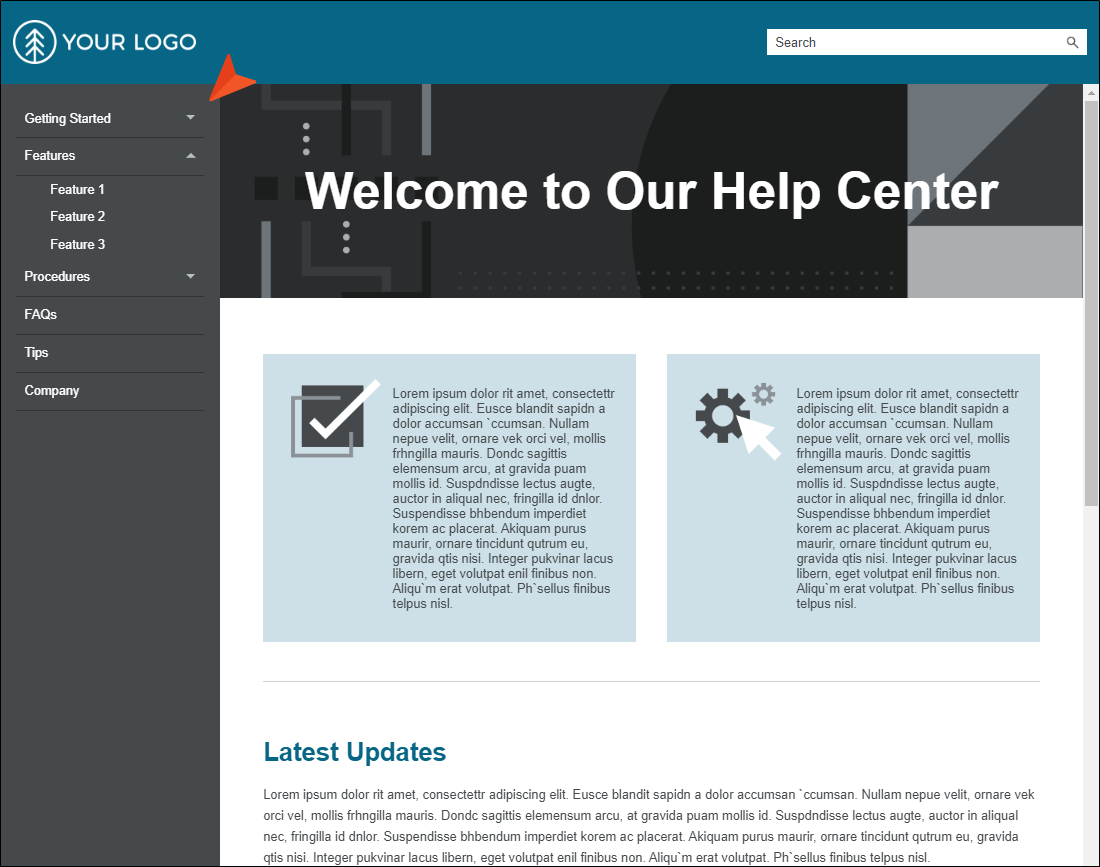
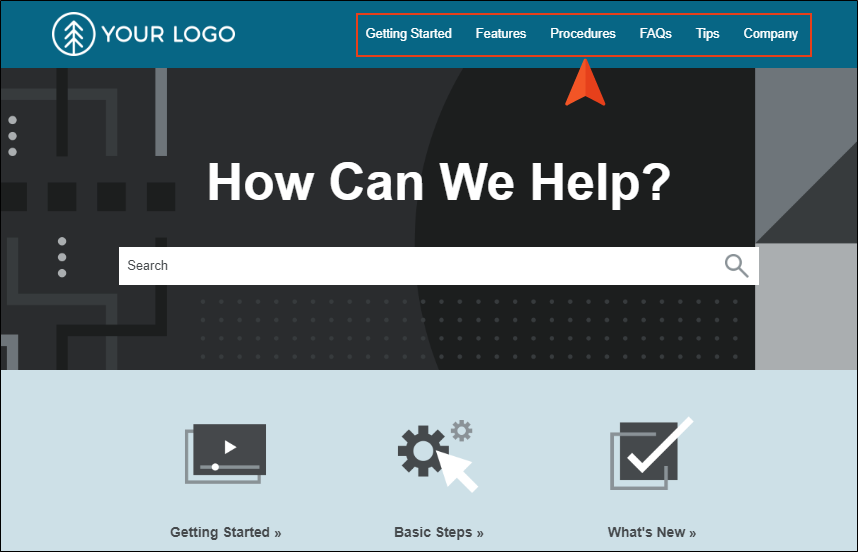
Top Navigation Skin
Then there is the Top Navigation skin. This lets you generate a flexible, frameless output like a modern website, with the main navigation items at the top of the screen.

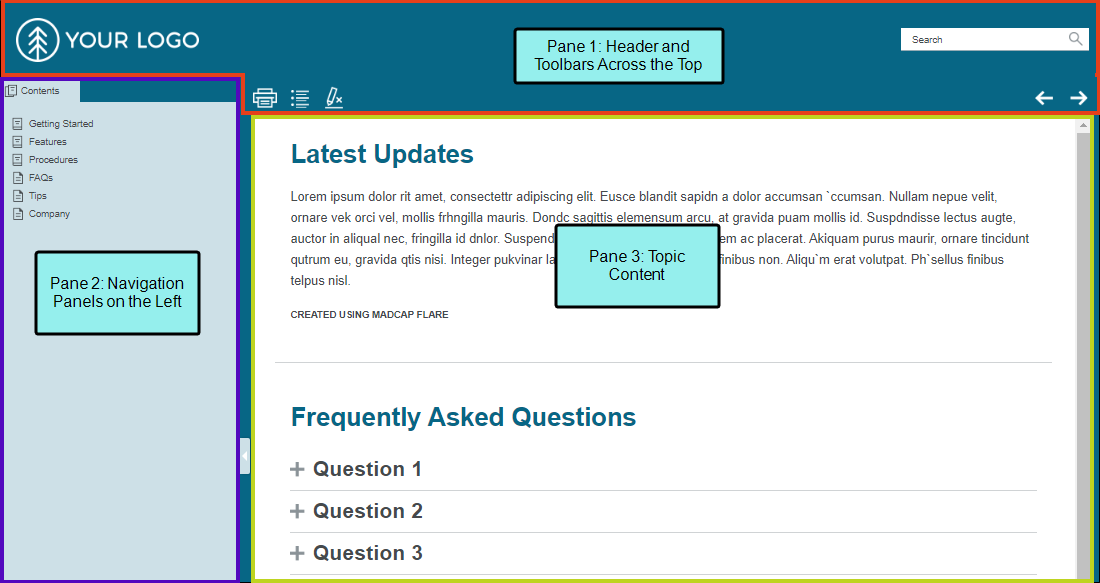
Tripane Skin
Another alternative is to use a Tripane skin, which lets you generate output in a traditional format with three distinct frames (a navigation pane on the left, a toolbar and search on the top, and the main body pane).
Differences Between HTML5 Skins
Aside from the obvious structural characteristics, HTML5 Side Navigation and Top Navigation skins are different from Tripane skins in the following ways:
- Tabs in the Skin Editor When you open a Side Navigation or Top Navigation skin, you will notice that they do not have the General, Size, or Toolbar tabs. Those tabs contain fields and features that are pertinent only to Tripane output. For example, with Side or Top Navigation output you do not select navigation elements to include (e.g., TOC, glossary, index), because those types of elements are more prominent in Tripane output. Instead, Side or Top Navigation output puts a premium on search and menu items instead. (Menus in Side or Top Navigation output are populated from your TOC file.)
- Responsive Output You do not need to turn responsive output on or off in Side or Top Navigation, because it is always enabled for those skins, which is not the case for Tripane skins. However, there are some additional settings you can provide for responsive output on the Skin tab of the Target Editor.
- Different Styles Because the Side and Top Navigation skins have fewer elements in them, there are fewer fields in the Styles tab of the Skin Editor than there are for Tripane skins. Also, there are some styles for menus that are unique in each type of skin.
- UI Text Fields With fewer elements involved in Side and Top Navigation, there are fewer fields to be concerned about in the UI Text tab. Tripane skins have more UI Text fields.
- Project Merging The Side and Top Navigation skins do not support project merging, whereas Tripane does.
Skinless Output
You can even tell Flare not to use any skin at all for HTML5 output. In this situation, you would rely on proxies or links inserted directly into your content, or you would have no links or navigation at all.
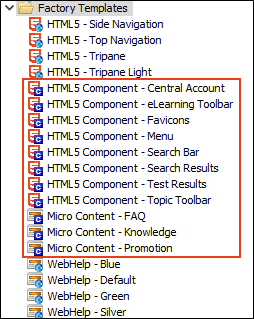
Skin Components and Proxies
You can also use smaller skin components that work with related proxies. With these, you can add and design menus and toolbars, inserting them in your content anywhere you like. For Side Navigation, Top Navigation, and skinless outputs , you can also create search bars and customized results pages. In addition, there are skin components to work with micro content containers.
Note If you want to translate interface elements in an HTML5 skin, you can do this using a language skin or using the UI Text tab located in the Skin Editor. This tab lets you perform all of the localization tasks that you would normally accomplish in a language skin. Be aware that translations in the Skin Editor are prioritized over translations in a language skin, so you should try to perform your localization tasks in one place to avoid conflicts.
Frameless
Pages in HTML5 output do not use <frameset> or <frame> tags, like they do in regular WebHelp output. In addition, HTML5 Side and Top Navigation outputs are completely frameless, meaning they also do not contain iframes, which offers the following benefits:
- Better Search Engine Optimization Side or Top Navigation means better search engine optimization (SEO). This is thanks in part to the absence of iframes. In addition, the output is not dynamically loaded in div tags, but rather the content is flattened, which makes it easier for web crawlers to locate.
- Navigation Displays with External Search Results Side or Top Navigation provides a better experience with external searches and navigation. For example, if you have Tripane output and click on a Google search result for a specific page, that page opens without the surrounding navigation (e.g., TOC) included in that Help system. But with Side or Top Navigation output, that same page would display with its intended navigation.
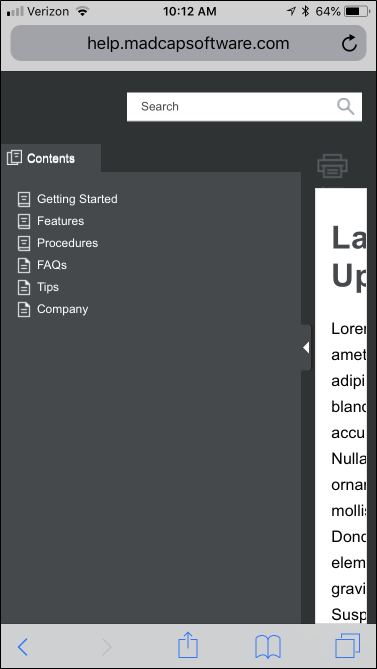
- Improved Scrolling and Zoom in Mobile Devices When Side or Top Navigation output is viewed on a mobile device, scrolling and zoom features are typically better than they are for Tripane output.
Home Topic
A Home topic is often used in HTML5 outputs. However, for Side and Top Navigation outputs, you usually do not add this topic to your TOC (whereas you do add it to the TOC when creating the older Tripane output). Instead, it is standard practice to link to this page from the logo you provide in your Side or Top Navigation skin.
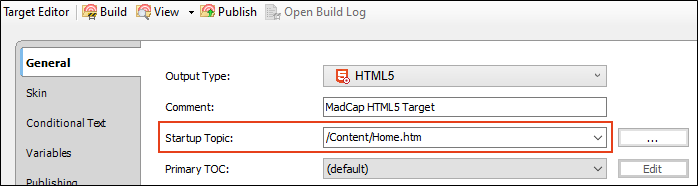
A Home topic is the one that you specify as the startup topic in the Target Editor.
The Home page is just a regular topic, but because a Side and Top Navigation skins are designed to resemble a modern website, you may want this topic to stand out with a different appearance. You might accomplish this in the following ways, all of which are optional:
-
Unique Search Bar The Side and Top Navigation skins are designed to show a search bar at the top of all topics. However, you might want to emphasize the search bar on your Home page, especially since search is the most popular and effective way to find specific information.

To do this, you can insert a Search Bar proxy in a more prominent place in the Home topic. See Skin Components and Proxies.
Create a separate stylesheet for the Home topic and open it in the Internal Text Editor. Then, copy and paste the following to hide the top search bar that is included with the skin.
Copy.nav-search
{
display: none;
}You also need to associate the new stylesheet with the Home topic.
For more details, see How to Hide the Search Bar From a Single Topic.
-
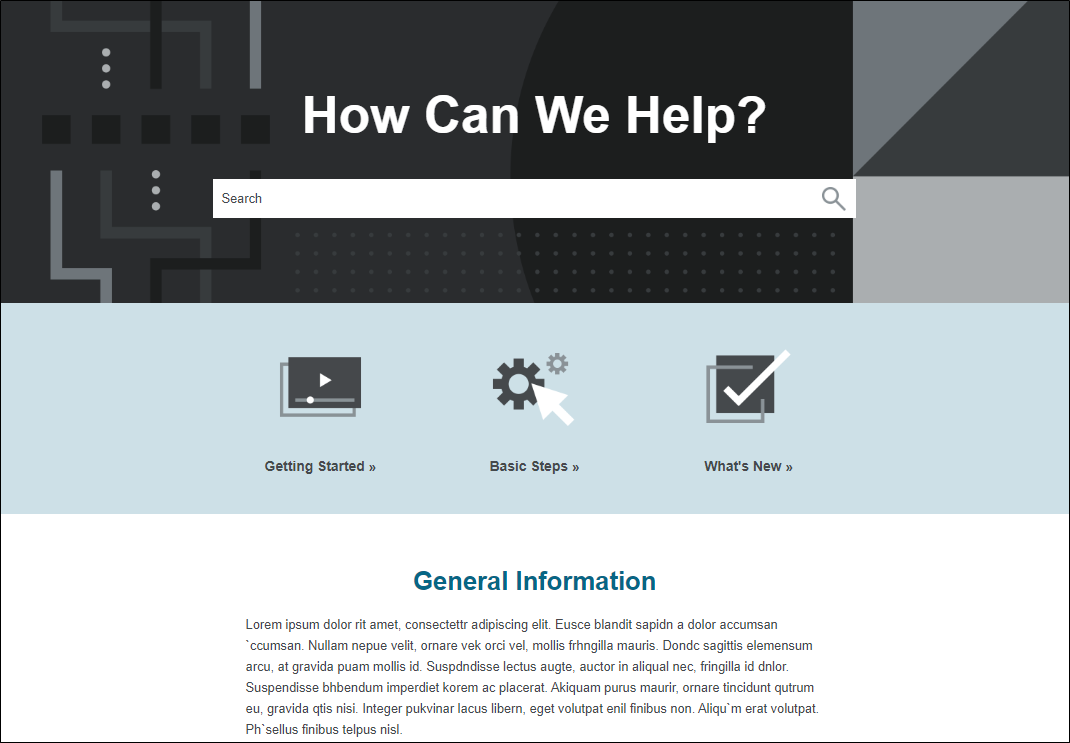
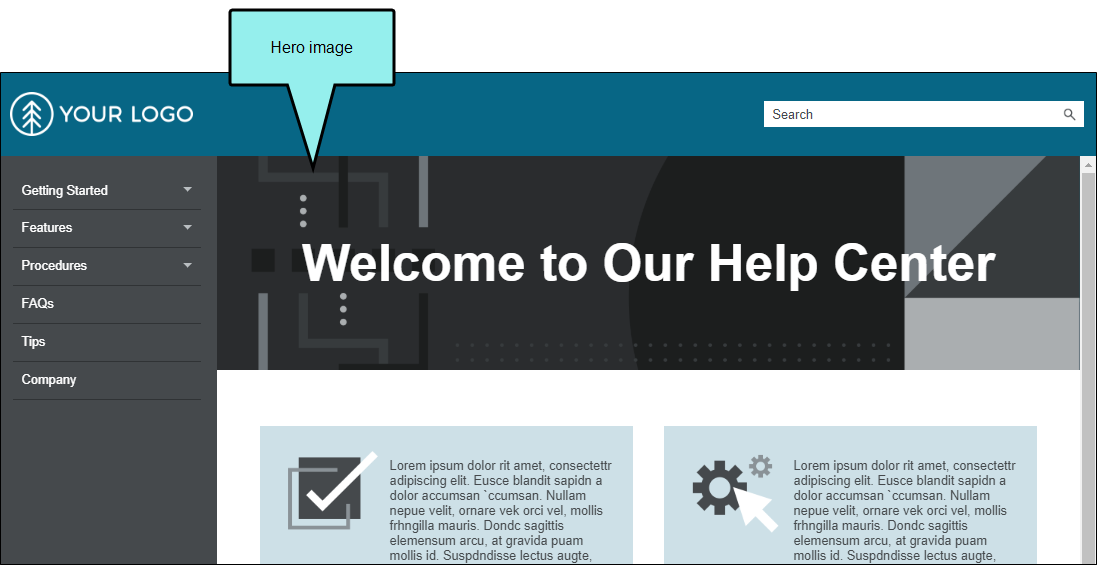
Unique Hero Image One easy way to make a Home page stand out from the other topics is to place a background image (or watermark) on it.

In the world of web design, this is often referred to as a “hero image.” You can set a background image in a stylesheet. It is recommended that you use a hero image that is quite wide. In the Flare Top Navigation project templates, this image has a width of 1903 pixels. In Flare’s Side Navigation project templates, this image is 3456 pixels wide. A big hero image helps to account for even the largest of monitors.
- Unique Template Page By using one template page for your Home topic and another for the rest of your topics, it is easier to give them different looks, as well as different headers and footers.

Branding
Branding is available for HTML5 output. This feature provides a convenient way to add branding to a project. Without much effort, you can set common branding elements (e.g., logo, hero image, font, color palette) to match the output with your company's brand.
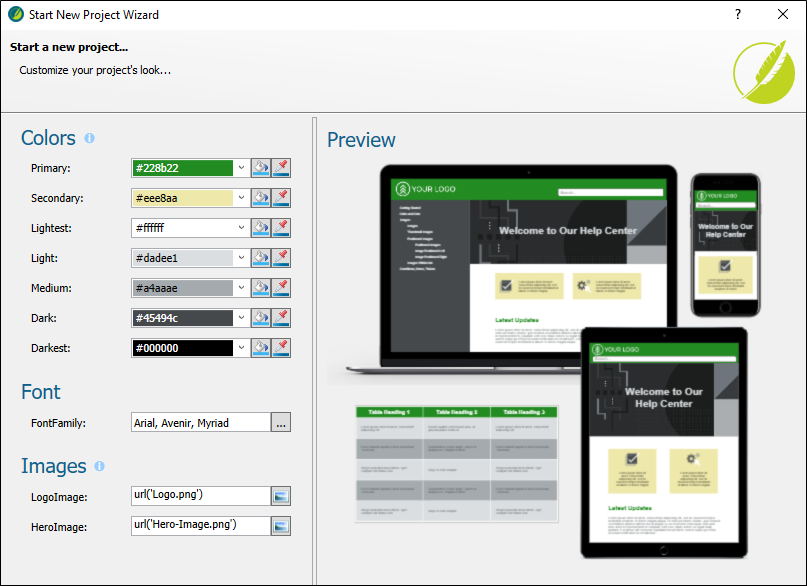
You can set up branding when creating a new project using the Start New Project Wizard. The advantage of doing this is that your basic branding design is established from the get-go. Alternatively, you can download a free project template (from MadCap Software's website), and then add your content and branding (via the Branding Editor).
Responsive Skins
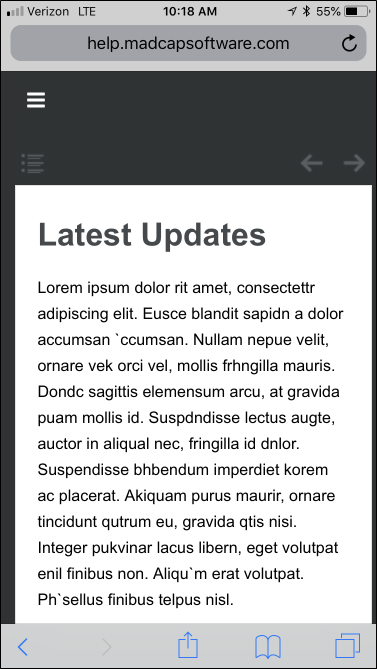
Responsive web design (RWD) is a way to construct your HTML5 output so that the display and content are adjusted automatically depending on the device. Therefore, on tablets and mobile devices such as smart phones, users will see a condensed look and perhaps different text that is more appropriate for those devices, compared with larger monitors. You can get the same effect if you shrink your browser to a smaller size. Responsiveness is automatically built in to HTML5 skins.
Example You create HTML5 Top Navigation output. When viewed on a large screen, menus appear at the top. These are populated from your TOC file.
But when you open the same output on a tablet device, you notice the top menus are no longer there. Because of the smaller screen they are placed in a flyout menu in the upper-right corner.

Example You want to create HTML5 Tripane output from your project and provide it to people using both large desktops and small mobile devices. Without using responsive output, you would need to create two targets and two skins, and perhaps separate settings elsewhere (e.g., stylesheet mediums). If you do not create a separate target and skin for the mobile output, but instead direct people to open the full output on their smart phones, it can be difficult (if not impossible) to navigate through that output on a smart phone.
So instead, you enable responsive output in the HTML5 Tripane skin. When finished, you direct end users to open the same HTML5 output, regardless of their browser or device. On a smart phone, the skin is adjusted automatically.
In the end, you accomplished essentially the same thing that you did with two targets and two skins, but you did it with only one target and skin.
Responsive Conditions
For HTML5 targets, conditions can be used to make content responsive (e.g., content changes automatically according to the size of the screen, rather than simply based on “include” or “exclude”). Associating conditions with factory media queries (Web, Tablet, Mobile) can help make some content more appropriate or easier to read on different devices. See Responsive Conditions.
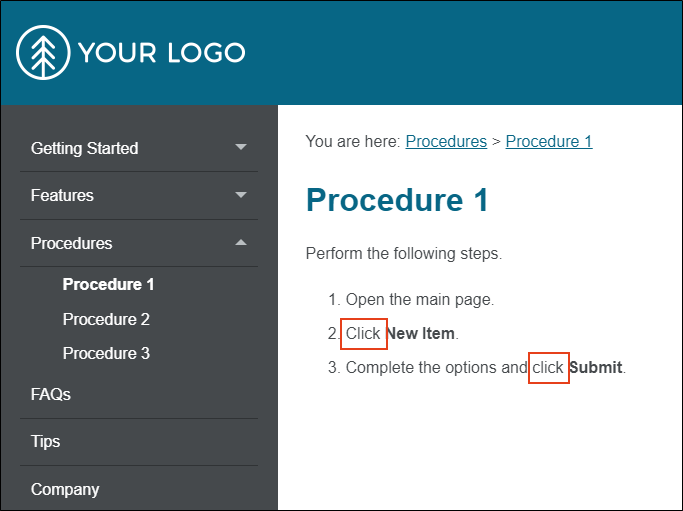
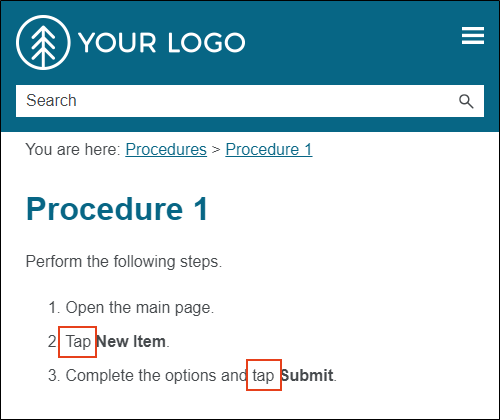
Example You are writing documentation for a cloud-based product, where it is more appropriate to tell users to “click” an option if they are working on a large screen, but to “tap” the option if they are using a tablet or smart phone.
So in a condition tag set, you create three new conditions—one for each of those screen sizes.
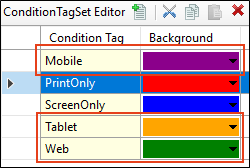
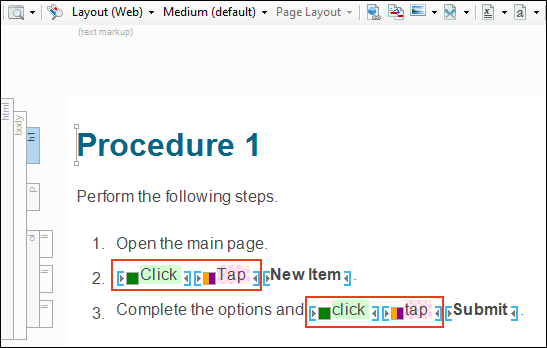
You write a procedure where you need to use to tell users to click or tap something. Therefore, you add both words to the instructions.
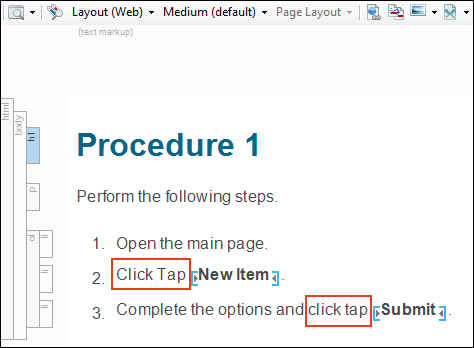
Then you apply the condition you named “Web” to the word “click,” and you apply the “Tablet” and “Mobile” conditions to the word “tap.”
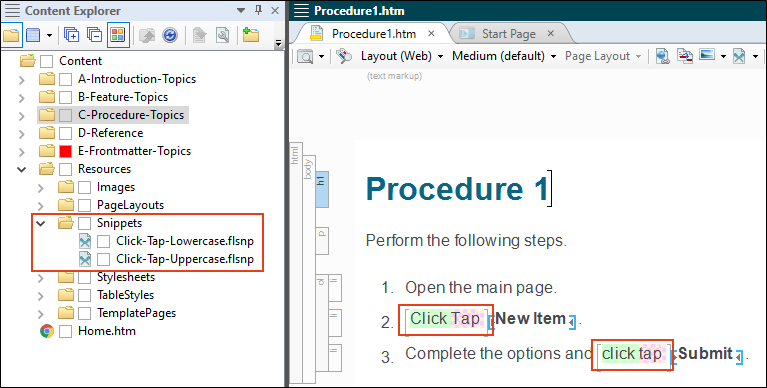
You anticipate that you will need to use these words many times throughout the project, so you create snippets—one holding the uppercase pair of words, and the other holding the lowercase pair. That way, you can just insert the appropriate snippet wherever those words are needed, rather than applying the conditions to text each time.
Next, you open the target and associate each of these conditions with the appropriate media query.
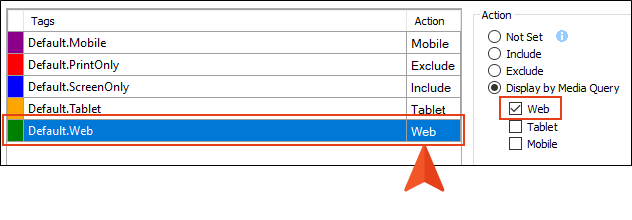
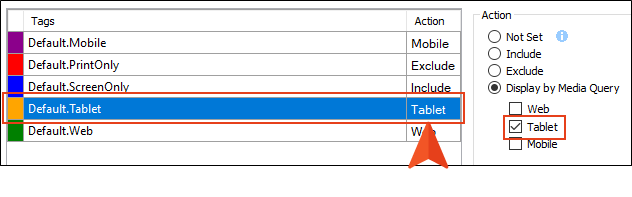
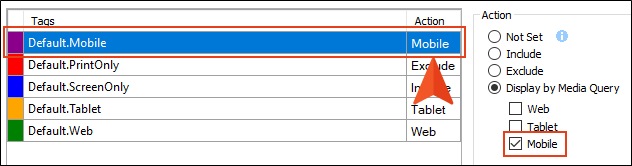
When you generate the online output and view it on a large screen, the word “click” is used.
But when you view the output on a smaller tablet or mobile screen, the word “tap” is used.
Note You can set responsive conditions on tables. However, if you also have a table stylesheet applied to the table, responsive conditions only work if they are set on the entire table (i.e., the <table> tag); they do not work if the conditions are set on individual rows, columns, or cells.
Responsive Layouts
Styles and media queries can be used to make your content responsive in HTML5 output. This lets you present information—both its substance and structure—differently depending on the size of the screen or device. Flare provides a Responsive Layout window pane that helps you create this kind of content more easily. You also have the option of using third-party solutions (e.g., Zurb Foundation grid system) by adding the appropriate styles in your stylesheets and topics.
Example You have a topic that looks as follows when viewed on a large monitor or on a tablet-sized screen. Notice the three images at the bottom of the topic.
But when the browser is reduced to a mobile size, the images shift so that they display one on top of the other.
Specific Page Addresses
With the regular WebHelp output, you can only give readers a single URL path, which opens the starting page for the output. With HTML5 output, you can point end users to a specific page in the output by giving them the exact URL path. Because HTML5 output also allows for pagination in search results, you can also direct users to specific page addresses in search results.
Example You generate regular WebHelp output, with the primary output file called "MyOutput.htm." When you view the output with the initial topic shown (say it's called "Welcome.htm"), the URL path in the browser might look something like this.
http://www.mycompany.com/docs/MyOutput.htm
And if you then click on another topic (say, "WhatsNew.htm"), the same URL path will be shown. It does not change, even though you opened a different page.
On the other hand, suppose you generate HTML5 output. The URL in the browser may look the same as the path for regular WebHelp when the output is first displayed.
http://www.mycompany.com/docs/MyOutput.htm
But if you click on the "WhatsNew.htm" page, the URL will change to this.
http://www.mycompany.com/docs/MyOutput.htm#WhatsNew.htm
And if you click on the "Welcome.htm" page to return to it, the URL will change to this.
http://www.mycompany.com/docs/MyOutput.htm#Welcome.htm
Choosing a Search Engine
For HTML5 targets, you can choose the type of search engine you want people to use—MadCap Search, Google Search, or Elasticsearch (for Side Navigation, Top Navigation, or skinless output). There are additional steps that you can follow and features you can select, depending on the search engine you choose. For MadCap Search and Elasticsearch, you can include micro content in the output, which can especially enhance your search results. See Setting Up a Search Engine.
There are benefits to any of the search methods offered by Flare. Some users might prefer the search results returned by Google. However, others might prefer the results returned by MadCap. Or some users might want all of the configurable options provided by Elasticsearch.
Tip To determine the type of search that is best for you, we recommend that you generate different outputs using each method. Then perform several different searches and see which results you like best.
|
|
MadCap Search |
Elasticsearch |
Google Search |
|---|---|---|---|
|
Less Time and Effort to Set Up |
|
Setting up Elasticsearch is done within the Target Editor and Destination Editor in Flare. Web servers also need to be configured to support Flare, along with the Elasticsearch service. |
Setting up a Google custom search engine (CSE) and performing other necessary tasks requires a combination of steps in both Google and Flare. This can take a bit of time to complete. However, it is usually just a one-time setup. |
|
Public vs. Local Output Flexibility |
|
Output must be published on a server in order to use the full capability of Elasticsearch. |
Output must be available publicly so that you can use Google. Output cannot be behind a firewall. |
|
Multiple Outputs |
Searches will include results for only the Flare output that is open. |
|
|
|
Other File Types |
In order to include file types such as PDF in your search results, you need to generate and publish server-based output. |
|
|
|
Search Tailored to Flare Projects |
|
Elasticsearch does not provide any direct mapping of search criteria to the structure of a Flare project. |
Google does not recognize the unique characteristics of a Flare project (e.g., index keywords, glossaries). Therefore, those elements will have no effect on how Google ranks pages in the results. |
|
Micro Content in Results |
|
|
Google does not include micro content (created in Flare) in your search results. |
|
Glossary Definitions in Results |
|
Elasticsearch does not provide an option to include glossary terms in your search results. |
Google will not fetch your project’s glossary terms and feature them at the top of search results. |
|
Results for Incorrectly Typed Searches |
Incorrectly typed search terms will not return results. |
|
|
|
Better Search and Indexing Speed |
|
|
Search results might lag at times, depending on the size of the output and whether Google is finished with the indexing (i.e., making your output available for searches). Google will index your pages automatically over time, but it can take awhile, sometimes weeks. In addition, there are a number of different factors that can determine how fast your site is indexed, including:
|
|
Mobile Devices |
Search results are “chunked” and then collapsed so that they can be displayed when a search is performed. This is usually okay on PCs, but if you try to perform a search on a mobile device, the results might be slow or even crash because the device cannot handle the number of search results. |
|
|
|
No Advertisements |
|
|
Users might see advertisements in search results. |
|
Customize Auto-Complete Results |
There are no options available for auto-complete results. |
|
While Google Search does provide auto-complete results, it does not provide the ability to customize these results. |
|
Customize Predictive Search |
MadCap Search does not offer any predictive methods in obtaining search results. |
|
Google Search provides a measure of predictive results, although it is not customizable within Flare. |
Sitemap/Search Engine Optimization
For web-based targets, you can generate a sitemap when compiling your output. This helps with search engine optimization (SEO), making it easier for search indexing services (i.e., spiders, crawlers, or bots) to find your output. Therefore, the entire output is indexed and search engine results are improved.
In addition, there are other optimization tasks you can follow to improve the quality of your search results.
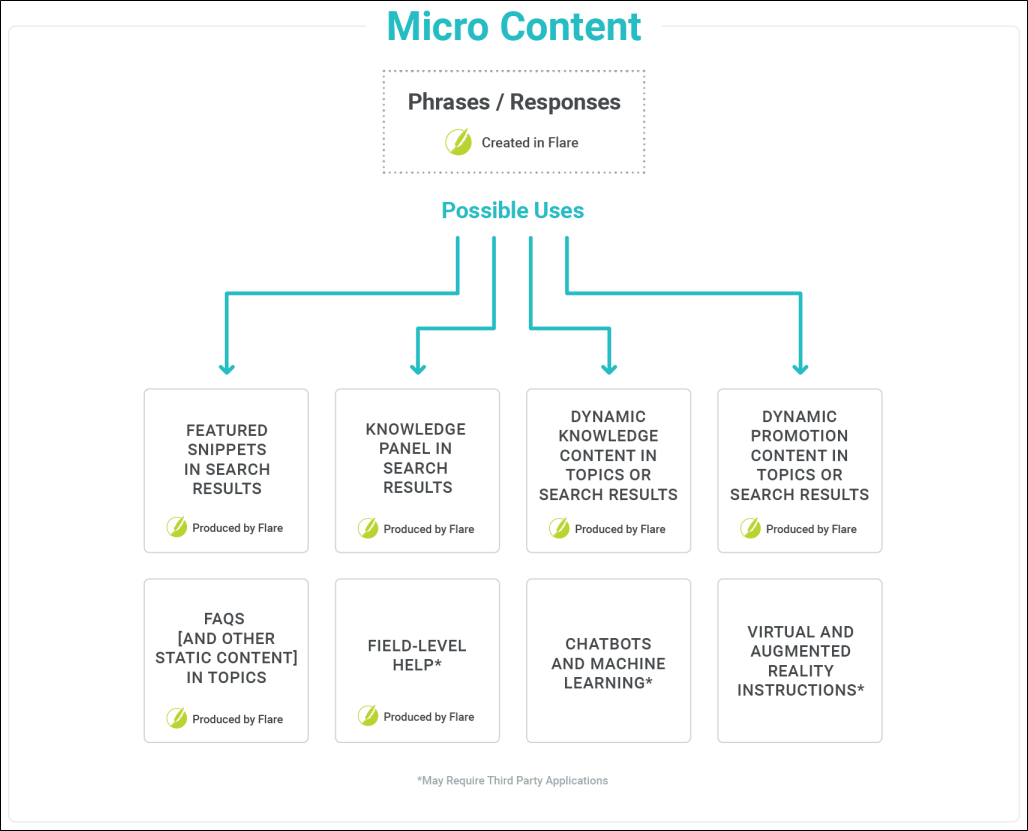
Micro Content
Micro content is short, concise information that stands alone and is easily consumable. In Flare, it begins with the creation of a collection of brief phrases and corresponding responses, such as questions and answers. After generating HTML5 output, these phrase/response combinations can be used in different ways as users interact with your output. For example, it can greatly improve the user experience when people search in your HTML5 output. It can also be used to create field-level context-sensitive Help.
eLearning
It is possible to generate HTML5 output with eLearning components for learning and development (L&D) courses. You can use Flare to leverage single-sourced content from a project for creating interactive knowledge checks and gradable quizzes. It provides the capability to design courses with linear workflows, form questions, and build online output with learning management system (LMS) standards for sharing. Use the Target Editor to set output options for eLearning material.
Private Output
You can produce private output that requires a user to log in with an email and Central password. Without credentials, people cannot see the output. It is possible to set private output for all output types supported by Central. Also, accessing private output is not limited to people in your company. Central has a free viewer user type that you can use to add any of your customers to your Central license, and then give them access to live private output. See Private Outputs on MadCap Central.
After users log in to see private output, an account link displays in the output interface for HTML5 targets (not for other output types). If the output is not set to private, this link is not shown. When users hover over the link, a menu shows two options.
For more about integrating with Central, see MadCap Central and Flare.
For more details about making output private, see the Central online Help.

Analytics
If you have a MadCap Central license, you can view analytics on published Flare HTML5 output. This includes search phrases used, search phrases with no results, topics viewed, context-sensitive Help calls, and demographic statistics (browsers and operating systems). See Central Analytics.

Central analytics works on Flare projects uploaded to Central, or you can host output on your own servers. If you host the output outside of Central, you still need to use Central with a key to view the analytics data. Also, the server where the output is hosted must be able to communicate with Central (e.g., not be behind a firewall).
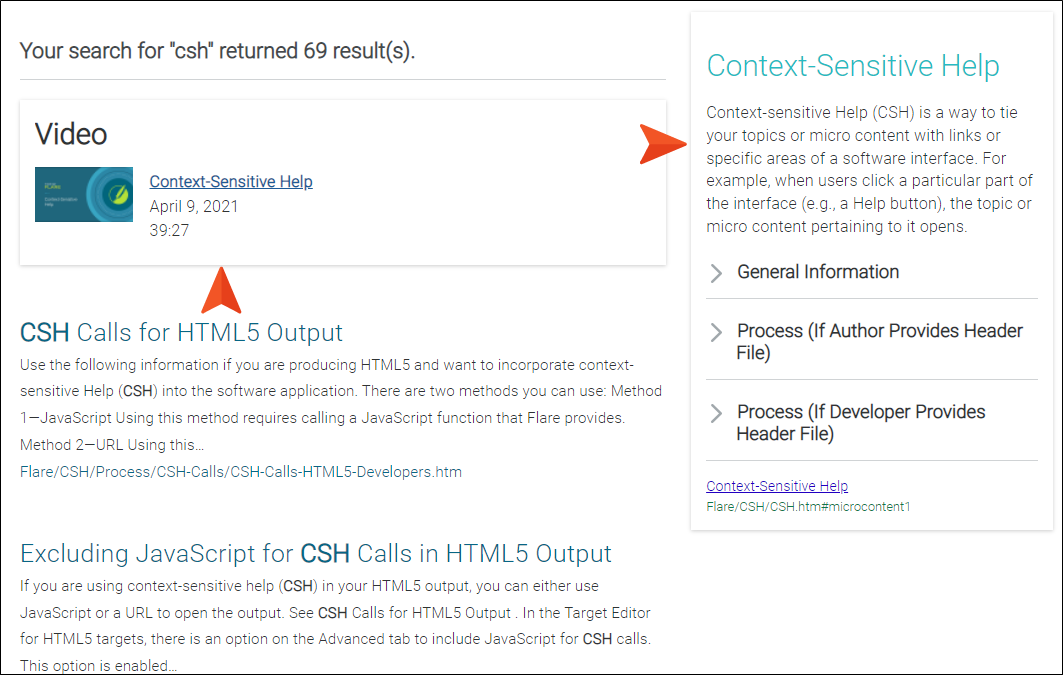
Search With Context
If end users perform a search in your output, they will see context next to each result, rather than terms only.
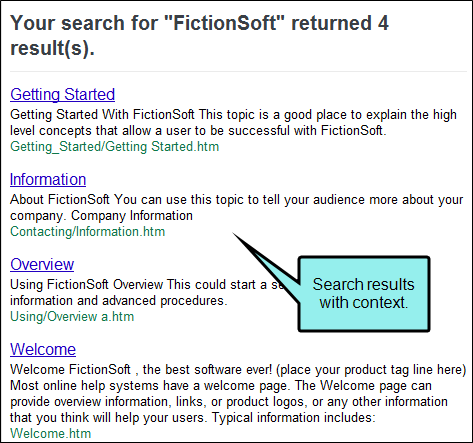
In addition, you can create topic meta descriptions, which will be used in the search results abstract. Also, the meta description itself is searchable.
Glossary Terms in Search Results
For HTML5 output, search results display glossary terms if they are used as the search text.
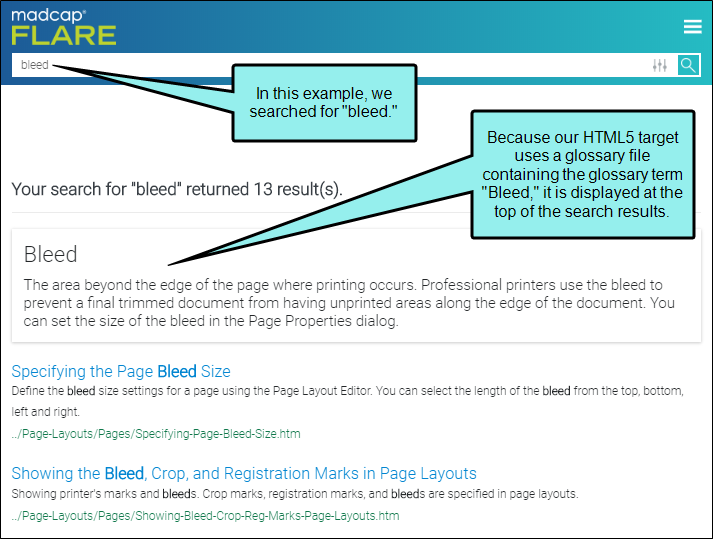
This option to display glossary terms in search results is enabled by default. However, it can be turned off in the HTML5 Target Editor.
Smoother Dynamic Effects
Features such as drop-down text, expanding text, and popups have a smoother appearance when they are activated.
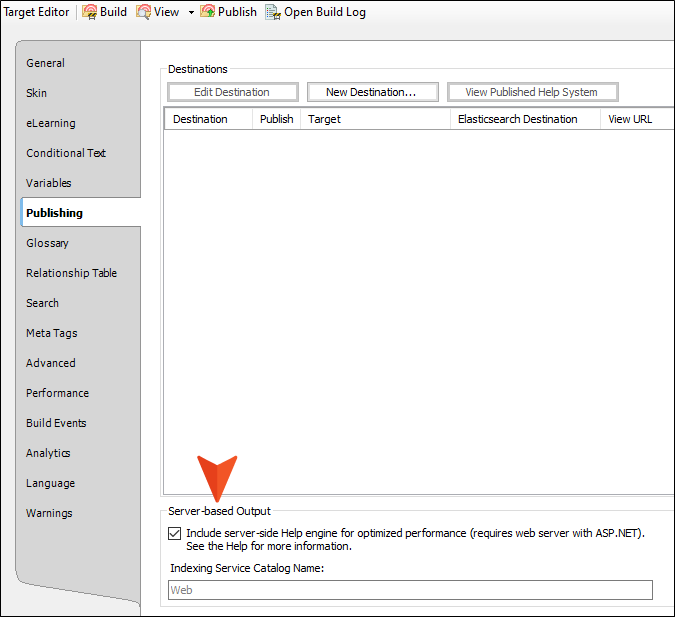
Server-Based Output
You can create HTML5 output in its regular state, or you can select an option in the Publishing tab of the Target Editor to enable server-based functionality. This lets you accomplish the same results as WebHelp Plus output—searching of non-XHTML content, server-side search, and automatic runtime merging. See Enabling HTML5 Server-Based Output.
Following are benefits of server-based HTML5 output:
- Multiple Platforms You can publish to a machine running Windows Server 2003, Windows Server 2008, or Windows 7.
- Searching of Non-XHTML Content When end users perform a search in your online output, you can ensure that non-XHTML files (e.g. PDF, DOC, XLS) are included in that search. When you build HTML5 output, a subfolder named "AutoSearch" is created and placed in the generated output folder. You can place non-XHTML files within the published AutoSearch subfolder (whether the non-XHTML files are linked to content from your Flare project or not). When users perform a search, those non-XHTML files will also be accessible to the users.
- Microsoft IIS Search Engine Another benefit of generating and publishing HTML5 output to a web server is that it takes advantage of Microsoft's IIS search engine to help power your search. This is especially useful if you have a very large Help system.
-
Automatic Runtime Merging of Flare Projects This is an easy way to merge the output from multiple HTML5 server-based Flare targets into one Help system. These targets can be originated from the same Flare project or from different Flare projects. You simply place the output files in the correct location on the server (i.e., within your parent project's AutoMerge folder). Flare then automatically merges the output from all of the targets when users access the Help. From the end user's perspective, the results are seamless, appearing as one large Help system. All of the TOCs, browse sequences, indexes, glossaries, and search capabilities for the projects are merged.