Ribbons

Capture's user interface lets you use a ribbon layout, or the more traditional tool strip layout. The ribbon layout consists of a File drop-down with common tasks such as creating new projects and files, as well as opening and saving documents. This is followed by the Edit ribbon, which is the default, and several others related to various features in Capture.

Example  

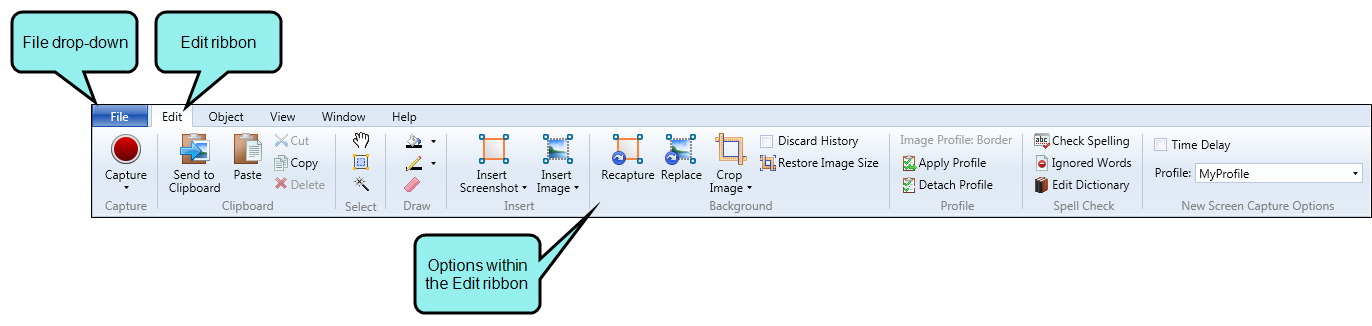
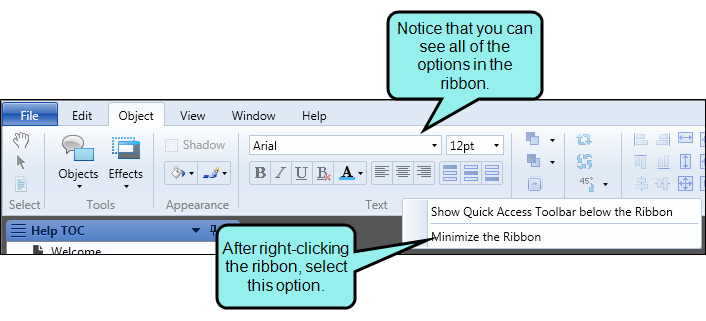
Here is the user interface with the ribbon layout displayed.

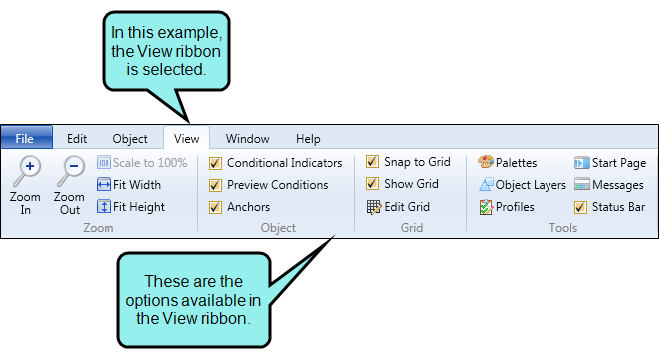
Here is the View ribbon.

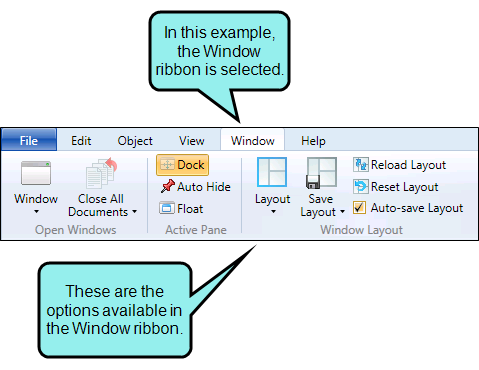
And here is the Window ribbon. Notice that it has different options.

Characteristics of Ribbons

Following are some characteristics of ribbons.

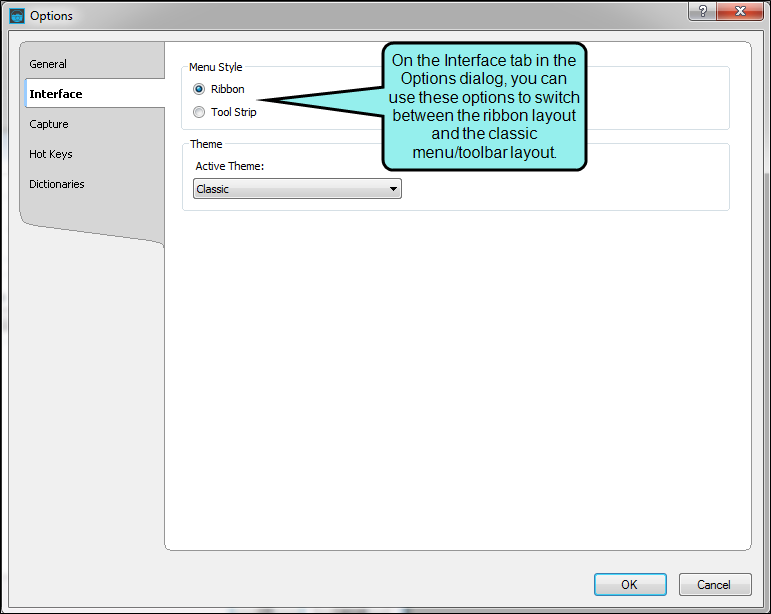
  • Switch Views By default ribbons are used when you install and launch Capture for the first time. However, you can use the Options dialog to switch back to the classic tool strip.

    See Switching Between Ribbons and the Tool Strip and Options Dialog.

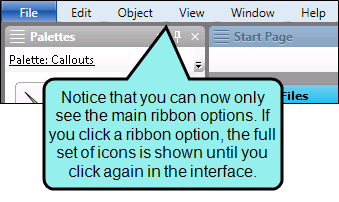
  • Minimize You can minimize the ribbons so that you only see the top portion of the ribbons until you select an option.

    To do this, right-click anywhere in a ribbon and select Minimize the Ribbon from the context menu.

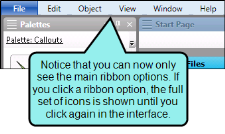
    See Minimizing Ribbons.

  • Icons/Text Ribbons consist of icons and text, which let you perform various tasks. Larger icons are shown for the most common tasks.
  • Sections Ribbons are split into sections to make it easier to locate the options on them. For example, the Edit ribbon contains the following sections: Capture, Clipboard, Select, Draw, Insert, Background, Profile, Spell Check, and New Screen Capture Options.

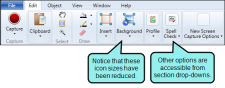
  • Reducing Application Window Size When you reduce the size of the entire application window, the ribbons are also reduced in a way that lets you continue to access hidden options by clicking on the section name.

    Example  

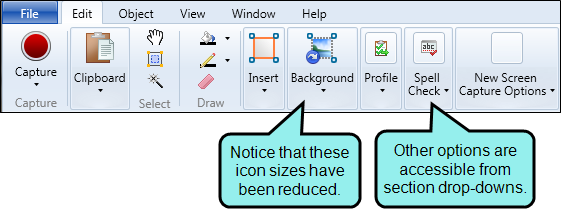
    Let's say you have the application window maximized, and this is what you see when opening the Edit ribbon.

    If you reduce the size of the application window, the ribbon may shrink along with it. You can still access all of the options. Some icons are simply smaller, and others are accessible from section drop-downs.

File Drop-Down

Click the button to capture a new screen shot region. You can also click the arrow to select from the following.

  • New Capture Captures a rectangular region of your computer screen. You can draw a rectangle over any area of your computer screen and capture that region. This is useful, for example, if you want to capture only a portion of a toolbar or a specific area of a window, but not the entire window. See Capturing a Region.
  • Capture Regions Consecutively Captures multiple images without having to select the capture option each time. In addition, in between each consecutive capture, you can relocate and resize the region as well as manipulate the onscreen content you want to capture. See Capturing Regions Consecutively.
  • Restore Last Capture Region Opens the selection rectangle for the most recent region that you captured. You can then capture another image using the same dimensions or resize the selection area as needed. See Restoring the Last Capture Region.
  • Capture Last Capture Recaptures the last image that you captured, displaying the bitmap in a new instance of the Capture Editor. If you do not want to create a new image, but simply want to replace a particular image with another one, use the recapture option instead. See Recapturing the Last Capture.
  • Capture Window Captures an open application, UI element or window, depending on the one you select from a list. See Capturing an Application.
  • Capture Window with Auto-scroll Captures an open window that is too long to be displayed in its entirety on the screen. This method grabs an image of the window, automatically scrolling to the bottom of the window for you. The image starts from the top edge of the window that can be seen on the screen and scrolls to the bottom to capture the image. See Capturing a Window With Auto-Scroll.
  • Capture Full Screen Captures everything (e.g., open applications, desktop icons and background, taskbar) displayed on your computer screen. See Capturing a Full Screen.
  • Capture Full Screen without Taskbar Captures everything (e.g., open applications, desktop icons and background) displayed on your computer screen, with the exception of the taskbar. See Capturing a Full Screen Without the Taskbar.
  • Capture New Image from Clipboard Captures whatever is on your Windows clipboard. To use this feature, simply take a new screenshot of something on your screen (e.g., by pressing PrtScn or ALT+PrtScn on your keyboard). Then select this option. See Capturing an Image From the Windows Clipboard.
  • Capture Shape Area Captures an area covered by a shape that you have drawn. For example, if you want to capture a circular area of an application, you can first capture the application, then draw a circle on that image and capture the image in that shape. See Capturing a Shape Area.

Click the button to create a new image. See Creating New Images.

You can also click the arrow to select from the following.

  • New from Profile Opens the Create New Image dialog which lets you select a profile to apply to the new image.
  • New Profile Opens the Profiles Editor where you can name and customize a new profile. See Creating Profiles.
  • New Palette Opens the Palette window pane where you can name and customize a new palette object. See Creating Palettes.
  • Link to a Profile Opens a profile from an external source. See Linking to External Profiles.
  • Link to a Palette Opens a palette from an external source. See Linking to External Palettes.
  • New Batch Job Opens the Batch Job Editor, which lets you apply a profile to many images at once. See Applying Profiles to Images.
  • Batch Replace Images Opens the Batch Replace Images dialog, which lets you replace background images in bulk, or by selecting images to replace from a list. See Setting Background Images.

Opens a dialog, which lets you search for and select an image to open.

Opens the folder containing the image.

Click the button to save changes to the active file. You can also click the arrow and choose the following.

  • Save Saves changes to the active file.
  • Save As Opens the Save As dialog, which lets you save the active file under a different name and/or file type and to a particular location. The new file is then displayed in the editor.
  • Save To Opens the Save As dialog, which lets you save the active file under a different name and/or file type and to a particular location. The new file is not automatically displayed in the editor.
  • Save Print Version Saves a copy of the image with print settings applied to it. This option is enabled if you have an image open in the Capture Editor and you have previously applied print settings to that image. (You must also save the image before this option is enabled.) Print settings are applied to an image on the Format tab of the File Properties dialog when you select the Print option from the Medium drop-down. When you use this option, the copy of the image is saved in a folder called "PrintVersions," next to the location where the original image was saved.

    Note You can enable settings for different mediums (i.e., other than the Web (Default) medium) only if the image in question already exists in a MadCap Flare project.

  • Save To Targets Opens the Save Targets dialog which lets you save the open image to multiple profile targets, thus using the same image with more than one profile. This option works especially well if you have included condition tags on some objects in the image. See Saving an Image and Conditions.
  • Rename and Save Opens the Save As dialog, which lets you save the active file under a different name and/or file type and to a particular location. The difference between this option and the normal "Save As" option is what happens to the original file. If you use this option, the old file is simply replaced with the new name. If you use the "Save As" option, the file is saved with a new name, but the old file style exists with the old name.
  • Send to Clipboard Sends the open image to the Windows clipboard. This lets you then paste the image into Microsoft applications (e.g., Paint, Word, Outlook). See Sending Images to the Windows Clipboard.
  • Save All Saves changes to all of the open files.

Opens the Print dialog, which lets you send a file to a printer. Make sure that the item that you want to print is selected. For example, if you want to print a topic from the online Help, first click somewhere inside the topic so that it is the active element in the interface.

Opens the Page Setup dialog, which lets you specify the page settings (e.g., paper, orientation, margins) to be used when you print an image file.

Opens the Properties dialog for the selected item.

Closes the active file.

Closes all files that you have opened in the workspace.

Closes all files that you have opened in the workspace, with the exception of the document that is currently active.

Displays a list of recently opened files. You can select one from the list to open it. You can also remove files from the list of recently opened files, which lets you keep the list shorter and more manageable. When you use this feature, the file is merely removed from the list, but the actual file is not deleted.

Opens the Options dialog, which lets you set various options. For more details, see Options Dialog.

Closes the application.

Edit Ribbon

Click the button to capture a new screen shot region. You can also click the arrow to select from the following.

  • Capture Region Captures a rectangular region of your computer screen. You can draw a rectangle over any area of your computer screen and capture that region. This is useful, for example, if you want to capture only a portion of a toolbar or a specific area of a window, but not the entire window. See Capturing a Region.
  • Capture Regions Consecutively Captures multiple images without having to select the capture option each time. In addition, in between each consecutive capture, you can relocate and resize the region as well as manipulate the onscreen content you want to capture.See Capturing Regions Consecutively.
  • Restore Last Capture Region Opens the selection rectangle for the most recent region that you captured. You can then capture another image using the same dimensions or resize the selection area as needed. See Restoring the Last Capture Region.
  • Capture Last Capture Recaptures the last image that you captured, displaying the bitmap in a new instance of the Capture Editor. If you do not want to create a new image, but simply want to replace a particular image with another one, use the recapture option instead.See Recapturing the Last Capture.
  • Capture Window Captures an open application, UI element or window, depending on the one you select from a list.See Capturing an Application.
  • Capture Window with Auto-scroll Captures an open window that is too long to be displayed in its entirety on the screen. This method grabs an image of the window, automatically scrolling to the bottom of the window for you. The image starts from the top edge of the window that can be seen on the screen and scrolls to the bottom to capture the image. See Capturing a Window With Auto-Scroll.
  • Capture Full Screen Captures everything (e.g., open applications, desktop icons and background, taskbar) displayed on your computer screen.See Capturing a Full Screen.
  • Capture Full Screen without Taskbar Captures everything (e.g., open applications, desktop icons and background) displayed on your computer screen, with the exception of the taskbar.See Capturing a Full Screen Without the Taskbar.
  • Capture New Image from Clipboard Captures whatever is on your Windows clipboard. To use this feature, simply take a new screenshot of something on your screen (e.g., by pressing PrtScn or ALT+PrtScn on your keyboard). Then select this option.See Capturing an Image From the Windows Clipboard.
  • Capture Shape Area Captures an area covered by a shape that you have drawn. For example, if you want to capture a circular area of an application, you can first capture the application, then draw a circle on that image and capture the image in that shape. See Capturing a Shape Area.

Sends the open image to the Windows clipboard. This lets you then paste the image into Microsoft applications (e.g., Paint, Word, Outlook). See Sending Images to the Windows Clipboard.

Pastes the selection from the clipboard to the place where the cursor is inserted.

Cuts the selection and sends it to the clipboard.

Copies the selection and sends it to the clipboard.

Deletes the selection.

Converts the cursor to Hand mode, which lets you drag areas of the image around. This is useful when you have zoomed in on an image so much that you cannot see all of it in the editor. See Using the Hand Mode.

Converts the cursor to the selection rectangle tool, which lets you select an area of your image and then move, delete, copy, cut, paste, or resize it.

Converts the cursor to the magic wand tool, which lets you select an area by color.

Converts the cursor to the color fill tool, which lets you fill a selected area with a color.

Converts the cursor to the pencil tool, which lets you draw on the canvas or background.

Converts the cursor to the eraser tool, which lets you erase any part of the canvas or background.

Click the button to initiate a region capture that will be inserted into the image that is currently open in the Capture Editor. You can also click the down arrow to select from the following:

  • Insert Screenshot Initiates a region capture that will be inserted into the image that is currently open in the Capture Editor. This is the same function that activates by clicking the face of the button.
  • Captured UI Element Initiates a UI Element capture that will be inserted into the image that is currently open in the Capture Editor.

See Capturing a Region and Capturing a Window.

Click the button to open a dialog where you can search for and select an image to insert into the file currently open in the Capture Editor. You can also click the down arrow to select from the following:

  • Image File Opens a dialog, which lets you search for and select an image. The new image will be added to the current image as an object. You can then edit the overlay image. This is the same function that activates by clicking the face of the button.
  • Cursor File Opens a dialog, which lets you search for and select a cursor image (i.e., a file with a .cur extension). The new image will be added to the current image as an object. You can then edit the overlay image.

Lets you re-create the capture for the active image. When you select this option, the same method used to capture the image previously is repeated. The new image replaces the old image. If you do not want to replace the old image, but simply want to create a new image using the same method and settings as the active image, use the Capture Last Capture option instead. (In order for this option to be enabled, you must first open an image in the Capture Editor.) See Recapturing Images.

Opens a dialog where you can select an image to replace the background image of the file that is currently open in the Capture Editor. See Setting Background Images.

After you capture an image, you may decide that you want to use only a portion of that image. You can crop (cut a portion of) the image to keep the part you want and discard the part that you don't want.

Click the button to activate the cropping tool in the Capture Editor. See Cropping Images.

You can also click the down arrow to select from the following:

  • Crop Image Activates the cropping tool in the Capture Editor. This is the same function that activates by clicking the face of the button.
  • Crop Image Object After you insert an image onto your background image, you may need to remove part of that image object. You can therefore crop (cut a portion of) the image object to keep the part you want and discard the part that you don't want. See Cropping Image Objects.

Lets you keep or discard the cropped image history of an image file. See Working With Image History.

Lets you restore your original image size after cropping an image with Discard History disabled.

Displays the profile that is currently active. Clicking the button will open the currently active profile in the Profiles Editor. See Profiles Editor.

Opens the Apply Profile dialog, which lets you apply all of the settings from a profile to the open image. See Applying Profiles to Images.

Removes all the settings from a profile from the open image. See Detaching Profiles From Images.

Opens the Spell Check window pane, which lets you perform spell checking manually.

Opens the Ignored Words dialog, which lets you create a list of words to be ignored when using the spell checking feature in the application.

See Spell Check and Adding Words to the Ignore Spell Check List.

Opens the Open Dictionary dialog, which lets you add words to a custom dictionary when you spell check images and click the "Add to Dictionary" button for highlighted words. When a word is added to the custom dictionary, it is not flagged as a questionable spelling in the future; Capture simply moves on to the next misspelled word.

Lets you enable the time delay feature. With this feature, images are captured after the number of seconds that you specify. It is useful, for example, if you need to capture tooltips in a software application. Tooltips typically disappear when you press keys, so a time delayed capture lets you avoid this problem. With time delay enabled, you can initiate a screen capture, and during the "countdown" you can hover your mouse over a button to display the tooltip. When the countdown finishes, the screen capture is taken.

Displays the profile that is "active." When you capture an image, the settings in the current profile will be used. To change the current profile, click the down arrow and select another profile from the list. See Selecting a Profile for Capturing.

Object Ribbon

Converts the cursor to Hand mode, which lets you drag areas of the image around. This is useful when you have zoomed in on an image so much that you cannot see all of it in the editor. See Using the Hand Mode.

Converts the cursor to Select mode, which lets you select any objects or areas in the image.

Selects all content in the file.

Opens a submenu, which lets you select various objects that you can add to your capture.

  • Rectangle Converts the cursor to Rectangle mode, which lets you create a square or rectangle shape by clicking in the image and dragging in any direction. When you release the cursor, the shape is created. See Rectangle Properties Dialog.

  • Polygon Converts the cursor to Polygon mode, which lets you create a closed plane shape bounded by three or more line segments. After you select this button, you can click anywhere in the image to identify the starting point for the shape. When you move the cursor, a straight line segment is drawn. If you click the left mouse button, it signifies the end of that line segment and the start of another line segment. When you move the cursor, another straight line segment is drawn. When you double-click, a final line segment joins your starting and ending points, thus closing off the shape. See Polygon Properties Dialog.

  • Oval Converts the cursor to Oval mode, which lets you create a circle or oval shape by clicking in the image and dragging in any direction. When you release the cursor, the shape is created. See Oval Properties Dialog.

  • Lines Opens a submenu, which lets you select one of the following types of lines: Polyline, Curved, Wave, Dashed, Zig Zag. This converts the cursor to Line mode. You can create a line with or without an arrow at the end (which you can change or remove by double-clicking the line and using the Line Properties dialog). After you select the type of line you want to create, you can click anywhere in the image to identify the starting point for the line. When you move the cursor, a line segment is drawn. If you click the left mouse button, it signifies the end of that line segment and the start of another line segment. When you move the cursor, another line segment is drawn. You can identify the end of the line by double-clicking. If you hold down the SHIFT key when drawing a line, you can use the line tool to easily draw create straight lines and perfect angles. See Adding Lines and Line Properties Dialog.

  • Graphics Opens a submenu, which lets you select various shapes that you can add to your capture.
    • Bubble Converts the cursor to Bubble mode, which lets you create a callout by clicking in the image and dragging a rectangle area. When you release the cursor, a "bubble" shape is created, which consists of a rectangular or square area for holding text and a pointy area for pointing toward an area of the image that you want to explain or emphasize. See Bubble Properties Dialog.

    • Annotation Converts the cursor to Annotation mode, which lets you create a callout by clicking in the image and dragging a rectangle area. When you release the cursor, an "annotation" shape is created, which consists of a bracket area for holding text and a line for pointing toward an area of the image that you want to explain or emphasize. See Annotation Properties Dialog.

    • Loop Converts the cursor to Loop mode, which lets you create a "loop" shape by clicking in the image and dragging a rectangle area. When you release the cursor, a loop shape is created. This is a useful shape for circling content that you want to emphasize. See Loop Properties Dialog.

    • Cursor Converts the cursor to Cursor mode, which lets you add a cursor bitmap to the image by clicking in the image and dragging in any direction. When you release the cursor, a cursor is added within a shaded oval shape. You can change the cursor type and adjust the color and transparency of the oval background from the Cursor Properties dialog. See Cursor Properties Dialog.

    • Arrow Converts the cursor to Arrow mode, which lets you create a curvy arrow shape. After you select this button, you can click anywhere in the image to identify the starting point for the arrow. When you move the cursor, a straight line shows where the arrow will be placed. When you release the cursor, an arrow is created. See Arrow Properties Dialog.

    • Star Converts the cursor to Star mode, which lets you create a star by clicking in the image and dragging a rectangle area. These stars can have 3–100 sides. When you release the cursor, a star is created. See Star Properties Dialog.

    • X-agon Converts the cursor to X-agon mode, which lets you create a polygon by clicking in the image and dragging a rectangle area. These polygons can have 3–100 sides. When you release the cursor, a polygon is created. See X-agon Properties Dialog.

  • Text Rectangle Converts the cursor to Text Rectangle mode, which lets you create a square or rectangle shape with text by clicking in the image and dragging in any direction. When you release the cursor, default text is shown in a popup editor. You can replace the text with your own and click outside the area to see the finished shape. In addition, this mode adds a background to the box (as opposed to a transparent background), which makes it easier to see the text. Converts the cursor to Text Rectangle mode, which lets you create a square or rectangle shape with text by clicking in the frame and dragging in any direction. Double-click in the rectangle to type text, and click outside the area to see the finished shape.

Note These editing modes can also be accessed by right-clicking anywhere in the Capture Editor and selecting it from the context menu.

Opens a submenu, which lets you select various effects that you can apply to an object.

  • Shade Converts the cursor to Shade Effect mode. This lets you create a square or rectangle shape by clicking in the image and dragging in any direction. When you release the cursor, the shape is created (in the case of the "zoom" option, a three-dimensional shape is created). The area inside the shape is clear, while the area outside the shape is shaded. You can change the darkness of the shading from the File Properties dialog. If you want to create this effect with other closed-off shapes (e.g., oval, polygon), first draw the shape in the image, then enable the shade effect from the Image Effects tab in the properties dialog for that object. See File Properties Dialog.Adds an effect area frame to an image object, allowing you to add an opacity effect mask. This lets you see the frame background through the image object.
  • Gray Scale Converts the cursor to Gray Scale Effect mode. This lets you create a square or rectangle shape by clicking in the image and dragging in any direction. When you release the cursor, the shape is created (in the case of the "zoom" option, a three-dimensional shape is created). The area inside the shape is displayed in its original color, while the area outside the shape is displayed in gray. If you want to create this effect with other closed-off shapes (e.g., oval, polygon), first draw the shape in the image, then enable the gray scale effect from the Image Effects tab in the properties dialog for that object. See Adding Gray Scale Effects.Adds an effect area frame to an image object, allowing you to add a gray scale mask to the object. With this mask, you can apply gray scale to the parts of the image inside or outside of the effect area frame.
  • Blur-Inside Converts the cursor to Blur Inside Effect mode. This lets you create a square or rectangle shape by clicking in the image and dragging in any direction. When you release the cursor, the shape is created (in the case of the "zoom" option, a three-dimensional shape is created). The area inside the shape is blurred, while the area outside the shape is clear. You can change the amount of the blurriness from the properties dialog of the shape (Image Effects tab). If you want to create this effect with other closed-off shapes (e.g., oval, polygon), first draw the shape in the image, then enable the blur-inside effect from the Image Effects tab in the properties dialog for that object. See Adding Blur-Inside Effects.
  • Blur Converts the cursor to Blur Effect mode. This lets you create a square or rectangle shape by clicking in the image and dragging in any direction. When you release the cursor, the shape is created (in the case of the "zoom" option, a three-dimensional shape is created). The area inside the shape is clear, while the area outside the shape is blurred. You can change the amount of the blurriness from the File Properties. If you want to create this effect with other closed-off shapes (e.g., oval, polygon), first draw the shape in the image, then enable the blur effect from the Image Effects tab in the properties dialog for that object. See File Properties Dialog.Adds an effect area frame to an image object, allowing you to add a blur effect mask to the object. With this mask, you can blur the image inside or outside of the effect area frame.
  • Zoom Converts the cursor to Zoom Effect mode. This lets you create a square or rectangle shape by clicking in the image and dragging in any direction. When you release the cursor, the shape is created (in the case of the "zoom" option, a three-dimensional shape is created). The area inside the original rectangle is enlarged and displayed in another rectangle that is larger and seemingly closer to the user (a three-dimensional effect). You can adjust the zoom settings from the Rectangle Properties dialog. See Rectangle Properties Dialog.

Note These editing modes can also be accessed by right-clicking anywhere in the Capture Editor and selecting it from the context menu.

Lets you apply a shadow to or remove it from the selected object.

Lets you select and apply a color to the background of the selected object.

Lets you select and apply a color to the border or line of the selected object.

Lets you select a font type (e.g., Arial, Times New Roman), applying it to the text within the selected object.

Lets you select a font size, applying it to the text within the selected object.

Applies bold typeface to the text within the selected object.

Applies italic typeface to the text within the selected object.

Underlines the content within the selected object.

Removes local formatting in a selection of text or the entirety of the text in an object.

Lets you select and apply a color to the text within the selected object.

Horizontally aligns the text within the selected object to the left.

Horizontally aligns the text within the selected object in the center.

Horizontally aligns the text within the selected object to the right.

Vertically aligns the text within the selected object to the top.

Vertically aligns the text within the selected object to the middle.

Vertically aligns the text within the selected object to the bottom.

Click the face of the button to sink the selected object, sending it backward one level if at least one other object overlaps it (below it). You can also click the down arrow to select from the following.

  • Sink Sinks the selected object, sending it backward one level if at least one other object overlaps it (below it). This is the same function that activates by clicking the face of the button.
  • Sink To Bottom Sinks the selected object, sending it backward to the bottom level if at least one other object overlaps it (below it).

See Floating and Sinking Objects.

Click the face of the button to float the selected object, bringing it forward one level if at least one other object overlaps it (above it). You can also click the down arrow to select from the following.

  • Float Floats the selected object, bringing it forward one level if at least one other object overlaps it (above it). This is the same function that activates by clicking the face of the button.
  • Float To Top Floats the selected object, bringing it forward to the top level if at least one other object overlaps it (above it).

See Floating and Sinking Objects.

Merges selected object(s) with the background to create a single image.

Lets you manually rotate the selected object by clicking and dragging it with your mouse.

Returns the object to its original setting before it was rotated.

Rotates the selected object 45 degrees clockwise. Click the down arrow to select from the following options.

  • Rotate 90 Clockwise Turns the object 90 degrees clockwise.
  • Rotate 45 Clockwise Turns the object 45 degrees clockwise. This is the same function that activates by clicking the button.
  • Rotate Clockwise Turns the object 1 degree clockwise.
  • Rotate 90 Counter Clockwise Turns the object 90 degrees counter clockwise.
  • Rotate 45 Counter Clockwise Turns the object 45 degrees counter clockwise.
  • Rotate Counter Clockwise Turns the object 1 degree counter clockwise.

See Rotating Objects.

Horizontally aligns the selected objects so that the left border of each is at the same location on the image. The alignment is based on the left border of the first object that you select. The first object selected has orange handles, while the other selected objects have white handles.

Horizontally aligns the selected objects so that the right border of each is at the same location on the image. The alignment is based on the right border of the first object that you select. The first object selected has orange handles, while the other selected objects have white handles.

Vertically aligns the selected objects so that the top border of each is at the same location on the image. The alignment is based on the top border of the first object that you select. The first object selected has orange handles, while the other selected objects have white handles.

Vertically aligns the selected objects so that the bottom border of each is at the same location on the image. The alignment is based on the bottom border of the first object that you select. The first object selected has orange handles, while the other selected objects have white handles.

Vertically aligns the selected objects so that the center of each is at the same location on the image. The alignment is based on the center of the first object that you select. The first object selected has orange handles, while the other selected objects have white handles.

Horizontally aligns the selected objects so that the middle of each is at the same location on the image. The alignment is based on the middle of the first object that you select. The first object selected has orange handles, while the other selected objects have white handles.

Resizes the width of the selected objects so that they are all the same. The resizing is based on the width of the first object that you select. The first object selected has orange handles, while the other selected objects have white handles.

Centers the selected object(s) both vertically and horizontally on the canvas.

Resizes the height of the selected objects so that they are all the same. The resizing is based on the height of the first object that you select. The first object selected has orange handles, while the other selected objects have white handles.

Centers the selected object(s) horizontally on the canvas.

Resizes the width and height of the selected objects so that they are all the same. The resizing is based on the width and height of the first object that you select. The first object selected has orange handles, while the other selected objects have white handles.

Centers the selected object(s) vertically on the canvas.

Lets you use the default look for objects in an image. In other words, you can remove the formatting from the selected object(s) and apply the default formatting for that particular type of object (e.g., oval, rectangle, bubble, line). For example, let's say you are drawing a rectangle on an image. When you select the rectangle tool from the local toolbar, the default factory settings are such that the rectangle initially has a thin black border and no fill color. You can apply, say, a green fill color to that object. If you then decide that you want to return to the default setting (in this case, no fill color), you can select this option. See Using the Default Look for Objects.

Lets you pick a style for the selected shape. You can choose from factory styles or from any styles you've added to your palettes. See Selecting Styles for Objects..

Lets you set the default look for objects. For example, let's say you draw a rectangle on an image and make formatting changes to the shape (e.g., color, border, shading). If you then select this object and set it as the default look, future rectangles will initially contain these same settings when you draw them. This option is enabled only if a single object is selected. See Setting the Default Look for Objects.

This button is enabled if you have selected more than one object. You can group multiple objects into an object group, which then acts as a single object. At any point, you can ungroup the objects so that they are separate.

Gives all the objects of the same type (e.g., all lines, all rectangles, all callouts) the same formatting as the object that you currently have selected.

You can also click the down arrow to select from the following:

  • Apply Style to Similar Gives all the objects of the same type (e.g., all lines, all rectangles, all callouts) the same formatting as the object that you currently have selected.
  • Apply Style to All Gives all objects, regardless of type, the same formatting as the object that you currently have selected.

See Applying Styles to Objects.

Lets you delete a point in certain objects (polygon and polyline). After you select a point in one of these objects, this button is enabled. When you click this button, the selected point is removed from the image.

Opens the properties dialog for the selected object. It lets you perform tasks specific to the selected object. For example, if a rectangle is selected, this dialog lets you add shadow effects, add text, and set the color for the object. Opens the properties window pane for the following item types: frame, object, audio object, keyframe, or effect. It lets you perform tasks specific to the selected item. For example, if a rectangle is selected, this window pane lets you add keyframes, text, and set the color for the object. If a keyframe is selected, this window pane lets you modify the transition between the selected keyframe and the next. This window pane is dynamic. Once it is open, it automatically changes to the property type applicable to what you have clicked on. In other words, if you click an object, it changes to the Object Properties window pane. If you click an audio object, it changes to the Sound Properties window pane.

View Ribbon

Increases the scale of the image each time you select the option.

Reduces the scale of the image each time you select the option.

Resets the scale of the image to 100%.

Resizes the image to fit the width of the current size of the Capture Editor.

Resizes the image to fit the height of the current size of the Capture Editor.

Shows or hides the colored shading of objects to which condition tags have been applied.

Example Your condition tag has blue associated with it and you have applied this tag to an object. When you click this button to show the indicator, a small blue square is displayed in the object. If more than one condition is applied to the object, the square contains all of the applied condition colors.

Lets you see what the image will look like with condition tags included or excluded in the output. In order to use this preview feature, you need to double-click the image and use the Conditional Text tab to include or exclude certain tags. Then when you click the Preview Conditions button, the objects that have condition tags set to be shown will still appear, but the objects that have condition tags set to be excluded will be hidden. This is simply a way to test your conditions before saving the image. See Previewing Conditions.

Shows arrows on each side of an object when you click it. You can then click any of the arrows to set the anchors. This lets you lock the position of the object in place. See Setting Object Anchors.

Makes the grid "sticky," so that when you drag objects around the Capture Editor, the edge is automatically attached to the frame in relation to the nearest vertical or horizontal line of dots. Otherwise, if you do not have this option set, the position of the objects will be "loose" on the page.

You can show or hide the grid on your image. Grids help you more accurately place images and objects. The grid does not display in the output; it is only shown in the Capture Editor. By dragging and placing the edges of an object along those dots, you can be assured that the object is positioned more accurately and aligned with other objects and images. See Working With Grids.

Lets you specify the number of pixels between dots on the grid.

Opens the Palettes window, which lets you add objects for future use or drag stored objects to an image. See Palettes.

Opens the Start Page, which provides links to high-level tasks and information. See Start Page.

Opens the Object Layers window pane, which lets you float, sink, lock, hide, or set various properties for objects. This window pane is especially useful if you need to work with objects that may be difficult to select in the Capture Editor. See Object Layers Window Pane.

Opens the Messages window pane, which displays important information as you work. For example, if a necessary file is missing, this window pane lets you know.

Opens the Profiles Editor, which lets you create, edit, and delete capture profiles.

Opens or closes the status bar at the bottom of the program window.

Window Ribbon

Opens the Manage Windows dialog, which lists the files that are currently open and lets you activate (i.e., switch to), save, or close a particular file.

Closes open files. You can select the following from the submenu:

  • Close All Documents Closes all files that you have opened in the workspace.
  • Close All But This Closes all files that you have opened in the workspace, with the exception of the document that is currently active.

If you select the Dock option when a window pane is active, the Drag Pane area is shown or hidden in the window pane accordingly. The Drag Pane area lets you move the window pane and dock it elsewhere in the program window.

"Pins" the active window pane or editor to the side of the interface so that you have more room for your workspace. You can show the window pane by hovering over the thin bar on the side of the interface. If you select the pin button at the top-right of the window pane, the window pane returns to its previous state (no longer pinned to the side of the interface).

Converts the active window pane or editor to a floating window, which means it is no longer attached to the interface. This is a good option to use if you want to work on two topics side-by-side. If you do not want a window pane or editor to be floating anymore, you can right-click in the title bar and select Dock.

Opens a submenu that lists the layouts. Select a layout to display it in the interface.

Saves the window layout. You can select the following from the submenu:

  • Save Window Layout If you are working in a particular layout and have opened different interface elements or moved interface elements around, you can select this option to save the changes to the layout.
  • Save Window Layout As Opens the Rename Window Layout dialog, which lets you save the current interface configuration as a layout.

If you are working in a particular layout and have opened different interface elements or moved interface elements around, you can select this option to return to the saved configuration of the layout.

Returns the current configuration of the interface to the factory layout settings (the original layout when you first installed and launched Capture).

Automatically saves the layout of the workspace when you exit Capture. The next time you launch Capture, that same layout will be displayed.

Help Ribbon

Opens the Dynamic Help window pane, which automatically displays the Help topic related to the active element in the interface.

Opens Help topics. You can select the following from the submenu:

  • Help Topic Opens the Help topic related to the active element in the Capture interface.
  • New Help Topic Window Opens a new instance of a Help topic in another window.

Opens the Help TOC window pane, which lets you locate and access topics in Capture's online Help.

Lets you manually synchronize the current Help topic with the TOC. In other words, the TOC book containing that topic also opens to show you where the topic resides in the TOC hierarchy.

Automatically synchronizes the current Help topic with the Help TOC. In other words, when a particular Help topic is displayed, the TOC book containing that topic also opens to show you where the topic resides in the TOC hierarchy.

Opens the index. You can select the following from the submenu:

  • Index Opens the Help Index window pane, which lets you search for information using the index in Capture's online Help.
  • Index Results Opens the Index Results window pane, which displays links to related topics after you perform a search in the Help index.

Opens the Help Search window pane, which lets you search for information in Capture's online Help.

Opens the Help Favorites window pane, which lets you quickly access your favorite Capture Help topics.

Opens the Help Glossary window pane, which lets you view glossary terms and definitions in Capture's online Help.

Opens a Help topic that lets you access one of the printed guides related to Capture. See PDFs.

Opens the MadCap Forums website, where you can obtain additional information about Capture and communicate with other Capture users.

Opens the Activate Product Wizard, allowing you to activate or renew the product.

Deactivates the currently used license for the machine running Capture.

Lets you register your version of Capture if you have not done so already. This option is enabled only if you are using a trial version of the software.

Opens the New Updates Available dialog, which lets you download Capture updates from MadCap Software.

Displays a popup that shows information about the current version of Capture. Click the popup to make it disappear.

Opens your default Internet browser to the MadCap Software bug submission web page, where you can report the bug.