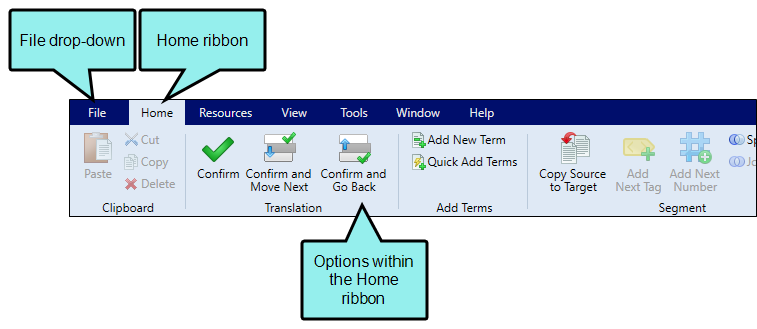
Lingo's user interface features a ribbon layout. The ribbon layout consists of a File drop-down with common tasks such as creating, exporting, and updating projects, as well as computing statistics. This is followed by the Home ribbon, which is the default, and several others related to various features in Lingo.
Example
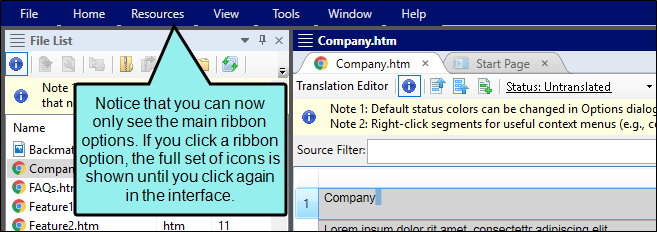
Here is the user interface with the ribbon layout displayed:
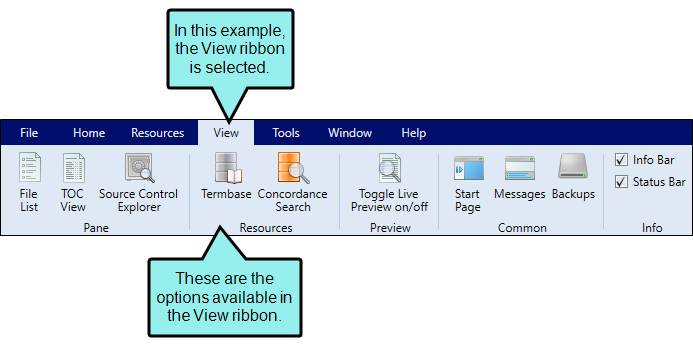
Here is the View ribbon:
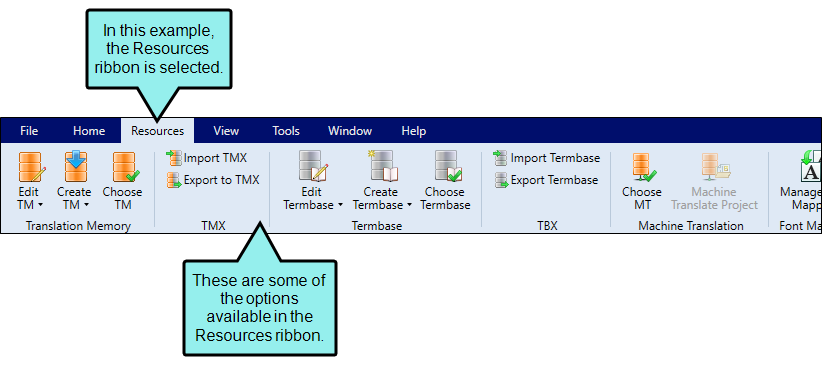
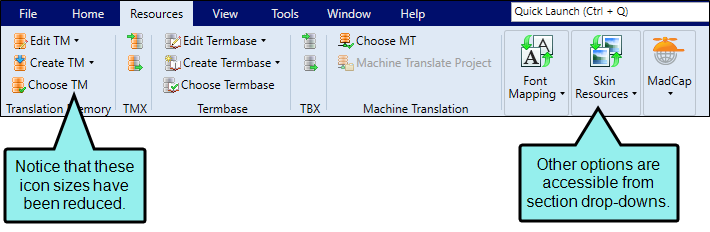
And here is the Resources ribbon. Notice that it has different options:
[Menu Proxy — Headings — Online — Depth3 ]
Characteristics of Ribbons
Following are some characteristics of ribbons:
-
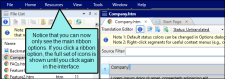
Minimize You can minimize the ribbons so that you only see the top portion of the ribbons until you select an option.
To do this, right-click anywhere in a ribbon and select Minimize the Ribbon from the context menu.
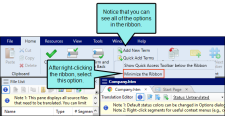
See Minimizing Ribbons.
- Icons/Text Ribbons consist of icons and text, which let you perform various tasks. Larger icons are shown for the most common tasks.
-
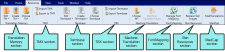
Sections Ribbons are split into sections to make it easier to locate the options on them. For example, the Resources ribbon contains the following sections: Translation Memory, TMX, Termbase, TBX, Machine Translation, Font Mapping, and MadCap.
-
Reducing Application Window Size When you reduce the size of the entire application window, the ribbons are also reduced in a way that lets you continue to access hidden options by clicking on the section name.
Example
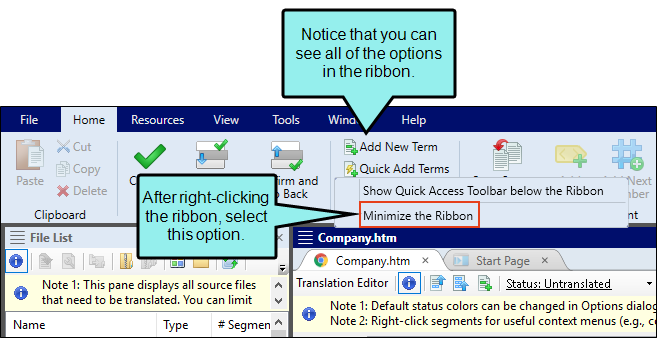
You have the application window maximized, and this is what you see when opening the Home ribbon.

If you reduce the size of the application window, the ribbon shrinks along with it. You can still access all of the options. Some icons are simply smaller, and others are accessible from section drop-downs.


File Drop-Down
|
|
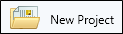
Opens the Start New Project Wizard, which you can use to create a new project. You can also use this wizard to import files from other sources. See Creating Projects. |
|
|
Opens a dialog, which lets you open any type of file supported by Lingo. |
|
|
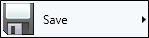
Click the face of the button to save changes to the active file. You can also select the following from the submenu:
|
|
|
Click the arrow and choose from the following. The options shown are different, depending on which source control provider your project is bound to.
|
|
|
Click the face of the button to create a temporary copy of the active file. You can also select the following from the submenu:
Example You might use this feature, for example, if you want to make some changes to a file but are not certain if you will want to keep them when you are finished. Therefore, you can make a backup of the file in question. When you are finished making your changes, you might decide that you prefer the file the way it was. If so, you can quickly roll back to the backup file, which overwrites the changes that you made. |
|
|
Opens the Project Properties dialog, which lets you access basic information about your project and change project settings. See Project Properties Dialog. |
|
|
Opens the Export Finished Translation dialog, which lets you create a copy of your translated project or file to the relevant application, file type, or location. The option shown depends on the origin of the information that you are translating in Lingo (e.g., Flare project, Microsoft Word document). This enables the author to open the translated project or file and create output for it. See Exporting Translated Projects. |
|
|
Generates a statistical report for your Lingo project. It displays the results in an HTML file and lets you see information about your translation work. This is a way to provide for your client an estimate of the amount of translation work that still needs to be done. See Computing Statistics. |
|
|
Opens a dialog that lets you select the quality assurance reports you want to run on your project. It displays the results in an HTML file and lets you see information about your translation work. This is a way to find errors in your project before finalizing the translation. See Running Quality Assurance Reports. |
|
|
Opens a dialog that lets you select a newer version of the source project or file(s) that are being translated. The Lingo project is then updated with those changes. See Updating Projects. |
|
|
Opens the Save for Review dialog, which lets you export selected files as a MadCap Contributor review archive file. You can then email the file to individuals so that they can review the translations. See Sending Translated Content for Review. You can also select the following from the submenu:
|
|
|
Click the face of the button to close the active file. You can also select the following from the submenu:
|
|
|
Displays a list of recently opened projects. You can select one from the list to open it. You can also remove projects from the list of recently opened projects, which lets you keep the list shorter and more manageable. When you use this feature, the project is merely removed from the list, but the actual project is not deleted. |
|
|
Displays a list of recently opened files. You can select one from the list to open it. You can also remove files from the list of recently opened files, which lets you keep the list shorter and more manageable. When you use this feature, the file is merely removed from the list, but the actual file is not deleted. |
|
|
Opens the Options dialog, which lets you set various options. For more details, see Options Dialog. |
|
|
Closes the application. |


Home ribbon
|
|
Pastes the selection from the clipboard to the place where the cursor is inserted. |
|
|
Cuts the selection and sends it to the clipboard. |
|
|
Copies the selection and sends it to the clipboard. |
|
|
Deletes the selection. |
|
|
Accepts the current segment, inserts that translation into the translation memory, and then moves the focus of the editor to the next untranslated segment. |
|
|
Accepts the current segment, inserts that translation into the translation memory, and then moves the focus of the editor to the next translated or untranslated segment. |
|
|
Accepts the current segment, inserts that translation into the translation memory, and then moves the focus of the editor to the previous translated or untranslated segment. |
|
|
Lets you add a term in the segment to a termbase. |
|
|
Uploads several new terms to the termbase. |
|
|
Replaces the target segment with the source segment contents. |
|
|
Copies each tag in order from the source to the target cell. |
|
|
Adds each number in order from the source to the target cell. |
|
|
Breaks the segment at the point where the cursor is placed, so that the one segment becomes two. |
|
|
Merges the selected segments into a single segment. |
|
|
Scans your translation memory to find 100% or 101% matches for untranslated segments and applies those translations accordingly. |
|
|
Uploads the selected segment to translation memory so that you can take advantage of that translation in the future. |
|
|
Opens the Batch Replace Images dialog, which lets you replace images in bulk, or by selecting images to replace from a list. |
|
|
Creates a translation bundle (based on files you have selected in the File List window pane) to send to translators. |
|
|
Merges a translation bundle that you have received from translators with your original project. |
|
|
Opens a submenu for inserting special characters or symbols into the editor.
|
|
|
Opens the Quick Find widget in the upper-right corner of the open document. This lets you search for text in that document. |
|
|
Opens the Quick Replace widget in the upper-right corner of the open document. This is the same as the Quick Find widget, except that it opens with the replace fields already in view. It lets you search for and replace text in that document. |
|
|
Opens a submenu, which lets you choose from various options.
|
|
|
Opens the Properties dialog for the selected item. |


Resources Ribbon
|
|
Lets you open a TM in the Translation Memory Editor, which lets you modify the contents of your TM database. |
|
|
Lets you create a new local or server TM database. |
|
|
Opens the Manage Translation Memory dialog, which lets you select one or more TM databases to be associated with the project. |
|
|
Opens the Import TMX dialog, which lets you import external Translation Memory eXchange (TMX) files into Lingo. |
|
|
Opens the Export to TMX dialog, which lets you export your TMX file so that it can be used in other tools. |
|
|
Opens the Termbase Editor, where you can add or change definitions in the termbase. |
|
|
Lets you create a new local or server termbase. |
|
|
Opens the Manage Termbases dialog, which lets you work with termbases that you have added. For more details, see Manage Termbases Dialog. |
|
|
Import an existing termbase to the Lingo project. See Importing Termbase Files. |
|
|
Export a termbase created in Lingo to a TermBase eXchange (TBX) file. See Exporting Termbase Files. |
|
|
Opens the Machine Translation Providers dialog, which lets you select a machine translation provider and enter applicable machine translation credentials. See Choosing a Machine Translation Provider. |
|
|
Runs machine translation on the entire project. See Translating Projects with Machine Translation. |
|
|
Opens the Manage Font Maps dialog, which lets you locate the fonts already used in the source Flare project and replace them with fonts that are supported by each target language. The mapped fonts will be used when the project is exported back to Flare. |
|
|
Opens the Replace Skin Images dialog, which lets you replace logos in HTML5 skins, and the About box in Mobile and WebHelp skins. |
|
|
Opens a website with information about MadTranslations. This is MadCap Software's translation service, which can help with your document translation needs. |


Source Control Ribbon
The source control ribbon uses a dynamic interface. The icons that display will change depending on the source control provider your project is bound to. Additionally, the ribbon will not display if you are not using source control.
|
|
Opens the Check In dialog, which lets you check files into source control. When you are finished editing files, you can check them in to source control. Checking in a file overwrites the old copy of the file in the database with the new one from your local machine. Even if others are not working on a file, it is a good idea to periodically check in files for a backup in source control. You will see this option if your project is bound to Microsoft Team Foundation Server. |
|
|
Opens the Commit dialog, which lets you commit files into source control. When you are finished editing files, you can commit them to source control. If your project is bound to Git, committing a file adds your changes to the local database. When you are ready to add your local commits to the remote repository, you can push these files to the remote. This icon is Git-specific. |
|
|
Opens the Commit dialog, which lets you commit files into source control. When you are finished editing files, you can commit them to source control. If your project is bound to Subversion, committing a file overwrites the old copy of the file in the source control database with the new one from your local machine. This icon is Subversion-specific. |
|
|
Opens the Submit dialog, which lets you submit files into source control. When you are finished editing files, you can submit them to source control. Submitting a file overwrites the old copy of the file in the source control database with the new one from your local machine. So even if others will not be working on that file, it is a good idea to periodically submit files so that you have a backup in source control. You will see this option if your project is bound to Perforce Helix Core. |
|
|
Opens the Check Out dialog, which lets you check out files from source control. When you need to work on any of the Lingo project files, you can check them out. Checking out files means to copy the latest source control files to your local Lingo project and remove the "Read Only" designation from them so that you can edit the files. A red check mark is displayed next to each file that is checked out. You will see this option if your project is bound to Microsoft Team Foundation Server or Perforce Helix Core. |
|
|
Opens the Lock dialog, where you can select files you want to lock. If your project is bound to Subversion, you can steal locks from another user's locked files using this dialog. When you are working, you may want to lock the files you have modified. Locking a file does not prevent other users from modifying the file. However, no one else can commit a file that you have locked until you unlock the file. If your project is bound to Subversion, you can steal a lock from another user if you need to commit a locked file while they are working on it. Likewise, another user can steal a lock on a file you have locked. You will see this option if your project is bound to Perforce Helix Core or Subversion.
|
|
|
Opens the Unlock dialog, where you can select files you want to unlock. If you have locked a file, you should unlock it when you are done modifying it. Other users can modify the file while you have it locked, but they cannot submit a locked file until you unlock it. To help prevent file conflicts and make sure that everyone on your team has the most current version of the file, you should unlock and submit the file when you are finished working on it. You will see this option if your project is bound to Perforce Helix Core or Subversion.
|
|
|
Opens the Get Latest Version dialog, which lets you "get" files from source control. After you bind a Lingo project to a source control application, you can get the latest version of any of the source control files. When you do this, you are copying the most current files stored in the source control application to your local Lingo project without necessarily checking out the files. This means that the "Read Only" designation will remain associated with the files until you check them out. You will see this option if your project is bound to Microsoft Team Foundation Server or Perforce Helix Core. |
|
|
Opens the Get Latest Version dialog, which lets you update files from source control. After you bind a Lingo project to Subversion, you can update any of the source control files. When you do this, you are copying the most current files stored in Subversion to your local Lingo project. You will see this option if your project is bound to Subversion.
|
|
|
Opens the Undo Check Out dialog, which lets you reverse the check-out of the files. If you have files checked out from source control but do not want them checked out anymore, you can use the "Undo Check Out" option instead of checking in the files. You will see this option if your project is bound to Microsoft Team Foundation Server.
|
|
|
Opens the Revert dialog, which lets you return files to their last known state. If you have modified files from source control but do not want to keep your modifications, you can use the "Revert" option instead of committing the files. While committing the file would save your changes to source control, reverting a file returns it to its previously committed state and does not commit any of your new changes to source control. When reverting changes made in Git, you only revert changes to the file on the branch you are currently editing. If you have a file that resides on multiple branches, copies of the file on other branches are preserved. You will see this option if your project is bound to Git, Perforce Helix Core, or Subversion.
|
|
|
Opens a window pane that lets you view the content and code differences for files. If you select a single file and choose this option, the differences between the local version of the file and the source control version of the file are shown. If you select two files and choose this option, the differences between those two files are shown. You will see this option for all source control providers. |
|
|
Opens the History dialog, which lets you view the history of a particular source control file, including all of the occasions when the file has been checked in. You can then use the dialog to view the differences between older versions of the file or roll back to a particular version. You will see this option for all source control providers.
|
|
|
Refreshes the window pane so that the latest information is shown. You will see this option for all source control providers. |
|
|
Opens the Check In dialog, which lets you check all the files in the project into source control. When you are finished editing files, you can check them in to source control. Checking in a file overwrites the old copy of the file in the database with the new one from your local machine. Even if others are not working on a file, it is a good idea to periodically check in files for a backup in source control. You will see this option if your project is bound to Microsoft Team Foundation Server. |
|
|
Opens the Commit dialog, which lets you commit all the files in the project into source control. When you are finished editing files, you can commit them to source control. If your project is bound to Git, committing a file adds your changes to the local database. When you are ready to add your local commits to the remote repository, you can push these files to the remote. This icon is Git-specific. |
|
|
Opens the Commit dialog, which lets you commit all the files in the project into source control. When you are finished editing files, you can commit them to source control. If your project is bound to Subversion, committing a file overwrites the old copy of the file in the source control database with the new one from your local machine. This icon is Subversion-specific. |
|
|
Opens the Submit dialog, which lets you submit all files in the project into source control. When you are finished editing files, you can submit them to source control. Submitting a file overwrites the old copy of the file in the source control database with the new one from your local machine. So even if others will not be working on that file, it is a good idea to periodically submit files so that you have a backup in source control. You will see this option if your project is bound to Perforce Helix Core. |
|
|
Opens the Check Out dialog, which lets you check out all of the files in the project from source control. When you need to work on any of the Lingo project files, you can check them out. Checking out files means to copy the latest source control files to your local Lingo project and remove the "Read Only" designation from them so that you can edit the files. A red check mark is displayed next to each file that is checked out. You will see this option if your project is bound to Microsoft Team Foundation Server or Perforce Helix Core. |
|
|
Opens the Get Latest Version dialog, which lets you "get" all of the files in the project from source control. After you bind a Lingo project to a source control application, you can get the latest version of any of the source control files. When you do this, you are copying the most current files stored in the source control application to your local Lingo project without necessarily checking out the files. This means that the "Read Only" designation will remain associated with the files until you check them out. See Updating or Getting the Latest Version of Source Control Files. You will see this option if your project is bound to Microsoft Team Foundation Server or Perforce Helix Core. |
|
|
Opens the Get Latest Version dialog, which lets you update all of the files in the project from source control. After you bind a Lingo project to Subversion, you can update any of the source control files. When you do this, you are copying the most current files stored in Subversion to your local Lingo project. You will see this option if your project is bound to Subversion.
|
|
|
Opens the Undo Check Out dialog, which lets you reverse the check-out of all of the files in the project. If you have files checked out from source control but do not want them checked out anymore, you can use the "Undo Check Out" option instead of checking in the files. You will see this option if your project is bound to Microsoft Team Foundation Server.
|
|
|
Opens the Revert dialog, which lets you return all files in the project to their last known state. If you have modified files from source control but do not want to keep your modifications, you can use the "Revert" option instead of committing the files. While committing the file would save your changes to source control, reverting a file returns it to its previously committed state and does not commit any of your new changes to source control. When reverting changes made in Git, you only revert changes to the file on the branch you are currently editing. If you have a file that resides on multiple branches, copies of the file on other branches are preserved. You will see this option if your project is bound to Git, Perforce Helix Core, or Subversion.
|
|
|
Opens the Select Remote for Pull dialog, which lets you select the remote repository from which you will download remote files. After you select the repository you want to pull from, the remote files are retrieved from the repository and downloaded to your local project. If necessary, Lingo will perform a commit before pulling your files. You will see this option if your project is bound to Git. |
|
|
Opens the Select Remote for Push dialog, which lets you select the remote repository to which you will upload your local commits. After you select the repository you want to push to, your files are sent to the remote repository. If necessary, Lingo will perform a commit before pushing your files. You will see this option if your project is bound to Git. |
|
|
Opens the Select Remote for Synchronize dialog, which lets you select the remote you want to use for a pull and push of files. After you select the repository, Lingo pulls the remote files from the Git repository and merges them with your local database. Then Lingo pushes your local changes back to the remote Git repository. If necessary, Lingo will perform a commit before synchronizing your files. You will see this option if your project is bound to Git. |
|
|
Opens a dialog that lets you view when a branch was started, committed, or merged. If there are any changes you wish to back out, you have the option to revert those changes on the branch. You will see this option if your project is bound to Git. See Merging Branches and Reverting Branches. |
|
|
Opens the Branch Management dialog, which lets you create branches, switch to (select) a different branch, and delete an existing branch. A Git branch is a pointer to a snapshot of your changes, or you can think of it as a variation from the original or main state of your files.. Adding a branch lets you create a new development area for your work (e.g., when translating large sections of text, using new translation memories or machine translation). Then later, you can merge the branch into another one. You will see this option if your project is bound to Git. See Creating Branches, Deleting Branches, Switching Branches, and Publishing Branches. |
|
|
Disconnects the source control network so you can work offline. You can reconnect at any time. You will see this option if your project is bound to TFS, Perforce Helix Core, or Subversion. |
|
|
Opens the Network Settings dialog, which lets you view and modify source control network settings from Flare. You will see this option if your project is bound to Git or Subversion. |


View Ribbon
|
|
Opens the File List window pane, which lets you view all of the content files in your project in alphabetical order. You can limit the files that are displayed by using the file type filter. For example, if you want to see only your image files, you could select the "Image/Media Files" option from the Filter drop-down list. You can also perform certain tasks from this window pane, such as opening files, applying condition tags, and applying stylesheets. And because you can select multiple files from the list, you can perform these tasks for all of the selected files at the same time. |
|
|
Opens the TOC View window pane, which lets you view topic files in your Lingo project that appear in a specific table of contents (TOC). When you view a TOC, the files appear in the same tree structure that they use in the associated Flare project. This is especially useful if you are working with a very large Lingo project, because not only does it let you filter by topic files and by TOC, but it also lets you see the order of the topics and the way the topics fit together in the final output. |
|
|
Opens the Source Control Explorer. The Source Control Explorer is used to view and manage source control-related files and settings for your project. See Source Control Explorer. |
|
|
Opens the Termbase window pane, which lets you create and work with termbases. See Termbases. |
|
|
Opens the Concordance Search window pane, which lets you perform advanced searches for content in the project. See Concordance. |
|
|
Toggles between Translation mode and Live Preview mode if you have a certain type of file (e.g., Word document; PowerPoint file; Flare topic, snippet, template page) open in the Translation Editor. |
|
|
Opens the Start Page, which provides links to high-level tasks and information. See Start Page. |
|
|
Opens the Messages window pane, which displays important information as you work. For example, if a necessary file is missing, this window pane lets you know. |
|
|
Opens the Backups window pane so that you can see the files for which you have created backups and restore (roll back) any of those files if necessary. |
|
|
Hides or shows special information pertaining to the editor or window pane. |
|
|
Opens or closes the status bar at the bottom of the program window. |


Tools Ribbon
|
|
Opens the Open Dictionary dialog, which lets you choose a custom global or project dictionary so you can make changes to it. See Editing Custom Dictionaries. |
|
|
Opens the Spell Check window pane, which lets you perform spell checking manually. See Spell Checking Manually. |
|
|
Activates a feature that lets you check your spelling as you type in your topics. Questionable words are underlined with a jagged red line. You can take action with the word by right-clicking on it. |
|
|
Opens the Ignored Words dialog, which lets you create a list of words to be ignored when using the spell checking feature in the application. See Spell Check and Adding Words to the Ignore Spell Check List. |
|
|
Opens the Thesaurus window pane, which lets you view and select terms related to words in an open translation file. See Thesaurus. |
|
|
Opens the segmentation rules dialog, which lets you create rules to automatically split segments or keep them together. |
|
|
Opens the file filters dialog, where you can add, edit, import, and export file filters for Word, XML, and text files. This lets you specify which parts of a file are imported for translation or how the file will appear when it is imported. See File Type Filters. |
|
|
Opens the MadCap Align utility, which lets you create alignment projects. For more details, see Alignment. |


Window Ribbon
|
|
Opens the Manage Windows dialog, which lists the files that are currently open and lets you activate (i.e., switch to), save, or close a particular file. |
|
|
Closes open files. You can select the following from the submenu:
|
|
|
If you select the Dock option when a window pane is active, the Drag Pane area |
|
|
"Pins" the active window pane or editor to the side of the interface so that you have more room for your workspace. You can show the window pane by hovering over the thin bar on the side of the interface. If you select the pin button at the top-right of the window pane, the window pane returns to its previous state (no longer pinned to the side of the interface). |
|
|
Converts the active window pane or editor to a floating window, which means it is no longer attached to the interface. This is a good option to use if you want to work on two topics side-by-side. If you do not want a window pane or editor to be floating anymore, you can right-click in the title bar and select Dock. |
|
|
Opens a submenu that lists the layouts. Select a layout to display it in the interface. |
|
|
Saves the window layout. You can select the following from the submenu:
|
|
|
If you are working in a particular layout and have opened different interface elements or moved interface elements around, you can select this option to return to the saved configuration of the layout. |
|
|
Returns the current configuration of the interface to the factory layout settings (the original layout when you first installed and launched Lingo). |
|
|
Automatically saves the layout of the workspace when you exit Lingo. The next time you launch Lingo, that same layout will be displayed. |


 is shown or hidden in the window pane accordingly. The Drag Pane area lets you move the window pane and dock it elsewhere in the program window.


Help Ribbon
|
|
Opens the Help system in a browser. By default, Lingo's online and dynamic Help system points to files hosted externally. This allows for live updates to the Help. Because the Help system is hosted online, you may not be able to access it if you are behind a firewall or if you have a slow connection. In that case, you can use a local version of the Help. Lingo will even switch to the local Help automatically if it detects that you cannot connect to the external Help system. If you want to use the local Help manually, open the Options dialog (File > Options), and on the General tab select Prefer Local Help. Note The local Help system is only updated when the application is updated. If you want to be sure that you have the most current version of the Help, disable the local Help. |
|
|
Opens the Dynamic Help window pane, which automatically displays the Help topic related to the active element in the interface. |
|
|
Opens a Help topic that lets you access one of the printed guides related to Lingo. See PDFs. |
|
|
Opens a website containing videos about Lingo. |
|
|
Opens the MadCap Forums website, where you can obtain additional information about Lingo and communicate with other Lingo users. |
|
|
Opens the Activate Product Wizard, allowing you to activate or renew the product. |
|
|
Deactivates the currently used license for the machine running Lingo. |
|
|
Lets you register your version of Lingo if you have not done so already. This option is enabled only if you are using a trial version of the software. |
|
|
Opens the New Updates Available dialog, which lets you download Lingo updates from MadCap Software. |
|
|
Displays a popup that shows information about the current version of Lingo. Click the popup to make it disappear. |
|
|
Opens your default internet browser to the MadCap Software bug submission web page, where you can report the bug. |